Quite a few people are going to be installing Fedora 22 in the coming days, searching for things in the software center and not finding what they want. This is because some applications still don’t ship AppData files, which have become compulsory for this release. So far, over 53% of applications shipped in Fedora ship the required software center metadata, up from the original 12% in Fedora 21. If you don’t like this, you can either use dnf
to install the package on the command line, or set gsettings set org.gnome.software require-appdata false
. If you want to see your application in the software center in the future, please file a bug either upstream or downstream (I’ve already filed a lot of upstream bugs) or even better write the metadata and get it installed either upstream tarball or downstream in the Fedora package. Most upstream and downstream maintainers have shipped the extra software center information, but some others might need a little reminder about it from users.
Category: Uncategorized
Telling the user about firmware updates
A common use-case that has appeared over the last week is that some vendors just want to notify people there is updated firmware available, but they don’t want fwupd to apply it automatically. This might be because an external programmer is required to update, the flashing tool is non-free, or other manual steps are required.
If anyone is interested in doing this for their device, there are just two USB string descriptors to add, and then it all just magically works once AppStream metadata is supplied. The device doesn’t have to be OpenHardware, so there’s no real excuse.
Updating OpenHardware Firmware 2
After quite a bit of peer review, it turns out my idea to use the unused serial field wasn’t so awesome. Thanks mostly to Stefan, we have a new proposal.
For generic USB devices you can use a firmware version extension that is now used by ColorHug, and I hope other projects too in the future. With this the fwupd daemon can obtain the firmware version without claiming the interface on the device and preventing other software from using it straight away.
To implement the firmware version extension just create an interface descriptor with class code 0xff
, subclass code 0x46
and protocol 0x57
pointing to a string descriptor with the firmware version.
An example commit to the ColorHug2 firmware can be found here. It costs just 21 bytes of ROM which means it’s suitable even for resource-constrained devices like the ColorHugALS. Comments welcome.
Updating OpenHardware Firmware
EDIT: Don’t implement this. See the follow-up post.
One of the use-cases I’ve got for fwupd is for updating firmware on small OpenHardware projects. It doesn’t make sense for each of the projects to write a GUI firmware flash program when most of them are using a simple HID or DFU bootloader to do basically the same thing. We can abstract out the details, and just require the upstream project to provide metadata about what is fixed in each update that we can all share.
The devil, as they say, is in the details. When enumerating devices, fwupd needs to know the device GUID (usually, just a hardcoded mapping table from USB VID/PID). This certainly could be in a udev rule that can be dropped into the right place when developing a new device, as I don’t want people to have to build a fwupd from git just to update the new shiny device that’s just arrived.
There are two other things fwupd needs to know. The most important is the current firmware version for a device. There is no specification for this as far as I can tell. ColorHug has a HID command GET_VERSION
which returns 3 uint16M
numbers for the major, minor and micro versions and other device firmwares have other similarly obvious but different ways of doing it.
The other is how to switch the device in firmware mode back into bootloader mode so that it can flash a new version. For ColorHug there’s a RESET
command, but on other hardware it’s either a custom command sequence, or doing something physical like pressing a secret button with a paperclip or shorting two pins on a PCB.
I think it would be useful to notify the user that there in an update available, even if we can’t actually do the upgrade without doing some manual step. For this we need to get the current firmware version, ideally without open()
ing the device as this will prevent other software from using it straight away. What we can get from the device for free is the device descriptors.
What I’m going to do for ColorHug is to change the unused device serial string descriptor to “FW:1.2.3”. I’ll also support in fwupd devices changing the product string from “Widget” to “Widget FW:1.2.3” i.e. we look in the various strings for a token with a “FW:” prefix and use that.
If that isn’t specified then we can fall back to opening the device and doing a custom command, but when you can ask friendly upstream firmware vendors to make a super small change, it makes things much easier for everyone. Comments welcome.
Updating device firmware on Linux
If you’re a hardware vendor reading this, I’d really like to help you get your firmware updates working on Linux. Using fwupd we can already update device firmware using UEFI capsules, and also update the various ColorHug devices. I’d love to increase the types of devices supported, so if you’re interested please let me know. Thanks!
Hughes Hypnobirthing
If you’re having a baby in London, you might want to ask my wife for some help. She’s started offering one to one HypnoBirthing classes for mothers to be and birth partners designed to bring about an easier, more comfortable birthing experience.
It worked for us, and I’m super proud she’s done all the training so other people can have such a wonderful birthing experience.
How to turn the Chromebook Pixel into a proper developer laptop
Recently I spent about a day installing Fedora 22 + jhbuild on a Chromebook and left it unplugged overnight. The next day I turned it on with a flat battery, grabbed the charger, and the coreboot bios would not let me do the usual ctrl+L boot-to-SeaBIOS trick. I had to download the ChromeOS image to an SD card, reflash the ChromeOS image and thet left me without any of my Fedora workstation I’d so lovingly created the day before. This turned a $1500 laptop with a gorgeous screen into a liability that I couldn’t take anywhere for fear of losing all my work, again. The need to do CTRL+L every time I rebooted was just crazy.
I didn’t give up that easily; I need to test various bits of GNOME on a proper HiDPI screen and having a loan machine sitting in a bag wasn’t going to help anyone. So I reflashed the BIOS, and now have a machine that boots straight into Fedora 22 without any of the other Chrome stuff getting in the way.
Reflashing a BIOS on a Chromebook Pixel isn’t for the feignt of heart, but this is the list of materials you’ll need:
- Set of watchmakers screwdrivers
- Thin plastic shim (optional)
- At least 1Gb USB flash drive
- An original Chromebook Pixel
- A BIOS from here for the Pixel
- A great big dollop of courage
This does involve deleting the entire contents of your Pixel, so back anything up you care about before you start, unless it’s hosted online. I’m also not going to help you if you brick your machine, cateat emptor and all that. So, lets get cracking:
- Boot chromebook into Recovery Mode (escape+refresh at startup) then do Control+D, then Enter, wait for ~5 mins while the Pixel reflashes itself
- Power down the machine, remove AC power
- Remove the rubber pads from the underside of the Pixel, remove all 4 screws
- Gently remove the adhesive from around the edges, and use the smallest shim or screwdriver you have to release the 4 metal catches from the front and sides. You can leave the glue on the rear as this will form a hinge you can use. Hint: The tabs have to be released inwards, although do be aware there are 4 nice lithium batteries that might kinda explode if you slip and stab them hard with a screwdriver.
- Remove the BIOS write protect screw AND the copper washer that sits between the USB drives and the power connector. Put it somewhere safe.
- Gently close the bottom panel, but not enough for the clips to pop in. Turn over the machine and boot it.
- Do enough of the registration so you can logon. Then logout.
- Do the CTRL+ALT+[->] (really F2) trick to get to a proper shell and login as the chromos user (no password required). If you try to do it while logged in via the GUI it will not work.
- On a different computer, format the USB drive as EXT4 and copy the squashfs.img, vmlinuz and initrd.img files there from your nearest Fedora mirror.
- Also copy the correct firmware file from johnlewis.ie
- Unmount the USB drive and remove
- Insert the USB drive in the Pixel and mount it to /mnt
- Make a backup of the firmware using
/usr/sbin/flashrom -r /mnt/backup.rom
- Flash the new firmware using
/usr/sbin/flashrom -w /mnt/the_name_of_firmware.rom
- IMPORTANT: If there are any warnings or errors you should reflash with the backup; if you reboot now you’ll have a $1500 brick. If you want to go back to the backup copy just use
/usr/sbin/flashrom -w /mnt/backup.rom
, but lets just assume it went well for now. /sbin/shutdown -h
now, then remove power again- Re-open the bottom panel, which should be a lot easier this time, and re-insert the BIOS write washer and screw, but don’t over-tighten.
- Close the bottom panel and insert the clips carefully
- Insert the 4 screws and tighten carefully, then convince the sticky feet to get back into the holes. You can use a small screwdriver to convince them a little more.
Power the machine back on and it will automatically boot to the BIOS. Woo! But not done yet. - It will by default boot into JELTKA which is “just enough Linux to kexec another”.
- When it looks like it’s hung, enter “root” then enter and it’ll log into a root prompt.
- Mount the USB drive into /mnt again
- Do something like
kexec -l /mnt/vmlinuz --initrd=/mnt/initrd.img --append=stage2=hd:/dev/sdb1:/squashfs.img
- Wait for the Fedora installer to start, then configure a network mirror where you can download packages. You’ll have to set up Wifi before you can download package lists.
This was all done from memory, so feel free to comment if you try it and I’ll fix things up as needed.
Introducing ColorHug ALS
Ambient light sensors let us change the laptop panel brightness so that you can still see your screen when it’s sunny outside, but we can dim it when the ambient room light level is lower to save power.
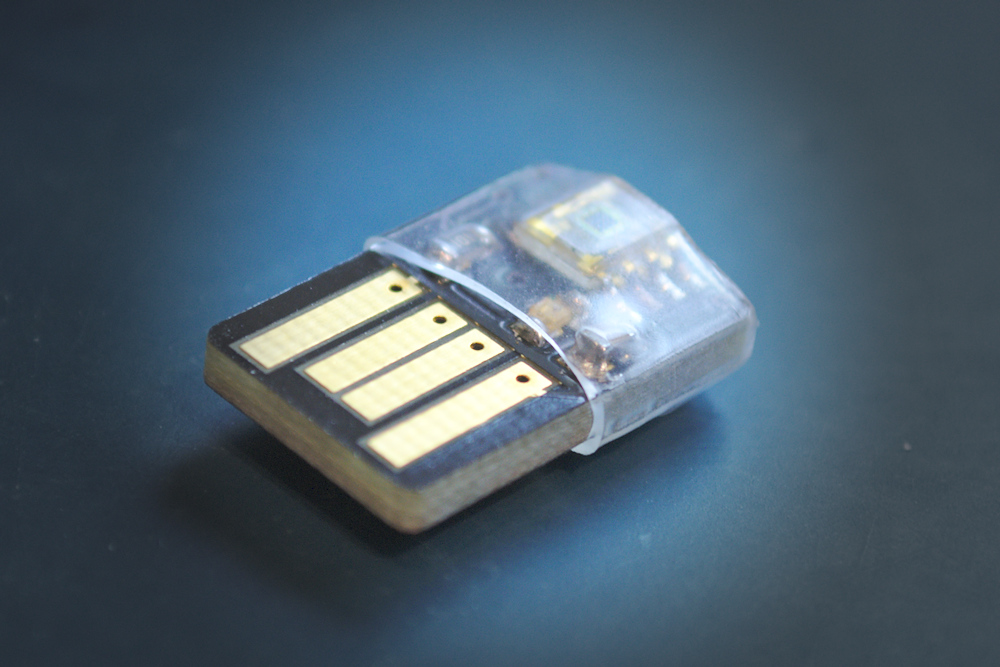
I’ve spent a bit of time over the last few months designing a small OpenHardware USB device that acts as a ambient light sensor. It’s basically an uncalibrated ColorHug1 design with a less powerful processor, but speaking a subset of same protocol so all the firmware update and test tools just work out of the box.
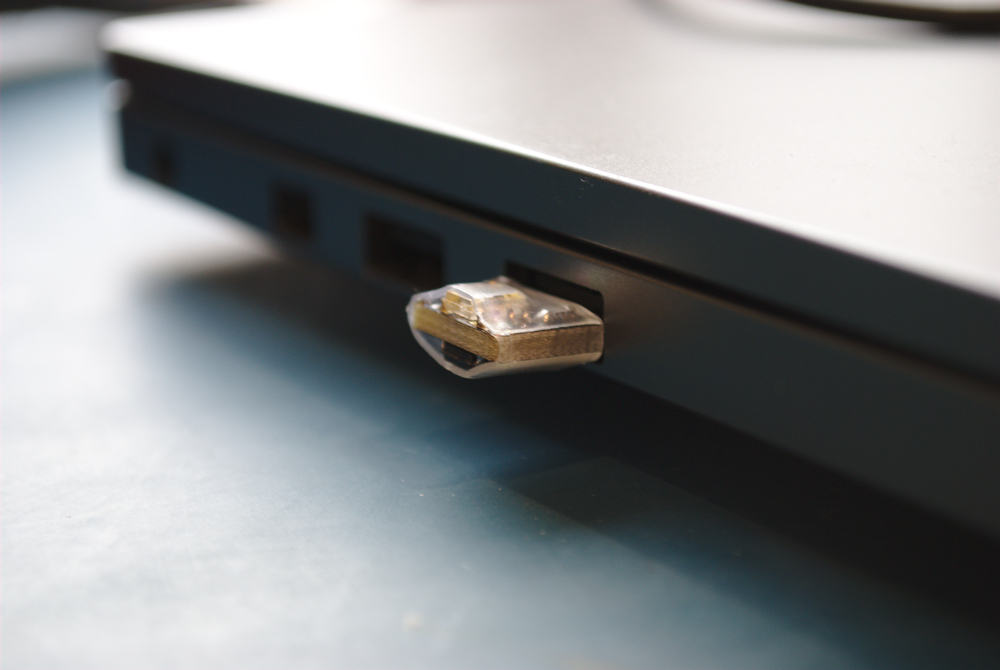
The sensor itself is a very small (12x22mm) printed circuit board that inserts directly into a spare USB socket. It only sticks out about 9mm from the edge of the laptop as most of the PCB actually gets pushed into the USB slot.
ColorHugALS can currently control the backlight when running the colorhug-backlight
utility. The Up/Down header buttons do the same as the hardware BrightnessUp and BrightnessDown keys. You can still set the absolute backlight so you’re in control of the absolute level right now, the ALS modifying the level either side of what you just set in the coming minutes. The brightness is modified using a exponential moving average, which makes the brightness changes smooth and unnoticeable on hardware with enough brightness levels.
We also use the brightness value at start to be what you consider “normal” so the algorithm tries to stay out of the way. When we’ve got some defaults that work well and has been tested the aim is to push this into gnome-control-center
and gnome-settings-daemon
for GNOME 3.18 so that no additional software is required.
I’ve got 42 devices in stock now. Buy one here!
Updating Firmware on Linux
A few weeks ago Christian asked me to help with the firmware update task that a couple of people at Red Hat have been working on for the last few months. Peter has got fwupdate to the point where we can “upload” sample .cap files onto the flash chips, but this isn’t particularly safe, or easy to do. What we want for Fedora and RHEL is to be able to either install a .rpm
file for a BIOS update (if the firmware is re-distributable), or to get notified about it in GNOME Software where it can be downloaded from the upstream vendor. If we’re showing it in a UI, we also want some well written update descriptions, telling the user about what’s fixed in the firmware update and why they should update. Above all else, we want to be able to update firmware safely offline without causing any damage to the system.
So, lets back up a bit. What do we actually need? A binary firmware blob isn’t so useful, and so Microsoft have decided we should all package it up in a .cab
file (a bit like a .zip
file) along with a .inf
file that describes the update in more detail. Parsing .inf
files isn’t so hard in Linux as we can fix them up to be valid and open them as a standard key file. The .inf
file gives us the hardware ID of what the firmware is referring to, as well as a vendor and a short (!) update description. So far the update descriptions have been less than awesome “update firmware” so we also need some way of fixing up the update descriptions to be suitable to show the user.
AppStream, again, to the rescue. I’m going to ask nice upstreams like Intel and the weird guy who does ColorHug to start shipping a MetaInfo file alongside the .inf
file in the firmware .cab
file. This means we can have fully localized update descriptions, along with all the usual things you’d expect from an update, e.g. the upstream vendor, the licensing information, etc. Of course, a lot of vendors are not going to care about good descriptions, and won’t be interested in shipping another 16k file in the update just for Linux users. For that, we can actually “inject” a replacement MetaInfo file when we curate the AppStream metadata. This allows us to download all the .cab
files we care about, but are not allowed to redistribute, run the appstream-builder on them, then package up just the XML metadata which can be consumed by pretty much any distribution. Ideally vendors would do this long term, bu you need got master versions of basically everything to generate the file, so it’s somewhat of a big ask at the moment.
So, we’ve now got a big blob of metadata we can read in GNOME Software, and show to Fedora users. We can show it in the updates panel, just like a normal update, we just can’t do anything with it. We also don’t know if the firmware update we know about is valid for the hardware we’re running on. These are both solved by the new fwupd project that I’ve been hacking on for a few days. This exit-on-idle daemon allows normal users to apply firmware to devices (with appropriate PolicyKit checks, typically the root password) in a safe way. We check the .cab
file is valid, is for the right hardware, and then apply the update to be flashed on next reboot.
A lot of people don’t have UEFI hardware that’s capable of using capsule firmware updates, so I’ve also added a ColorHug provider, which predictably also lets you update the firmware on your ColorHug device. It’s a lot lower risk testing all this super-new code with a £20 EEPROM device than your nice shiny expensive prototype hardware from Intel.
At the moment there’s not a lot to test, we still need to connect up the low level fwupdate code with the fwupd provider, but that will be a lot easier when we get all the prerequisites into Fedora. What’s left to do now is to write a plugin for GNOME Software so it can communicate with fwupd, and to write the required hooks so we can get the firmware upgrade status as a notification for boot+2. I’m also happy to accept patches for other hardware that supports updates, although the internal API isn’t 100% stable yet. This is probably quite interesting for phones and tablets, so I’d be really happy if this gets used on other non-Fedora, or non-desktop usecases.
Comments welcome. No screenshots yet, but coming soon.
16F1454 RA4 input only
To save someone else a wasted evening, RA4 on the MicroChip PIC 16F1454 is an input-only pin, not I/O like stated in the datasheet. In other news, I’ve prototyped the ColorHug ALS on a breadboard (which, it turns out was a good idea!) and the PCB is now even smaller. 12x19mm is about as small as I can go…