
Recently I wanted to play a bit with the Arduino family of atmega microcontroller development board. I wanted a very simple to use and easy to develop for, small microcontroller board and went with the Arduino Nano v3.0.
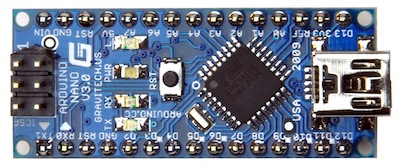
It’s really pretty nifty, it’s only ~ 4-by-2 cm, has 14 digital I/O pins (6 can be used for PWM), 8 analog input pins and runs at 16 MHz. So I thought I would just order one to play with, wrong! I ordered it from DealExtreme because it’s really cheap, but apparently you should also expect it to have a delivery time of 2 months! I was quite patient and I actually almost forgot that I ordered it in the first place, but today I finally received the package with the Arduino Nano.
This evening I wanted to try it out, so I installed the Arduino software, the FTDI drivers and CrossPack AVR (yes this was on OS X, but it doesn’t matter). Next I launched the Arduino IDE thingie and I was ready to go! I started by loading the LED blinking example. I configured the right port for the USB connection, selected the Duemilanove w/ ATmega328 (which sounds nothing like “Nano”, I had to look that up) and pressed Upload…. error! I went off the obvious checklist, checked cables, ports and looked online if I selected the right board. Everything seemed fine, the board was powered and seemed to be working, but it was simply refusing to upload the program.
I initially thought there would be a lot of documentation on the Arduino board and how to work with them, but I found it quite hard to find a solution for my problem. The first clue came from the fact that various sources report that when you reset the board, the L led right next to the power led should be flashing a few times. This is an indication that the arduino bootloader (responsible for programming the atmega) is ready and listening for programming commands. My L led was not flashing at all. In fact I had not seen it turn on even once. I tried resetting and replugging the board, but no flashing LED. Ok, so maybe there is a reason why the board comes a bit cheap? As far as I know, from reading online, all Arduino boards normally come with the Arduino bootloader pre-flashed. That’s cool, because it means you don’t need to have an external AVR/ISP programmer to program the damn thing.
At this point I was almost ready to give up. I looked for how to flash the bootloader but all I found was that you can use another Arduino board as an ISP programmer. It’s just that I don’t have another board. Then it hit me that a long time ago I did buy some kind of AVR programmer (for another project that never got off the ground). Yay! After some searching, I found my avrusb500. I was ready to start connecting the ICSP pins of the programmer to the Nano when I noticed that the ICSP header on my Nano was not actually soldered on the board. It was just provided with the board. I don’t know if that’s standard practice, but it seemed a bit weird to me. Time to take out the good’ol soldering iron! Man, did I not solder for 5 years or so. Personally, I think I did a reasonable job, but I will not show pictures of the result :)
So, header soldered and pins wired I was ready to go. The arduino software thingie allows you to burn the bootloader of your board through the UI. I tried that first (and why not) but it failed with very similar error messages. I thought it might not work since I did not see the avrusb500 in the list of programmers, but I tried anyway, thinking that since it was a stk500v2 compatible programmer. Time to turn to the interweb yet again. I found this tutorial which explains how to use avrdude directly to flash stuff through use of an external programmer, so I basicly followed that. For my Arduino Nano I used the following:
avrdude -p m328p -c stk500v2 -P /dev/cu.usbserial-A9006MNK -b115200 -v -e -U hfuse:w:0xDA:m -U lfuse:w:0xFF:m -U efuse:w:0x00:m
avrdude -p m328p -c stk500v2 -P /dev/cu.usbserial-A9006MNK -b115200 -v -e -U flash:w:/Applications/Arduino.app/Contents/Resources/Java/hardware/arduino/bootloaders/atmega/ATmegaBOOT_168_atmega328.hex -U lock:w:0x0F:m
Some of the flags are I guess quite obvious, -p selects the chip you want to program (the Nano has an ATmega328p), -c selects the type of programmer you have, -P specifies the device on which the programmer is connected, -b specifies the baudrate (might not be needed, specified it anyway), -e does a chip erase and the -U stuff specifies what to program. The first line basicly resets the fuse bits (I haven’t actually looked what these bits do, but it’s mentioned that these bits might have not been set correctly). The second line then programs the Arduino bootloader in the flash memory.
avrdude done. Thank you.
Wow, something worked! And I’ll be damned, the Nano automatically resets after it has been flashed and for the first time in my time together with the Nano I see the beloved orange Led, flashing ever so friendly indicating the board is ready to be programmed! Victory! I quickly tested the blinking LED example and the Arduino software now successfully upload programs to the Nano. Let the LEDs flash!
Pingback: jessevdk » Programming the Arduino Nano | Arduino in the Classroom | Scoop.it
Pingback: jessevdk » Programming the Arduino Nano | Arduino Geeks | Scoop.it
Congratulations on getting it all working!
I just wanted to note that it seems you have to watch cheap Arduinos. Like you I bought an Arduino Nano that was unbelievably cheap. It turned out to actually be a clone board, and not an official Arduino/Gravitech one.
Still, it’s working fine… and I didn’t have any of the problems you did (other than the supplied USB cable simply not working, which stumped me for a bit!).
Hmm, I didn’t think about that. Is there a way to see if I have the real thing? I would feel bad for the good old Arduino people if I bought a rip off.
Pingback: jessevdk » Programming the Arduino Nano | Arduino, Netduino, Rasperry Pi! | Scoop.it
Jesse,
I guess a good start would be to compare with the photos on the Arduino website. I believe all the official ones have arduino.cc or Gravitech written across the top of the board under the ICSP connector. In that orientation, I believe the official ones say “USA” on the lower left (place of manufacture?), and the year on the lower right.
Mine on the other hand has “www.funduino.com” on the top of the board (below “Arduino Nano V3.0”), and in place of “USA” it has “LISA”.