Making thunderbird conversations quick reply area larger

I’m using the thunderbird conversations add-on and am generally quite happy with it. One pain point however is that its quick reply feature has a really small text area for replying. This is especially annoying if you want to reply in-line and have to scroll to relevant parts of the e-mail.

A quick fix for this:

  1. Install the Stylish thunderbird add-on
  2. Add the following style snippet:
    .quickReply .textarea.selected {
      height: 400px !important;
    }

Adjust height as preferred.

Posted in Uncategorized | Leave a comment

New gedit beta release for OS X

We have been hard at work since the last announcement. Thanks to help from people testing out the previous release, we found a number of issues (some not even OS X related) and managed to fix most of them. The most significant issues that are resolved are related to focus/scrolling issues in gtk+/gdk, rendering of window border shadows and context menus. We now also ship the terminal plugin, had fixes pushed in pygobject to make multiedit not crash and fixed the commander and multiedit plugin rendering. For people running OS X, please try out the latest release [1] which includes all these fixes.

Can’t see the video? Watch it on youtube: https://www.youtube.com/watch?v=ZgwGGu7PYjY

[1] ftp://ftp.gnome.org/pub/GNOME/binaries/mac/gedit/beta/Gedit-3.13.91-dbg-2.dmg

Posted in gedit | 6 Comments

gedit 3.14 for OS X (preview)

If you’re reading this through planet GNOME, you’ll probably remember Ignacio talking about gedit 3 for windows. The windows port has always been difficult to maintain, especially due to gedit and its dependencies being a fast moving target, as well as the harsh build environment. Having seen his awesome work on such a difficult platform, I felt pretty bad about the general state of the OS X port of gedit.

The last released version for OS X was gedit 3.4, which is already pretty old by now. Even though developing on OS X (it being Unix/BSD based) is easier than Windows (for gedit), there is still a lot of work involved in getting an application like gedit to build. Things have definitely improved over the years though, GtkApplication has great support for OS X and things like the global menu and handling NSApp events are more integrated than they were before (we used the excellent GtkosxApplication from gtk-mac-integration though, so things were not all bad).

I spent most of the time on two things, the build environment and OS X integration.

Build environment

We are still using jhbuild as before, but have automated all of the previously manual steps (such as installing and configuring jhbuild). There is a single entry point (osx/build/build) which is basically a wrapper around jhbuild (and some more). The build script downloads and installs jhbuild (if needed), configures it with the right environment for gedit, bootstraps and finally builds gedit. All of the individual phases are commands which can be invoked by build separately if needed. Importantly, whereas before we would use a jhbuild already setup by the user, we now install and configure jhbuild entirely in-tree and independently of existing jhbuild installations. This makes the entire build more reliable, independent and reproducible. We now also distribute our complete jhbuild moduleset in-tree so that we no longer rely on a possibly moving external moduleset source. This too improves build reproducibility by fixing all dependencies to specific versions. To make updating and maintaining the moduleset easier, we now have a tool which:

  1. Takes the gtk-osx stable modulesets.
  2. Applies our own specific overrides and additional modules from a separate overrides file. For modules that already exist, a diff is shown and the user is asked whether or not to update the module from the overrides file. This makes it easy to spot whether a given override is now out of date, or needs to be updated (for example with additional patches).
  3. For all GNOME modules, checks if there are newer versions available (stable or unstable), and asks whether or not to update modules that are out of date.
  4. Merges all modules into two moduleset files (bootstrap.modules and gedit.modules). Only dependencies required for gedit are included and the resulting files are written to disk.
  5. Downloads and copies all required patches for each required module in-tree so building does not rely on external sources.

If we are satisfied with the end modulesets, we copy the new ones in-tree and commit them (including the patches), so we have a single self-contained build setup (see modulesets/).

All it takes now is to run

osx/build/build all

and the all of gedit and its dependencies are built from a pristine checkout, without any user intervention. Of course, this being OS X, there are always possibilities for things to go wrong, so you might still need some jhbuild juju to get it working on your system. If you try and run into problems, please report them back. Running the build script without any commands should give you an overview of available commands.

Similar to the build script, we’ve now also unified the creation of the final app bundle and dmg. The entry point for this is osx/bundle/bundle and works in a similar way as the build script. The bundle script creates the final bundle using gtk-mac-bundler, which gets automatically installed when needed, and obtains the required files from the standard build in-tree build directory (i.e. you’ll have to run build first).

OS X Integration

Although GtkApplication takes care of most of the OS X integration these days (the most important being the global menu), there were still quite some little issues left to fix. Some of these were in gtk+ (like the menu not showing [1], DND issues [2], font anti-aliasing issues [3] and support for the openFiles Apple event [4]), of which some have been already fixed upstream (others are pending). We’ve also pushed support for native 10.7 fullscreen windows into gtk+ [5] and enabled this in gedit (see screenshot). Others we had fixed inside gedit itself. For example, we now use native file open/save dialogs to better integrate with the file system, have better support for multiple workspaces, improved support for keeping the application running without windows, making enchant (for the spell checker) relocatable and have an Apple Spell backend, and other small improvements.

Besides all of these, you of course also get all the “normal” improvements that have gone into gedit, gtk+ etc. over the years! I think that all in all this will be the best release for OS X yet, but let it not be me to be the judge of that.

gedit 3.13.91 on OS X

We are doing our best to release gedit 3.14 for OS X at the same time as it will be released for linux, which is in a little bit less than a month. You can download and try out gedit 3.13.91 now at:

ftp://ftp.gnome.org/pub/GNOME/binaries/mac/gedit/beta/Gedit-3.13.91-dbg-1.dmg

It would be really great to have people owning a mac try this out and report bugs back to us so we can fix them (hopefully) in time for the final release. Note that Gedit 3.14 will require OS X 10.7+, we no longer support OS X 10.6.

[1] [Bug 735122] GtkApplication: fix global menubar on Mac OS
[2] [Bug 658722] Drag and Drop sometimes stops working
[3] [Bug 735316] Default font antialiasing results in wrong behavior on OS X
[4] [Bug 722476] GtkApplication mac os tracker
[5] [Bug 735283] gdkwindow-quartz: Support native fullscreen mode

Posted in gedit | 11 Comments

Looking for new opportunities

I have been a bit more quiet on this blog (and in the community) lately, but for somewhat good reasons. I’ve recently finished my PhD thesis titled On the dynamics of human locomotion and the co-design of lower limb assistive devices, and am now looking for new opportunities outside of pure academics. As such, I’m looking for a new job and I thought I would post this here in case I overlook some possibilities. I’m interested mainly in working around the Neuchâtel (Switzerland) area or working remotely. Please don’t hesitate to drop me a message.

My CV

Posted in Uncategorized | 4 Comments

bugzini

I think I’m not the only one who dreads visiting the hog that is bugzilla. It is very aptly named, but a real pain to work with at times. Mostly, what I really don’t like about bugzilla is that it’s 1) really slow to load and in particular search, 2) has a very cluttered interface with all kinds of distracting information that I don’t care about. Every time I think to quickly look up a bug, or search something specific, get all bugs related to some feature in gedit or even open just all bugs in a certain product, bugzilla just gets in the way.

So I introduce bugzini (https://github.com/jessevdk/bugzini), the light-weight bugzilla front-end which runs entirely in the local browser, using the bugzilla XML-RPC API, a simple local webservice implemented in Go and a JavaScript application running in the browser using IndexedDB to store bugs offline.

bugzini-index

Screenshot of the main bug index listing

It’s currently at a state where I think it could be useful for other people as well, and it’s running reasonably well (although there are certainly still some small issues to work out). There are several useful features in bugzini currently which makes it much nicer to work with than bugzilla.

  1. Search as you type, both for products as well as bug reports. This is great because you get instantaneous results when looking for a particular bug. A simple query language enables searching for specific fields and creating simple AND/OR style queries as shown in the screenshot (see the README for more details)
  2. Products in which you are interested can be starred and results are shown for all starred products through a special selection (All Starred in the screenshot)
  3. Searches can be bookmarked and are shown in the sidebar so that you can easily retrieve them. In the screenshot one such bookmark is shown (named file browser) which shows all bugs which contain the terms file and browser
  4. bugzini keeps track of which bugs contain new changes since your last visit and marks them (bold) similar to e-mail viewers. This makes it easy to see which bugs have changed without having to track this in bugzilla e-mails instead
Viewing a bug

Viewing a bug

Try it out

To try out bugzini, simply do the following from a terminal:

git clone https://github.com/jessevdk/bugzini.git
make
./bugzini -l

Please don’t forget to file issues if you find any.

Posted in Uncategorized | 6 Comments

gnome code assistance

Quite a while back, I introduced gedit code assistance, a plugin for gedit which uses clang to provide various C/C++ code assistance features to gedit such as diagnostics and cross-referencing. The plugin worked reasonably, but there were a few iss

ues that made it difficult to develop it further. First, we couldn’t manage the memory consumption of the plugin very well. Since the plugin works in-process, this meant that gedit memory usages would quickly go up with code assistance enabled. I’m not sure whether we simply forgot to clean up some things (this we could have fixed), or if there were inherent memory leaks in libclang at the time. The only resolution we had was to restart gedit once in a while, which of course is highly undesirable.

The second issue is that we do not really control libclang, so i

f there is any bug that could cause crashes, there is no way we can work around that easily. This is of course true for any library used in gedit, but we found that libclang was not yet as stable as we’d hoped. The third and final issue was really that we couldn’t easily extend the plugin to other languages than those supported by libclang. The reason is that many modern languages nowadays provide parsers, type checkers and other useful code assistance features as part of their standard library, or if third party tools exist, they are also usually written in that particular language. In gedit, we only support C (and by extension Vala) and python as languages in which plugins can be written, so supporting a Ruby parser written in Ruby would have been difficult.

The way forward was fairly obvious, move code assistance out-of-process and make it a service. Doing so solves all of the above problems. Memory can be managed per service, and if it goes wild the service can just be restarted without affecting the editor. Any bugs in a code-assistance service can no longer crash the editor, and services can be written in any language.

gnome-code-assistance is a project which aims at providing general code assistance services. We split out the language specific parts from the gedit plugin into this new project, while the plugin simply becomes a language agnostic consumer of the services provided by gnome-code-assistance. Using dbus as a transport layer, code assistance can be relatively easily integrated into existing editors, and a reference implementation is provided by gedit-code-assistance. It’s all still in the early stages, but it’s currently functional for gedit at least. For the moment, gnome-code-assistance provides diagnostics for a number of languages, including C, CSS, Go, JavaScript, JSON, Python, Ruby, Shell, Vala and XML. Other services, such as code completion, symbol browsing, cross-referencing and smart indentation are in the works.

gnome-code-assistance diagnostics in gedit

The idea is that such code assistance services can be made available to a variety of tools and applications, without the need for each of them to implement their own solution. Nothing is set in stone yet, so it would be great to get input from the people working on IDE’s such as Anjuta and see if we can work towards a single framework for code assistance features, consumable by different editors. If you’re interested, please drop by on (on gimpnet). For a little bit more information on the internal design of gnome-code-assistance, such as dbus interfaces, have a look at the README.

To try it out, the easiest way currently is to install both gnome-code-assistance and gedit-code-assistance from git, using something like:

git clone git://git.gnome.org/gnome-code-assistance
cd gnome-code-assistance && ./autogen.sh --prefix=$HOME/.local && make install
git clone git://git.gnome.org/gedit-code-assistance
cd gedit-code-assistance && ./autogen.sh --prefix=$HOME/.local --enable-local && make install
Posted in Uncategorized | 7 Comments

gitg 0.3.2

We’ve just released a minor new version of gitg. This release fixes some small issues with regard to packaging (man page installation, parallel install, updated dependency versions). As always, we appreciate any issues reported back to us.

I’ve also added a PACKAGING file which contains some information which might be useful for packagers about the structure of gitg.

Posted in Uncategorized | 9 Comments

vala and autobuild

When we switched gitg to Vala, we initially had some problems making the build work correctly. Parallel build especially gave us a lot of headaches. Just so that if someone else runs into the same problems, here are some thoughts on the matter.

We now use (mostly) non-recursive make. This isn’t required or anything, but it is working out great for us and improves build times as well as dependency tracking. It does not take a lot of effort to switch to a non-recursive build. We kept separate Makefile.am in sub directories, but instead of using SUBDIRS we simply include them in the toplevel Makefile.am. You then just need to make sure that variables are properly separated and target specific (i.e. using <target>_VALAFLAGS instead of AM_VALAFLAGS).

gitg is composed of two installed libraries (libgitg and libgitg-ext, where libgitg depends on libgitg-ext), some plugins (also written in Vala) and a program (gitg). Various of these components depend on the libgitg and/or libgitg-ext libraries and I think it’s safe to say that we have a reasonably complex build situation. Only until recently did we manage to make automake understand all these dependencies properly. The main problem was that automake does not properly track dependencies of inter-project vala packages if you specify them with –vapidir and –pkg (which is understandable). Therefore, in parallel build we would end up with libgitg and gitg being valac’d at the same time. This in turn made the build of gitg fail because it depends on libgitg. To solve this, we now instead specify the libgitg-1.0.vapi directly as a source file to the build of gitg. This corrects the dependency resolution such that libgitg is always valac’d before gitg.

Finally, the vala autobuild support works a bit differently than you would normally expect (at least, than I had expected). Although valac will generate .c, .h, .vapi, .gir files etc, all these files are expected to end up in the tarball. Like this, distributed tarballs do not actually require vala at all to compile since all generated sources are included in the archive. automake automatically sets up all the required rules so normally you’re fine. However, we used to add all these generated files to CLEANFILES so that ‘make clean’ would gives us a nice clean tree. Don’t do this! Cleaning up these files breaks assumptions on the state of your working directory and the rules generated by vala automake support doesn’t work correctly in parallel build when you clean up only a subset of the generated files. More specifically, you’d need to also cleanup the .stamp files. Even if you do cleanup everything generated in CLEANFILES, your distcheck will most likely still fail because it doesn’t expect these files to be cleaned by CLEANFILES. Anyway, instead of cleaning them, we now just add all those generated files to GITIGNOREFILES (we use git.mk) and everything seems to be working fine.

If you’re having problems, or just want to have a look, this is our toplevel Makefile.am, libgitg/Makefile.am and gitg/Makefile.am.

Posted in Uncategorized | 6 Comments

gitg

I don’t really write a lot of blog posts, but when I write one it’s because I have something to say. Today I want to say something about gitg (a graphical interface for git). You can skip to Dawn if you’re not interested in the history of gitg, or directly to The Now if you just want to see pretty pictures of a all new and shiny gitg release.

The Past

The initial commit in gitg is dated June 24, 00:04, 2008, which makes gitg to date around five and a half years old. Originally, the development of gitg started as a clone of GitX (a graphical interface for OS X being developed by my roomate at the time, Pieter de Bie) to the GNOME/gtk+ platform. I basically set out to provide the same application (UI wise) but for a different platform and using different technologies. If you look back at early screenshots of gitg and GitX, you’ll be able to see the resemblance between the two applications.

Five years ago, the way that most (if not all) interfaces had to interact with git was through the git cli itself. There was no library underlying git core, so unless you wanted to reimplement the whole of git, you simply didn’t have much of a choice. Luckily for us, git was designed to be used like this. As most of you probably know, git generally has had two types of commands, plumbing and porcelain. The porcelain commands are that ones that users are most familiar with. These commands implement things like commit and rebase and are implemented in terms of the plumbing commands. The plumbing commands are at the very core of git and usually do only a single, lowlevel thing. You can consider the plumbing commands as a very UNIXy way of providing an API through processes (instead of a for example a shared library).

Originally, most of git porcelain was implemented using shell scripts which were simply calling various plumbing commands. Therefore, all plumbing commands usually have very good machine-parseable interfaces for both input and output. Of course, input and output is still all pure text so you’d need to do some amount of interpreting, but at least it is all well defined. To illustrate how this worked, here is an pseudo example of how gitg used to create a commit using plumbing. Given a current index to be committed:

  1. git write-tree: writes out a new tree object with the contents of the index. The output of this command is the SHA-1 hash of the new tree object.
  2. git commit-tree <tree-id> -p <parent-id>: writes out a new commit object for the given <tree-id> (obtained previously) setting the parent to <parent-id> (usually the id of HEAD obtained by git rev-parse, or HEAD^ in case of amending). The input of this command is the commit message and the output is the SHA-1 hash of the commit object.
  3. git update-ref -m <subject> HEAD <commit-id>: this updates the reference pointed to by HEAD (which is a symbolic ref, usually to another ref) to be at <commit-id> (previously obtained). The ref log is also updated with the given <subject> (extracted from the first line of the commit message).

This is pretty much what git commit does behind the scenes, but in a more controllable way. Of course then there is error handling (obtaining stderr), chaining all these commands manually etc. All of the functionality in gitg is implemented in this way, and although it certainly works well, calling out to programs is still a pretty horrid to develop a GUI application.

The Twilight
…you know, that time in between

gitg has been a GObject/C application from the beginning. This kind of made sense at the time. I was pretty familiar with this, coming from gedit, and gobject-introspection wasn’t as mature yet. gitg was also meant to be a simple interface for viewing git history, plus some trinkets like committing and creating a branch here or there.

Of course, looking back, I’m not so sure it was really the right choice. It wasn’t all that easy getting interaction with the git cli working reliably from C. Also, GObject/C requires a huge amount of boilerplate. It’s pretty nice to develop a library (portable, can be consumed by many languages, object oriented), but it definitely does not make sense anymore to develop graphical applications in C. Eventually, gitg development stagnated. There are of course other reasons (it was functioning so why work on it), but in the end I didn’t feel as much to work on it. New functionality was hard to implement, going through the git cli. Porting to gtk+3 was painful doing everything in C, etc. gitg is pretty much unchanged since the 0.2.5 release from September 1, 2011 (more than two years ago).

Dawn

Around april 2012, we decided to start development of the next version of gitg. Unhappy with the current state of things, we decided to make two major changes. The first was to use Vala instead of C. By the time, Vala had matured enough for us to be considered as a very viable solution to the problem of writing GUI applications in C. It is made exactly for writing GObject based applications, while providing a level of programming interface very close to C#. The second change was to use libgit2 instead of git cli to interface with git. Implemented as a re-entrant shared library, libgit2 provides a great interface to almost all facets of git and is used by a great many projects (not the least of which is github). Other than that, we also wanted to refresh the gitg interface in accordance with the GNOME 3 interface guidelines, have a plugin architecture to extend functionality, improve our diff rendering etc.

Having made these decisions, we started from scratch to reimplement everything, throwing away any inherited bagage from the old gitg. This was almost two years ago.

The Now

Personally, I can’t develop for extended periods of time (I mean like months) anymore consistently on a single project. I usually have urges for little sprints, working all evenings for one week long (if permitted), but not much more. This means of course that development is pretty slow overall. So it took some time to get gitg back to it’s original state, but we are nearing the end.

history
history


Yesterday, I released gitg 0.3.1, the first release (of hopefully many) of the new gitg. We have most of the basic functionality implemented (viewing history, making commits), but we still have some regressions in functionality compared to 0.2.x. We are mainly missing create/rename/delete branch/tag and push/pull, but these will hopefully land soon enough.

I hope that people will find the refresh interface as much of an improvement as we think it is and that gitg might continue to be a useful tool to visualise and  interact with git. Please do try it out if you can (you will need to build it in jhbuild until distro’s start shipping it) and report issues!

Posted in gitg | 7 Comments

On fixing a WD Live, data rescue and Arduino’s

Some while ago, I bought a WD Live (2T) type of NAS for use as a media server/backup storage at home. From various other solutions for  running this type of thing, I was pretty happy with the WD Live. It’s compact, silent and it runs Debian (lenny)! It also doesn’t try to lock you out, you can enable SSH access from the web interface easily and from that point on you can do with the box what you want. That’s pretty great no?

And pretty great it was. Everything worked out of the box. The only output the WD Live has is an ethernet port, so you just hook it into your router and you’re done. The Twonky media server that’s installed on it can be a bit slow if you ask me, especially when it starts to index on boot, but otherwise streaming to the PS3 (for example) works perfectly. That is, until a power outage managed to brick it.

The fail

Basically, although it would start to turn on and you could hear the disk spinning, it wasn’t booting. Actually, it was rebooting automatically about every 10 seconds. At this point you’re kind of out, you only have access to the ethernet on the box. At this point I saw two options, 1) bring it back and get it “repaired” or 2) put on the DIY hat and start tinkering. Fully expecting that going with 1) would loose me all my data and that it could be fun/satisfactory to go with 2), I opened the box.

My initial guess was that the disk somehow got corrupted by the outage. I verified this by looking online and seeing it was a not-uncommon problem with the device. Once opened, it’s easy to take out the standard SATA HD. So I bought a new 2TB disk and started the data recovery.

Recovering the data

I used ddrescue to rescue data from the old disk to the new disk. ddrescue is a really great tool which tries several strategies for recovering data and you can run it such that it first try to rescue large regions and then have it retry failed regions in smaller increments (great if the disk is failing and you need to rescue as much as possible as fast as possible). It turned out that I only had a small number of errors on the disk, nevertheless it took ddrescue a few days to go through the whole 2TB.

After the rescue, I wanted to see which files got corrupted. This turned out pretty problematic. ddrescue doesn’t know anything about filesystems, it just sees the HD as a big block device. The problem is that the WD Live is a PPC architecture and the data partition of the HD (for whatever reason) has a block size of 65k. This turns out to be a problem because on x86 (at least with the default linux kernel) only block sizes up to 4k (the maximum page size) are supported. So basically, I couldn’t mount my data partition and check for problems.

After some thinking, I couldn’t really come up with a solution, but I didn’t want to jam the new HD back without knowing if some files were damaged. In the end, I managed to find an old G5/PPC in the lab and I could hook up the drives and mount them! I used ddrescue logs to zero out the parts of the new disk corresponding to the damaged parts of the old disk. After that, I simply ran an md5sum on the whole system for both disks and did a diff to see which files were corrupted. Luckily, it turned out that non of the system files were corrupted (just some of my personal data).

Feeling pretty confident that the new HD would boot, I plugged it back into the WD Live and started it up. This time it started of doing better, it didn’t reboot right away and seemed to certainly do some stuff (the HD was purring along). However, HD activity stopped after about 15 seconds and I still didn’t get network access. At this point I was kind of ready go give up. I couldn’t access any visible ports on the board. I couldn’t really debug anything. Maybe some of the boards hardware got fried? Or maybe the HD was not restored completely correctly? No way of knowing really. So I stowed the thing on a shelf and went on with other things.

The unbrick

Until yesterday enough time had passed for me to wanting another go at it. I was wondering if there wasn’t any way to get access to the device. The most obvious idea being to connect somehow a serial console to it. So I checked online, and low and behold! There actually is a serial output on the WD Live (http://mybookworld.wikidot.com/wd-mybook-live-uart). Ok so cool. Only, I don’t have anything with a serial port to connect it with. I would basically need to have a serial TLL to USB converter thingie, which I also didn’t have. Now, of course, I could have just bought the converter, but where is the fun in that. What I do have though is some Arduino’s, soldering iron and a breakout board.

Opened up WD Live with UART wires soldered

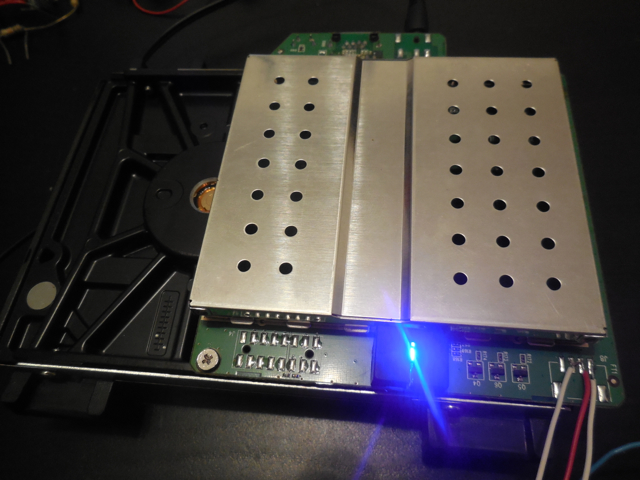
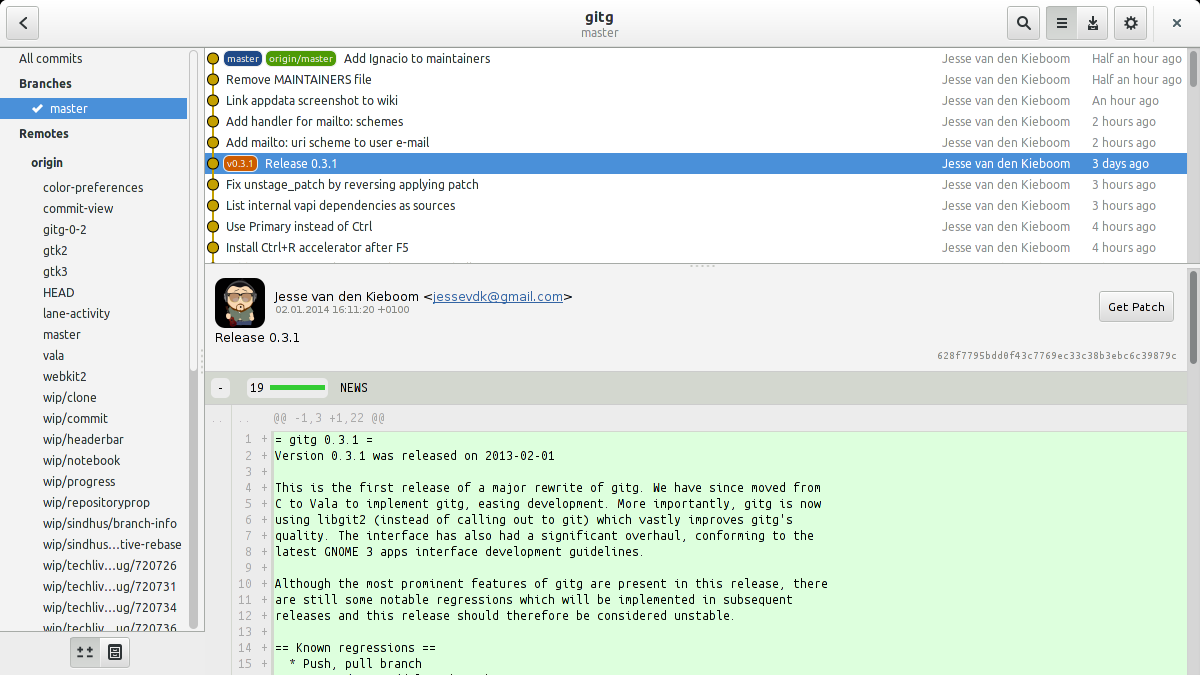
Opened up WD Live with UART wires soldered (on the right, RX, TX, Gnd)

The idea is to use the Arduino as a serial TTL <-> USB converter. I started with the Arduino Nano that I had already setup in a previous project. One thing you have to watch out for is that the WD Live UART port uses 3.3V TTL, while the Arduino Nano uses 5V. Although 3.3V is usually enough to be considered high even for a 5V reference, you shouldn’t try to set 5V on a 3.3V receiver. This basically means that you should drop the voltage from the Nano TX to the WD Live RX from 5V to 3.3V. You can achieve this by using a simple voltage divider, which you can create using two simple resistors of the right value. As chance had it, I actually still had the exact circuit that I needed for this because I was testing the Arduino Nano with a HC-05 bluetooth module. The HC-05 also uses 3.3V TTL UART so I could just replace the HC-05 with the WD Live in my circuit and voila!

The problem is that the Nano hardware UART is used by the USB. So what I did was to use the SoftwareSerial library for the Arduino to create a software (instead of hardware) based serial port on two digital pins of the board. The problem here is that the WD Live UART is configured for a 115200 baud rate. The Arduino Nano however is a 16MHz processor and unfortunately it isn’t able to run the software serial fast enough for 115200. When I hooked it up therefore, what I saw was half garbled output from the WD Live boot. I could recognise parts of the boot sequence, but especially when there was a lot of output, all of it got garbled. More importantly, this was the case when the boot got stuck. So now I had a basic working setup, almost there. But I still couldn’t see what went wrong with the boot!

Luckily, I also recently bought an Arduino micro pro from Sparkfun. It has some similar features as the Nano (and ironically is actually smaller), but importantly, it has a separate hardware UART from the USB. So I simply switched out the Nano for the Micro and used Serial1 instead of SoftwareSerial. I used this trivial Arduino program:

void setup() {
    // Initialize serial port for USB communication to host
    Serial.begin(115200);

    // Initialize serial port for communication with the WD live
    Serial1.begin(115200);
}
void loop() {
    if (Serial.available() > 0) {
        Serial1.write(Serial.read());
    }

    if (Serial1.available() > 0) {
        Serial.write(Serial1.read());
    }
}
DSCN0649

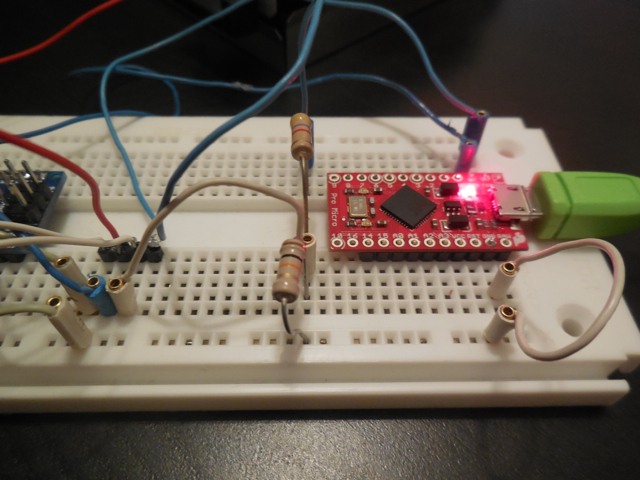
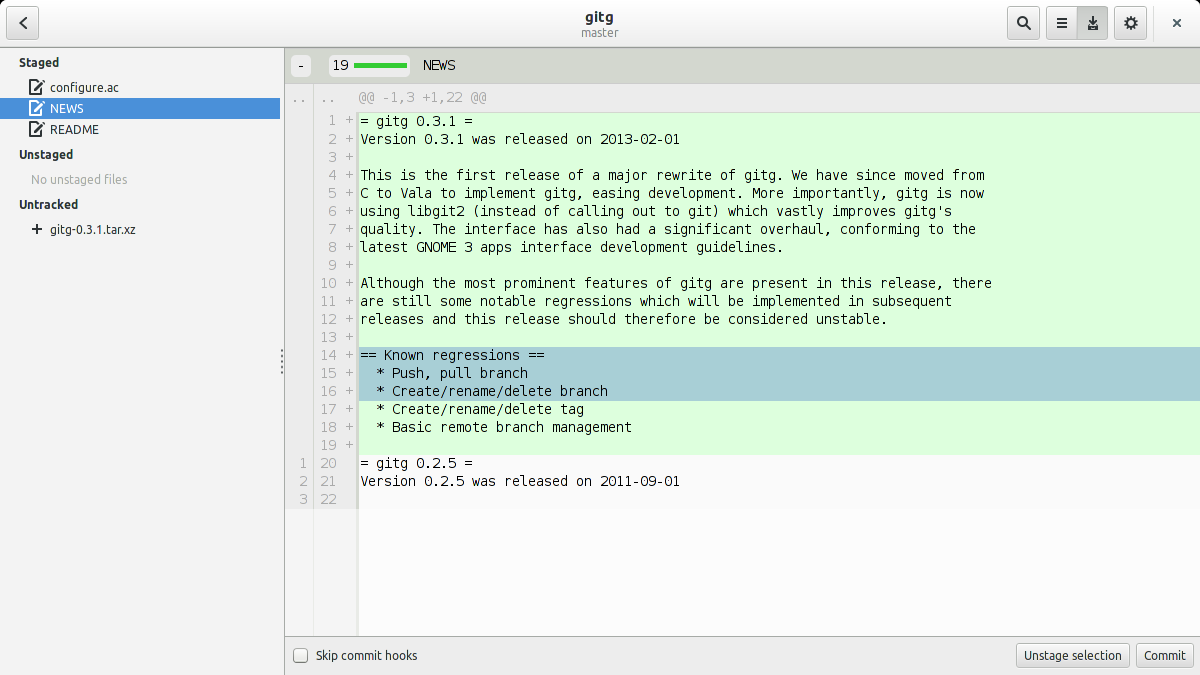
Arduino Micro Pro on breakout board and voltage divider

Complete setup including WD Live, Arduino and laptop

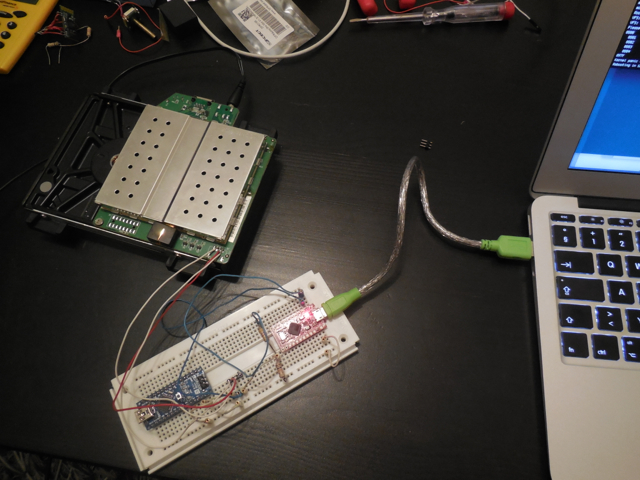
Complete setup including WD Live, Arduino and laptop. The Arduino Nano is on the board but not actually connected.

And that is the complete setup. Tinker worthy I would say. And finally, starting the WD Live now gets me the boot sequence on the console! Yay! I use GNU screen to connect to the serial console on the laptop, which is pretty convenient. So what happens at the boot? Turns out I get to see this:

md127: WARNING: sda2 appears to be on the same physical disk as sda1.
True protection against single-disk failure might be compromised.
raid1: raid set md127 active with 2 out of 2 mirrors
md127: detected capacity change from 0 to 2047803392
md: ... autorun DONE.
Root-NFS: No NFS server available, giving up.
VFS: Unable to mount root fs via NFS, trying floppy.
VFS: Cannot open root device "md1" or unknown-block(2,0)
Please append a correct "root=" boot option; here are the available partitions:
0800 2930266584 sda driver: sd
 0801 1999872 sda1
 0802 1999872 sda2
 0803 500736 sda3
 0804 2925750727 sda4
097f 1999808 md127 (driver?)
Kernel panic - not syncing: VFS: Unable to mount root fs on unknown-block(2,0)
Rebooting in 180 seconds..

Turns out that for whatever reason, the new disk is being assembled as /dev/md127, while the kernel is booted using root=/dev/md1. It then fails later on trying to mount the root partition. Sigh.

Fixing the boot

The WD Live uses U-boot as the boot loader. I wasn’t familiar with it but the basics are pretty straightforward. When booting, you have about 1 second early on to press a key to get into the U-boot console. Once in the console, I wasn’t really sure what to do. I was looking at how to change the root= kernel parameter. So I checked with printenv to see what commands were being run by U-boot. Basically, what it would do is “mount” the disk, then read the file /boot/boot.scr (which is a u-boot script file) to a memory location (using ext2load) and then run that memory location (using source). To see what boot.scr was doing, I used ‘md 100000 100’ to dump the contents of boot.scr (which got loaded at memory location 100000). This finally showed the actual U-boot commands that were used to boot the kernel, and hardcoded into it root=/dev/md1! To bootstrap, I simply executed the relevant parts of the script, changing root=/dev/md1 to root=/dev/md127:

sata init
ext2load sata 1:1 ${kernel_addr_r} /boot/uImage
ext2load sata 1:1 ${fdt_addr_r} /boot/apollo3g.dtb
setenv bootargs root=/dev/md127 rw rootfstype=ext3
run addtty
bootm ${kernel_addr_r} - ${fdt_addr_r}

After bootm I finally got the WD Live booted correctly, and everything just worked after that! Now the only remaining problem is how to make the fix permanently. Initially, I wanted to make the disk being mounted at /dev/md1. This would be the nicest option, but I couldn’t figure out how to update the super-minor id (which is what is used to decide the /dev point, changeable using mdadm –assemble –update=super-minor /dev/md1….) on the root partition while it is mounted. The second option then was to update the /boot/boot.scr file to set root=/dev/md127. So that’s what I did. The boot.scr file is some kind of binary file, but it seems that there is just some binary magical header in front of otherwise ASCII text composing the actual U-boot script. Taking the text part of boot.scr and putting it into boot.cmd, you can then use:

mkimage -A arm -O linux -T script -C none -a 0 -e 0 -n 'Execute uImage' -d boot.cmd boot.scr

To create the corresponding boot.scr file. You’ll need to intstall the uboot-mkimage package to get the mkimage command, but that’s it.

In conclusion

Phew, pretty long post. If you’re here after reading it all, congrats! I’m happy to say that the box seems to be working well again and the solution gave me some personal satisfaction that even in current days, you can still fix things yourself and tinkering is still worth something. In the end I guess it would have been cheaper/easier to just buy a new WD Live, but I ask you, where is the fun/spirit in that?

Posted in Uncategorized | Leave a comment