Co-authored by Sebastian Wick & Jonas Ådahl.
During April 24 to 26 Red Hat invited people working on compositors and display drivers to come together to collaborate on bringing the Linux graphics stack to the next level. There were three high level topics that were discussed at length: Color Management, High Dynamic Range (HDR) and Variable Refresh Rate (VRR). This post will go through the discussions that took place, and occasional rough consensus reached among the people who attended.
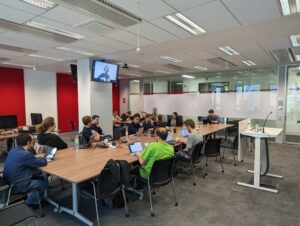
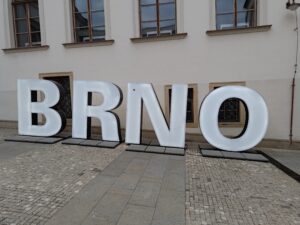
The event itself aimed to be both as inclusive and engaging as possible, meaning participants could attend both in person, in the Red Hat office in Brno, Czech Republic, or remotely via a video link. The format of the event was structured in a way aiming to give remote attendees and physical attendees an equal opportunity to participate in discussions. While the hallway track can be a great way to collaborate, discussions accessible remotely were prioritized by having two available rooms with their own video link.
This meant that if the main room wanted to continue on the same topic, while some wanted to do a breakout session, they could go to the other room, and anyone attending remotely could tag along by connecting to the other video link. In the end, the break out room became the room where people collaborated on various things in a less structured manner, leaving the main room to cover the main topics. A reason for this is that the microphones in both rooms were a bit too good, effectively catching any conversation anyone had anywhere in the room. Making one of the rooms a bit more chaotic, while the other focused, also allowed for both ways of collaborating.
For the kernel side, people working on AMD, Intel and NVIDIA drivers were among the attendees, and for user space there was representation from gamescope, GNOME, KDE, smithay, Wayland, weston and wlroots. Some of those people are community contributors and some of them were attending on behalf of Red Hat, Canonical, System76, sourcehut, Collabora, Blue Systems, Igalia, AMD, Intel, Google, and NVIDIA. We had a lot of productive discussion, ending up in total with a 20 (!) page document of notes.
Color management & HDR
Wayland
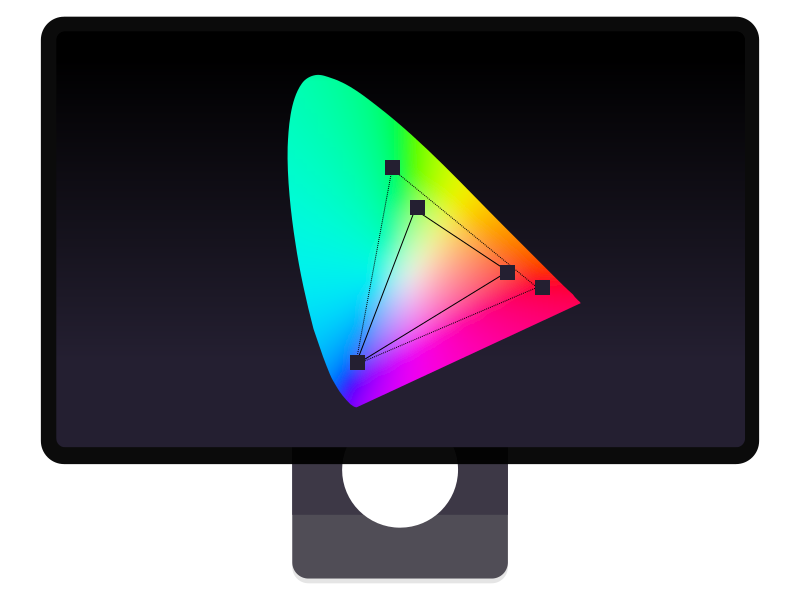
Color management in the Linux graphics stack is shifting in the way it is implemented, away from the style used in X11 where the display server (X.org) takes a hands-off approach and the end result is dependent on individual client capabilities, to an architecture where the Wayland display server takes an active role to ensure that all clients, be them color aware or not, show up on screen correctly.
Pekka Paalanen and Sebastian Wick gave a summary of the current state of digital color on Linux and Wayland. For full details, see the Color and HDR documentation repository.
They described the in-development color-representation and color-management Wayland protocols. The color-representation protocol lets clients describe the way color channels are encoded and the color-management protocol lets clients describe the color channels’ meaning to completely describe the appearance of surfaces. It also gives clients information about how it can optimize its content to the target monitor capabilities to minimize the color transformations in the compositor.
Another key aspect of the Wayland color protocols in development is that compositors will be able to choose what they want to support. This allows for example to implement HDR without involving ICC workflows.
There is already a broad consensus that this type of active color management aligns with the Wayland philosophy and while work is needed in compositors and client toolkits alike, the protocols in question are ready for prototyping and review from the wider community.
Colors in kernel drivers & compositors
There are two parts to HDR and color management for compositors. The first one is to create content from different SDR and HDR sources using color transformations. The second is signaling the monitor to enter the desired mode. Given the current state of kernel API capabilities, compositors are in general required to handle all of their color transformations using shaders during composition. For the short term we will focus on removing the last blockers for HDR signaling and in the long term work on making it possible to offload color space conversions to the display hardware which should ideally make it possible to power down the GPU while playing e.g. a movie
Short term
Entering HDR mode is done by setting the colorimetry (KMS Colorspace property) and overriding the transfer characteristics (KMS HDR_OUTPUT_METADATA property).
Unfortunately the design of the Colorspace property does not mix well with the current broader KMS design where the output format is an implementation detail of the driver. We’re going to tweak the behavior of the Colorspace property such that it doesn’t directly control the InfoFrame but lets the driver choose the correct variant and transparently convert to YCC using the correct matrix if required. This should allow AMD to support HDR signaling upstream as well.
The HDR_OUTPUT_METADATA property is a bit weird as well and should be documented. Changing it might require a mode set and changing the transfer characteristics part of the blob will make monitors glitch, while changing other parameters must not require a mode set and must not glitch.
Both landing support upstream for the AMD driver, and improvements to the documentation should happen soon, enabling proper upstream HDR signaling.
Vendor specific uAPI for color pipelines
Recently a proposal for adding vendor specific properties for exposing hardware color pipelines via KMS has been posted, and while it is great to see work being done to improve situation in the Linux kernel, there are concerns that this opens up for per vendor API that end up necessary for compositors to implement, effectively reintroducing per vendor GPU drivers in userspace outside of mesa.
Still, upstream support in the kernel has its upsides, as it for example makes it much easier to experiment. A way forward discussed is to propose that vendor specific color pipeline properties should be handled with care, by requiring them to be clearly documented as experimental, and disabled by default both with a build configuration, and a off-by-default module parameter.
A proposal for this will be sent by Harry Wentland to the relevant kernel mailing lists.
Color pipelines in KMS
Long term, KMS should support color pipelines without any experimental flags, and there is a wide agreement that it should be done with a vendor agnostic API. To achieve this, a proposal was discussed at length, but to summarize it, the goal is to introduce a new KMS object for color operations. A color operation object exposes a low level mathematical function (e.g. Matrix multiplication, 1D or 3D look up tables) and a link to the next operation. To declare a color pipeline, drivers construct a linked list of these operations, for example 1D LUT → Matrix → 1D LUT to describe the current DEGAMMA_LUT → CTM → GAMMA_LUT KMS pipeline.
The discussions primarily focused on per plane color pipelines for the pre-blending stage, but the same concept should be reusable for the post blending stage on the CRTC.
Eventually this work should also make it possible to cleanly separate KMS properties which change the colors (i.e. color operations) from properties changing the mode and signaling to sinks, such as Broadcast RGB, Colorspace, max_bpc.
It was also agreed that user space needs more control over the output format, i.e. what is transmitted over the wire. Right now this is a driver implementation detail and chosen such that the bandwidth requirements of the selected mode will be satisfied. In particular making it possible to turn off YCC subsampling, specifying the minimum bit depth and specifying the compression strength for DCC seems to have consensus.
There are a lot more details that handle all the quirks that hardware may have. For more details and further discussion about the color pipeline proposal, head over to the RFC that Simon Ser just sent to the relevant mailing lists.
Testing & VKMS
Testability of color pipelines and KMS in general was a topic that was brought up as well, with two areas of interest: testing compositors and the generic DRM layer in the kernel using VKMS, and testing actual kernel drivers.
The state of VKMS is to some degree problematic; it currently lacks a large enough pool of established contributors that can take maintainership responsibilities, i.e. reviewing and landing code, but at the same time, there is an urge to make it a more central part of GPU driver development in general, where it can take a more active role in ensuring cross driver conformance. Discussions on how to create more incentive for both kernel developers and compositor developers to help out were discussed, and while ability to test compositors is a relatively good incentive, an idea discussed was to require new DRM properties to always get a VKMS implementation as well to be able to land. This is, however, not easy, since a significant amount of bootstrapping is needed to make that viable. Some ideas were thrown around, and hopefully something will come out of it; keep an eye on the relevant mailing lists for something related to this area.
For testing actual drivers, the usage of Chamelium was discussed, and while everyone agreed it’s something that is definitely nice to have, it takes a significant amount of resources to maintain wired up CI runners for the community to rely on. Ideally a setup that can be shared across the different compositors and GPU drivers would be great, but it’s a significant task to handle.
Variable Refresh Rate
Smoothing out refresh rate changes
Variable Refresh Rate monitors driven at a certain mode have a minimum and maximum refresh cycle duration and the actual duration can be chosen for every refresh cycle. One problem with most existing VRR monitors however is that when the refresh duration changes too quickly, they tend to produce visible glitches. They appear as brightness changes for a fraction of a second and can be very jarring. To avoid them, each refresh cycle must change the duration only up to some fixed amount. The amount however varies between monitors, with some having no restriction at all.
A VESA certification is currently being deployed aiming to certify monitors where any change in the refresh cycle duration does not result in glitches. For all other monitors, the increase and decrease in duration which does not result in glitches is unknown if not provided by optional EDID/DisplayID data blocks.
Driving monitors glitch-free without machine readable information therefore requires another approach. One idea is to make the limits configurable. Requiring all users to tweak and fiddle to make it work good enough, however, is not very user friendly, so another idea that was discussed is to maintain a database similar to the one used by libinput, but in libdisplay-info, that contains the required information about monitors, even if there is no such information made available by the vendor.
With all of the required information, the smoothing of refresh rate changes still needs to happen somewhere. It was debated whether this should be handled transparently by the kernel, or if it should be completely up to user space. There are pros and cons to both ways, for example better timing ability in the kernel, but less black box magic if handled by user space. In the end, the conclusion is for user space components (i.e. compositors) to handle this themselves first, and then reconsider some point in the future if that is enough, or whether new kernel uAPI is needed.
Low Framerate Compensation
The usual frame rates that a VRR monitor can achieve typically do not cover a bunch of often used low frame rates, such as 30, 25, or 24 Hz. To still be able to show such content without stutter, the display can be driven at a multiple of the target frame rate and present new content on every n-th refresh cycle.
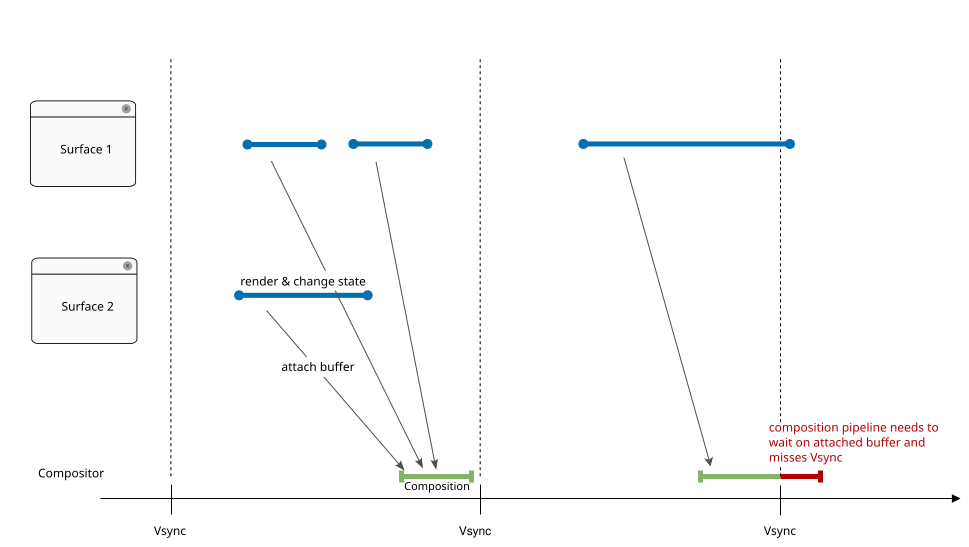
Right now this Low Framerate Compensation (LFC) feature is built into the kernel driver, and when VRR is enabled, user space can transparently present content at refresh rates even lower than what the display supports. While this seems like a good idea, there are problems with this approach. For example the cursor can only be updated when there is a content update, making it very sluggish because of the low rate of content updates even though the screen refreshes multiple times. This either requires a special KMS commit which does not result in an immediate page flip but ends up on the refresh cycles inserted by LFC, or implementing LFC in user space instead. Like with the refresh rate change smoothing talked about earlier, moving LFC to user space might be possible but also might require some help from the kernel to be able to time page flips well enough.
Wayland
For VRR to work, applications need to provide content updates on a surface in a semi-regular interval. GUI applications for example often only draw when something changed which makes the updates irregular, driving VRR to its minimum refresh rate until e.g. an animation is playing and VRR is ramping up the refresh rate over multiple refresh cycles. This results in choppy mouse cursor movements and animations for some time. GUI applications sometimes do provide semi-regular updates, e.g. during animations or video playback. Some applications, like games, always provide semi-regular updates.
Currently there is no1 Wayland protocol letting applications advertise that a surface works with VRR at a moment in time, or at all. There is no way for a compositor to automatically determine if an app or a surface is suitable for VRR as well. For wayland native applications a protocol to communicate this information could be created but there are a lot of applications out there which would work fine with VRR but will not get updated to support this protocol.
Maintaining a database similar to the one mentioned above, but for applications, was discussed, but there is no clear winner in how to do so, and where to store the data. Maintaining a list is cumbersome, and complicates the ability for applications to work with VRR on release, or on distributions with out of date databases. Another idea was a desktop file entry stating support, but this too has its downsides. All in all, there is no clear path forward in how to actually enable VRR for applications transparently without causing issues.
1. Except for a protocol proposal.
Wrap-up
The hackfest was a huge success! Not only was this a good opportunity to get everyone up to speed and learn about what everyone is doing, having people with different backgrounds in the discussions made it possible to discuss problems, ideas and solutions spanning all the way from clients over compositors, to drivers and hardware. Especially on the color and HDR topics we came up with good, actionable consensus and a clear path to where we want to go. For VRR we managed to pin-point the remaining issues and know which parts require more experimentation.
For GNOME, Color management, HDR and VRR are all topics that are being actively worked on, and the future is both bright and dynamic, not only when it comes to luminescence and color intensity, but also when it comes to the rate monitors present all these intense colors.
Dor Askayo who has been working on bringing VRR to GNOME attended part of the hackfest, and together we can hopefully bring experimental VRR to GNOME soon. There will be more work needed to iron out the overall experience, as covered above, but getting the fundamental building blocks in place is a critical first step.
For HDR, work has been going on to attach color state information to the scene graph, and at the hackfest Georges Basile Stavracas, Sebastian Wick and Jonas Ådahl sat down and sketched out a new Clutter rendering API that aims replace the current Clutter paint nodes API that is used in Mutter and GNOME Shell, which will make color transformations a first class citizen. We will initially focus on using shaders for everything, but down the road, the goal is to utilize the future color pipeline KMS uAPI for both performance and power consumption improvements.
We’d like to thank Red Hat for organizing and hosting the hackfest and for allowing us to work on these interesting topics, Red Hat and Collabora for sponsoring food and refreshments, and especially Carlos Soriano Sanchez and Tomas Popela for actually doing all the work making the event happen. It was great. Also thanks to Jakub Steiner for the illustration, and Carlos Soriano Sanchez for the photo from the hackfest.
For another great hackfest write-up, head over to Simon Ser’s blog post.


 GNOME Classic has been updated to use that built-in support instead of compiling a separate stylesheet on its own.
That means that the gnome-shell-sass repository is no longer needed by the gnome-shell-extensions project, and will therefore no longer be updated upstream.
If you are building your own theme from those sources, you will either have to get them from the gnome-shell repository yourself, or coordinate with other 3rd party theme authors to keep the subproject updated.
GNOME Classic has been updated to use that built-in support instead of compiling a separate stylesheet on its own.
That means that the gnome-shell-sass repository is no longer needed by the gnome-shell-extensions project, and will therefore no longer be updated upstream.
If you are building your own theme from those sources, you will either have to get them from the gnome-shell repository yourself, or coordinate with other 3rd party theme authors to keep the subproject updated.


