Introducing cldoc: a clang based documentation generator for C and C++

I would like to introduce my latest project that I have spent some time on developing in the last weeks. cldoc is a clang based documentation generator for C and C++. I started this project because I was not satisfied with the current state of documentation generators available for C++, and I thought it would be a fun little project (turns out it was fun, but not that little). What I was looking for is a generator which does not require any configuration or me writing a whole lot of special directives and instructions in my code. It should also be robust against complex C++ projects and not require me to tell it by hand how to interpret certain parts if its parser is too limited (hence using clang). Finally, I wanted a modern output, nice coverage reporting, integrated searching, simple deployment and integration.

I think cldoc addresses most (if not all) of these features in its current stage. Even if it’s still in the early stages of development, it’s pretty complete and seems to work well medium sized projects. I’m sure it’s not without bugs, but those can be fixed!

Features:

  • Uses clang to robustly parse even the most complex C++ projects without additional effort from the user.
  • Requires zero configuration.
  • Uses markdown for documentation formatting.
  • Generates an xml description of the API which can be reused for other purposes.
  • Uses a simple format for documenting your code.
  • Supports cross-referencing in documentation.
  • Generates a single file, javascript based web application to render the documentation.
  • Integrates seamlessly with your existing website.
  • Lightning fast client-side searching using a pregenerated search index.
  • Generates a formatted documentation coverage report and integrates it in the website.

I also wanted to detail here some of the development, since I always like to take the opportunity to use “modern” technology when starting a new project. The cldoc utility itself is a pretty plain and simple python application. Nothing particularly interesting about that. It uses the libclang python bindings to parse, scan and extract all necessary information. It then generates a set of xml pages describing fully the namespaces, types, methods, functions etc that were scanned. It also does some fancy cross-referencing and generates a suffix-array based search index in a json file. The search index is fetched on the client and traversed locally for very fast searching of documentation.

I had some more fun with the web application though. What I wanted was something with the following features:

  1. Easy to deploy
  2. Easy to integrate in an existing website
  3. Doing things on the client as much as possible
  4. Render the website from the generated xml
  5. Still allow exporting a static website instead of a dynamic one

As a result, the generated html file is really just a stub containing two containers. All the rest is done in javascript. For this project I went with coffeescript. I had played with it before, and  it certainly has it quirks. The fact is though it does make me a lot more productive than writing javascript directly. Generating html is still a pain, but it’s shorter to write. Besides that I obviously use jQuery (can’t do anything without really), and showdown (a javascript markdown parser).

What the webapp basically does is fetch the xml page using AJAX and format/render it on the page. It then uses html5 history to implement navigating the documentation without actually going to another page. Navigation around simply fetches more xml pages and renders them. It caches the fetched xml and rendered html so things end up being pretty fast. One other neat thing is the implementation of local search. When a search is initiated, the search database is fetched from the server. This database is basicly a suffix array encoded in json. Currently it’s quite basic, it only indexes symbols. Then, a html5 webworker is started which does the actual searching, so that the browser is not blocked during this process. For medium sized projects, I don’t think there is any real need for this, but at least now it will scale pretty well. Search results are then communicated back to the main javascript thread and rendered.

One nice side effect of this implementation is that it becomes very easy to integrate the documentation with an existing website in an unobtrusive way. An existing website can simply add two containers to their html and load the js app. The rest of the website will still function normally. The only real issue currently would be that if the original website also uses html5 history, they will currently conflict. This is something to resolve in the near future. Another “issue” is that it’s very hard to separate css styles completely, especially if not designed as such from the start. The cldoc stylesheet will only apply styles to the cldoc containers, but of course, the containing website will still have styles which can cascade into the cldoc containers. Anyway, not my problem I guess :)

With regard to the last bullet point of my little list above, the whole website can also be generated statically quite easily. This is not implemented at this time, but the same javascript web app can be run on node.js without too much effort. Each page can then be rendered using the exact same app (using jsDOM) and then exported as a html file.

Well, that’s it for now. Please have a look at it and let me know what you think. The project is completely hosted on github. Website: http://jessevdk.github.com/cldoc, source: https://github.com/jessevdk/cldoc.

Posted in Uncategorized | 20 Comments

Programming the Arduino Nano

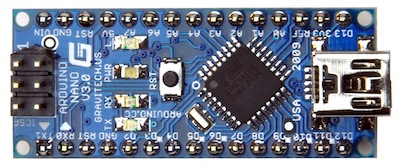
Recently I wanted to play a bit with the Arduino family of atmega microcontroller development board. I wanted a very simple to use and easy to develop for, small microcontroller board and went with the Arduino Nano v3.0.

It’s really pretty nifty, it’s only ~ 4-by-2 cm, has 14 digital I/O pins (6 can be used for PWM), 8 analog input pins and runs at 16 MHz. So I thought I would just order one to play with, wrong! I ordered it from DealExtreme because it’s really cheap, but apparently you should also expect it to have a delivery time of 2 months! I was quite patient and I actually almost forgot that I ordered it in the first place, but today I finally received the package with the Arduino Nano.

This evening I wanted to try it out, so I installed the Arduino software, the FTDI drivers and CrossPack AVR (yes this was on OS X, but it doesn’t matter). Next I launched the Arduino IDE thingie and I was ready to go! I started by loading the LED blinking example. I configured the right port for the USB connection, selected the Duemilanove w/ ATmega328 (which sounds nothing like “Nano”, I had to look that up) and pressed Upload…. error! I went off the obvious checklist, checked cables, ports and looked online if I selected the right board. Everything seemed fine, the board was powered and seemed to be working, but it was simply refusing to upload the program.

I initially thought there would be a lot of documentation on the Arduino board and how to work with them, but I found it quite hard to find a solution for my problem. The first clue came from the fact that various sources report that when you reset the board, the L led right next to the power led should be flashing a few times. This is an indication that the arduino bootloader (responsible for programming the atmega) is ready and listening for programming commands. My L led was not flashing at all. In fact I had not seen it turn on even once. I tried resetting and replugging the board, but no flashing LED. Ok, so maybe there is a reason why the board comes a bit cheap? As far as I know, from reading online, all Arduino boards normally come with the Arduino bootloader pre-flashed. That’s cool,  because it means you don’t need to have an external AVR/ISP programmer to program the damn thing.

At this point I was almost ready to give up. I looked for how to flash the bootloader but all I found was that you can use another Arduino board as an ISP programmer. It’s just that I don’t have another board. Then it hit me that a long time ago I did buy some kind of AVR programmer (for another project that never got off the ground). Yay! After some searching, I found my avrusb500. I was ready to start connecting the ICSP pins of the programmer to the Nano when I noticed that the ICSP header on my Nano was not actually soldered on the board. It was just provided with the board. I don’t know if that’s standard practice, but it seemed a bit weird to me. Time to take out the good’ol soldering iron! Man, did I not solder for 5 years or so. Personally, I think I did a reasonable job, but I will not show pictures of the result :)

So, header soldered and pins wired I was ready to go. The arduino software thingie allows you to burn the bootloader of your board through the UI. I tried that first (and why not) but it failed with very similar error messages. I thought it might not work since I did not see the avrusb500 in the list of programmers, but I tried anyway, thinking that since it was a stk500v2 compatible programmer. Time to turn to the interweb yet again. I found this tutorial which explains how to use avrdude directly to flash stuff through use of an external programmer, so I basicly followed that. For my Arduino Nano I used the following:

avrdude -p m328p -c stk500v2 -P /dev/cu.usbserial-A9006MNK -b115200 -v -e -U hfuse:w:0xDA:m -U lfuse:w:0xFF:m -U efuse:w:0x00:m
avrdude -p m328p -c stk500v2 -P /dev/cu.usbserial-A9006MNK -b115200 -v -e -U flash:w:/Applications/Arduino.app/Contents/Resources/Java/hardware/arduino/bootloaders/atmega/ATmegaBOOT_168_atmega328.hex -U lock:w:0x0F:m

Some of the flags are I guess quite obvious, -p selects the chip you want to program (the Nano has an ATmega328p), -c selects the type of programmer you have, -P specifies the device on which the programmer is connected, -b specifies the baudrate (might not be needed, specified it anyway), -e does a chip erase and the -U stuff specifies what to program. The first line basicly resets the fuse bits (I haven’t actually looked what these bits do, but it’s mentioned that these bits might have not been set correctly). The second line then programs the Arduino bootloader in the flash memory.

avrdude done.  Thank you.

Wow, something worked! And I’ll be damned, the Nano automatically resets after it has been flashed and for the first time in my time together with the Nano I see the beloved orange Led, flashing ever so friendly indicating the board is ready to be programmed! Victory! I quickly tested the blinking LED example and the Arduino software now successfully upload programs to the Nano. Let the LEDs flash!

Posted in Uncategorized | 6 Comments

Making sure go source passes gofmt before committing

Here is a nice little snippet to make sure your go code passes gofmt before committing. Put this in .git/hooks/pre-commit:

#!/bin/sh
set -e
d=`mktemp -d --tmpdir gofmtcheck-XXXXXX`
git checkout-index --prefix "$d/" -a
ret=`find . -regex '.*\.go$' -exec gofmt -d '{}' \;`
if [ ! -z "$ret" ]; then
    echo "Not all go files are well formatted:"
    echo
    echo "$ret"
    echo
    exit 1
fi

Extra points for the person who extends this to stage the suggestions from gofmt in the index on request!

Posted in Uncategorized | 1 Comment

Command line option parsing in go

There are a great many very cool things about go, but its builtin command line parsing package (flag) is not one of them. It lacks convenience, functionality and the generated help messages are plain ugly. Therefore I introduce: go-flags: https://github.com/jessevdk/go-flags. It has many features that the builtin package lacks and makes use of reflection to make it more convenient to specify command line options. It also has pretty printing of help messages :) go get it! (go get github.com/jessevdk/go-flags).

Example:

import(
    flags "github.com/jessevdk/go-flags"
    "os"
)

type Options struct {
    Verbose []bool `short:"v" long:"verbose" description:"Show verbose debug information"`
}

func main() {
     opts := new(Options)
     parser := flags.NewParser("testapp")

     parser.AddHelp(os.Stderr)
     parser.AddGroup(flags.NewGroup("Application Options", opts))
     
     args, err := parser.Parse(os.Args[1:])

     if err != nil {
         if err != flags.ErrHelp {
             parser.PrintError(os.Stderr, err)
         }

         os.Exit(1)
     }
}
Posted in Uncategorized | 5 Comments

Video editing WTF

So once in a while, say every half a year, I have the need to do some very simple video editing. So every half a year I try various video editing software using GNOME technologies to see if any of them can actually do anything close to trivial video editing (you can already guess the conclusion at the end of this post, no they can’t). This time I had a very simple problem. I just finished making a little screencast of the new version of gitg (which will be actually quite cool, more on that later). So after I went to live.gnome.org to find again what the shortcut was for the builtin GNOME shell screen recorder, I pressed Ctrl+Shift+Alt+R and happily recorded my desktop. So far so good, but I have a dual monitor and it recorded the full desktop. Ok that’s fine, so I will just launch the latest stable version of some video editor and crop my movie (I’m on Ubuntu precise, and that should be recent enough for any decent video editor).

You can’t argue that this is not just the simplest task to be accomplished. I thought I could do this:

  1. Launch video editor
  2. Import clip
  3. Crop movie by selecting a rectangle with the mouse
  4. Save/export/encode movie

Guess what, I was wrong! You can’t actually do that! I’ve tried Pitivi, Openshot, Kdenlive and Novacut. So lets have the verdict:

Pitivi

The first thing I tried was Pitivi. It’s always in my mind as the video editor that has the most potential. It uses all these cool technologies like gstreamer. Lets for a moment forget it doesn’t actually use gtk+3 and that the UI doesn’t look very polished (to me).

  1. Launch video editor
    This step when fine. I launched it and there it was, new empty project. Perfect!
  2. Import clip
    This also went perfectly fine. At this point I’m already very happy, it can import my clip. Many editors I tried before didn’t actually manage this step. Euphoria!
  3. Crop movie
    Ai! No can do mister! Of course I tried the  obvious thing. There is this Clip configuration panel, a bit weirdly located in the UI. You know, the standard size of the clip is 0.5 x 0.5, whatever that means. Then I can scale and position the movie with the mouse, but not crop it. There are actually 4 cropping controls, but you know, you have to enter the pixels to crop (and I don’t know that, I just made some random screencast). Also, very nice indeed, try to edit a number in those crop fields and press ‘Delete’ to delete a character. Oops! There goes your clip! Completely deleted. Even if I manage to crop the clip, I still need to manually resize the output size of the movie still (since I’m just modifying the clip). So no, Pitivi fail!


Openshot

I’m not really sure what openshot tries to be exactly, it reminds me of shotwell (is that from the same people). So I tried it and lets see:

  1. Launch video editor
    Woo, just works!
  2. Import clip
    Oops! No can do! It failed to import my clip and it hang the whole application. Besides this, why is the UI so glossy, I feel like I’m using KDE from a few years back, yegh! Openshot fail!


Kdenlive

I’ve used kdenlive before. It kinda worked and I did have a much better experience in terms of stability and that I could actually add some text overlay on my movie (which other editors can’t do, because that’s very difficult stuff to do). Of couse I don’t particularly enjoy using a KDE application, mostly because I’m not used to it. Lets see what I managed to do:

  1. Launch video editor
    Almost worked! The first time I launched it I got this dialog to follow some guided tour/wizard thingie. I was already quite puzzled by looking at the kdenlive logo, because it’s kind of like a film strip kite, but it casts a shadow like it’s a ball. Can’t compute that! Then I wanted just to skip the wizard, but the only buttons that were there are Next and Cancel. So since I didn’t want to do the wizard, I pressed Cancel. And of course, it quits the whole application! That seems like the right thing to do, I launched the application just to cancel it before it opens. So I launch it again and this time I click through the dialog and I’m in!
  2. Import clip
    This mostly works fine. It pops up an error dialog that my clip is somehow not compatible with any output profile, but I chose to ignore this because I can.
  3. Crop movie
    So I’m there and want to crop my movie. I added the Crop effect which was not too difficult to find, but then I got the same shit again. I have to input pixels, and it’s the weirdest thing. The entry box in kdenlive for this actually has ‘0pixels’ literally in it. So presumably I could type ‘2centimeter’ also, but who wants to do that? Never heard of a dropdown box? We are already on my 5th WTF moment of the day, and I’m only just getting started! So kdenlive, fail!


 Novacut

I’ve been trying to follow a bit the development of Novacut, meaning reading some blog posts and the occasional screencast. It seems to me like an interesting project with potential although there is the clear lack of a usable application even after some years of development now (as far as I know). In any case, lets give it a try.

  1. Launch video editor
    Fail! Oops. I should have actually added one bullet point before the launching phase, which is the Installing phase, because Novacut doesn’t actually install! I simply tried adding the Precise PPA for Novacut and installing it with apt-get. Turns out that dmedia doesn’t install correctly, failing to write into /home/.dmedia (and you know what dmedia, you can’t actually do that on my system which has /home mounted from NFS and local root does not have access to just write there). I was not very hopeful that Novacut would be able to solve my extremely difficult cropping problem, but I couldn’t even launch it…


So that’s it. None of these tools can help me to do what I want. I know there are some others out there like Blender. I actually liked blender quite well for editing videos, but it’s hard to get used to the workflow. You can also see how it’s clearly designed with the 3D movie making in mind and a bit less as a standalone non linear video editor. It suffers from the same problems as the other solutions. I have to manually specify the cropping dimensions and output resolution and it’s a mess.

Now, you might ask yourself how did I crop my movie in the end, and that’s a good question. I wanted to see what all the fuzz is about with this video editing. Is that really such a hard thing to do? So I grabbed python and gstreamer and made a quick tool (using gnonlin also) to crop my movie. And guess what, it’s not that hard! I could manage to implement what I needed in one hour! Not a few years, and still can’t do trivial things, but literally an hour! I didn’t even know gstreamer before. I really, really don’t know what everyone else is doing, but guys, just make this thing already!

Posted in Uncategorized | 29 Comments

Hiding git ignored files

Some projects that I work with tend to autogenerate a lot of files, autotools projects in particular are very good at that. Most gnome software correctly adds all the autogenerated files to .gitignore files automatically, so git nicely ignores them and you don’t get distracted from the files that actually matter. I like that. What I don’t like is that when I go in the terminal and type ‘ls’ I see all the cruft again. It would be nice if I could hide all gitignored files from ls, and I can! Put the following script somewhere (e.g. ~/.local/bin/hidefiles.sh).

#!/bin/bash
# Hide all files specified in the file .lshide, if it exist if test -f .lshide;
then
 cat .lshide 2>/dev/null | while read line; do
 echo -n "--hide $line "
 done
fi
# Hide all files which git ignores git ls-files --others -i --exclude-standard 2>/dev/null | grep -v / | while read line; do  echo -n "--hide $line "; done

And in your .bashrc add a line like:

alias ls='ls --color $(hidefiles.sh)'

Me no see stupid files no more!

Posted in Uncategorized | 1 Comment

Avahi on fedora

I have been frustrated by avahi apparently not working properly on Fedora. Turned out I just had to disable the firewall… One more thing fedora could polish…

Posted in Uncategorized | 15 Comments

gedit 3.2.6 released for OS X (native)

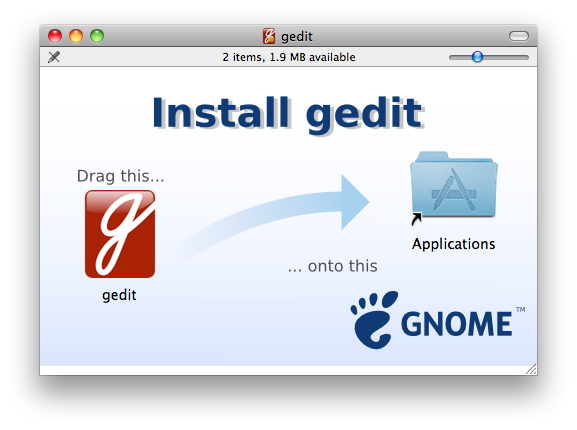
As you might know, gedit has been ported a while ago to run natively on OS X (and on windows for that matter). Lately, the OS X port has been lacking updates. This is mostly due to the huge changes that were introduced in 3.x in much of the stack, and a lack of time. However, over the last few weeks, I worked on and off to get a proper OS X application released for our latest gedit (3.2). The installation is a simple drag and drop of the application bundle (as expected).

Improvements

With respect to the previous release (apart from having all the 3.2 goodness), the integration with OS X has been improved. For example, we now ship binaries for Tiger, Leopard and Snow Leopard, integrated native apple spell checking, fixed issues with translations and fixed various issues with keybindings and the global menu (which annoyed a lot of people in 2.32 using different keyboard layouts).

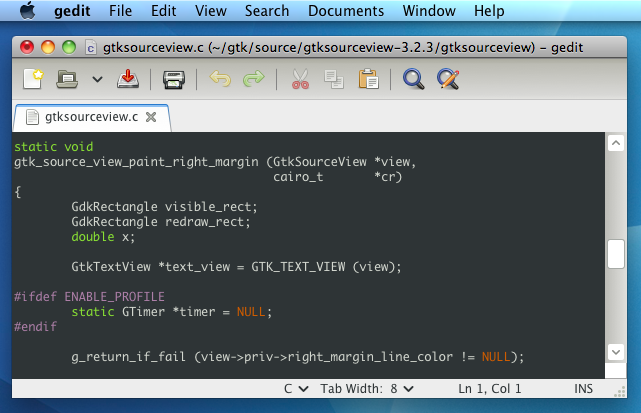
After installing gedit and launching it, you should see something like the following:

Integration

As you can see, we have spent some effort (just as previously) to integrate gedit in OS X natively. Most of this effort is not spent by gedit, but by a small group of people doing amazing work on the quartz backend of gtk+ and on mac application integration (yes, that’s you John Ralls). I really want to thank everyone spending a lot of effort to integrate gtk+ (quartz backend) and GNOME applications (mac integration) into OS X. Without these guys a gedit port for OS X would simply not exist.

Build process

Whereas gedit for OS X was previously built by me in mixed environment of jhbuild and custom checkouts with various patches (pushed into github), this time I decided to handle things more properly and integrate the whole build process in the gedit tree as a jhbuild moduleset and accompanying patches. This also solves the issue with the previous binary for which we did not strictly adhere to the GPL, in the sense that it was almost impossible to recreate the binaries from source. This time, you can simply follow the instructions in the osx/README file and everything should be built for you the same way I built it on my machine. This meant I started basicly from scratch, which is also why it took quite some time to get everything working as expected.

Porting applications

I think that gedit is a great application showing how you can port an application using a lot of GNOME/freedesktop technologies to another platform (hopefully we will have a 3.2 for windows soon too, poke nacho ;)). gedit uses dbus, libpeas (gobject-introspection), plugins (C and python), printing and more. All of this works (or at least should work :)) on OS X, and we are getting more native with each release. If you are interested in porting your application to OS X, please feel free to have a look on how we do it for gedit.

Bugs

I expected a series of bugs and releases for gedit 3.2.6. On the one hand a lot of software has seen a lot of development, none of which were tested on platforms like OS X (or windows). On the other hand, I’m still expecting some issues resulting from building binaries on one machine for different distributions. For example, the first release was quite a disaster, crashing on launch due to some issues with iconv and a set of hard coded paths (which worked on my machine, but obviously not on others :)). Anyway, I would like to invite anyone running OS X to try and install gedit 3.2.6 and report any issues in gnome bugzilla!

Posted in gedit | 37 Comments

gedit code assistance plugin

Just a quick update on the gedit code assistance plugin (see this previous post). We moved development from github to gnome infrastructure. You can find the repository here: http://git.gnome.org/browse/gedit-code-assistance. There is also a first release of the plugin available on the gnome servers (http://ftp.gnome.org/pub/gnome/sources/gedit-code-assistance/0.1/).

Don’t expect it to be very stable. It should work, but it is currently still somewhat prone to crash. Since it is written in vala (thus C) this unfortunately means that it will crash gedit as well. So use on your own risk :). For those running fedora 16, packages will be available soon.

I will try to work on this on and off if I find the time, feel free to pitch in though!

Posted in gedit | Leave a comment

Make yum faster

Pleeeaaaaase… It’s not acceptable, really…

Note: This is a rant…

Posted in Uncategorized | 51 Comments