tl;dr: You need an application icon of at least 64×64 in size

At the moment the appstream-builder in Fedora requires a 48x48px application icon to be included in the AppStream metadata. I’m sure it’s no surprise that 48×48 padded to 64×64 and then interpolated up to 128×128 (for HiDPI screens) looks pretty bad. For Fedora 28 and higher I’m going to raise the minimum icon size to 64×64 which I hope people realize is actually a really low bar.

For Fedora 29 I think 128×128 would be a good minimum. From my point of view the best applications in the software center already ship large icons, and the applications with tiny icons are usually of poor quality, buggy, or just unmaintained upstream. I think it’s fine for a software center to do the equivalent of “you must be this high to ride” and if we didn’t keep asking more of upstreams we’d still be in a world with no translations, no release information and no screenshots.

Also note, applications don’t have to do this; it’s not like they’re going to fall out of the Fedora — they’re still installable on the CLI using DNF, although I agree this will impact the number of people installing and using a specific application. Comments welcome.

Do you have dmidecode 42?

Dear Lazyweb, I need your help. Does anyone have a newish server system (it’s not going to work on Laptops) that has any output from sudo dmidecode | grep "DMI type 42"? If you do, can you tar up the contents of /sys/firmware/dmi/tables and send it to me via email. If I can get this code working then I’ll have another more exciting blog post coming up. Thanks!

Shipping PKCS7 signed metadata and firmware

Over the last few days I’ve merged in the PKCS7 support into fwupd as an optional feature. I’ve done this for a few reasons:

  • Some distributors of fwupd were disabling the GPG code as it’s GPLv3, and I didn’t feel comfortable saying just use no signatures
  • Trusted vendors want to ship testing versions of firmware directly to users without first uploading to the LVFS.
  • Some firmware is inherently internal use only and needs to be signed using existing cryptographic hardware.
  • The gpgme code scares me.

Did you know GPGME is a library based around screen scraping the output of the gpg2 binary? When you perform an action using the libgpgme APIs you’re literally injecting a string into a pipe and waiting for it to return. You can’t even use libgcrypt (the thing that gpg2 uses) directly as it’s way too low level and doesn’t have any sane abstractions or helpers to read or write packaged data. I don’t want to learn LISP S-Expressions (yes, really) and manually deal with packing data just to do vanilla X509 crypto.

Although the LVFS instance only signs files and metadata with GPG at the moment I’ve added the missing bits into python-gnutls so it could become possible in the future. If this is accepted then I think it would be fine to support both GPG and PKCS7 on the server.

One of the temptations for X509 signing would be to get a certificate from an existing CA and then sign the firmware with that. From my point of view that would be bad, as any firmware signed by any certificate in my system trust store to be marked as valid, when really all I want to do is check for a specific (or a few) certificates that I know are going to be providing certified working firmware. Although I could achieve this to some degree with certificate pinning, it’s not so easy if there is a hierarchical trust relationship or anything more complicated than a simple 1:1 relationship.

So this is possible I’ve created a LVFS CA certificate, and also a server certificate for the specific instance I’m running on OpenShift. I’ve signed the instance certificate with the CA certificate and am creating detached signatures with an embedded (signed-by-the-CA) server certificate. This seems to work well, and means we can issue other certificates (or CRLs) if the server ever moves or the trust is compromised in some way.

So, tl;dr: (should have been at the top of this page…) if you see a /etc/pki/fwupd/LVFS-CA.pem appear on your system in the next release you can relax. Comments, especially from crypto experts welcome. Thanks!

Forward only binary patching

A couple of weeks ago I’ve added some new functionality to dfu-tool which is shipped in fwupd. The dfu-tool utility (via libdfu) now has the ability to forward-patch binary files, somewhat like bsdiff does. To do this it compares the old firmware with the new firmware, finding blocks of data that are different and storing the new content and the offset in a .dfup file. The reason for storing the new content rather than a binary diff (like bsdiff) is that you can remove non-free and non-redistributable code without actually including it in the diff file (which, you might be doing if you’re neutering/removing the Intel Management Engine). This does make reversing the binary patch process impossible, but this isn’t a huge problem if we keep the old file around for downgrades.

$ sha1sum ~/firmware-releases/colorhug-1.1.6.bin
955386767a0108faf104f74985ccbefcd2f6050c  ~/firmware-releases/colorhug-1.1.6.bin

$ sha1sum ~/firmware-releases/colorhug-1.1.7.bin
9b7dbb24dbcae85fbbf045e7ff401fb3f57ddf31  ~/firmware-releases/colorhug-1.1.7.bin

$  dfu-tool patch-create ~/firmware-releases/colorhug-1.1.6.bin
~/firmware-releases/colorhug-1.1.7.bin colorhug-1_1_6-to-1_1_7.dfup
-v
Dfu-DEBUG: binary growing from: 19200 to 19712
Dfu-DEBUG: add chunk @0x0000 (len 3)
Dfu-DEBUG: add chunk @0x0058 (len 2)
Dfu-DEBUG: add chunk @0x023a (len 19142)
Dfu-DEBUG: blob size is 19231

$ dfu-tool patch-dump colorhug-1_1_6-to-1_1_7.dfup
checksum-old: 955386767a0108faf104f74985ccbefcd2f6050c
checksum-new: 9b7dbb24dbcae85fbbf045e7ff401fb3f57ddf31
chunk #00     0x0000, length 3
chunk #01     0x0058, length 2
chunk #02     0x023a, length 19142

$ dfu-tool patch-apply ~/firmware-releases/colorhug-1.1.6.bin
colorhug-1_1_6-to-1_1_7.dfup new.bin -v
Dfu-DEBUG: binary growing from: 19200 to 19712
Dfu-DEBUG: applying chunk 1/3 @0x0000 (length 3)
Dfu-DEBUG: applying chunk 2/3 @0x0058 (length 2)
Dfu-DEBUG: applying chunk 3/3 @0x023a (length 19142)

$ sha1sum new.bin
9b7dbb24dbcae85fbbf045e7ff401fb3f57ddf31  new.bin

Perhaps a bad example here, the compiler changed between 1.1.6 and 1.1.7 so lots of internal offsets changed and there’s no partitions inside the image; but you get the idea. For some system firmware where only a BIOS default was changed this can reduce the size of the download from megabytes to tens of bytes; the largest thing in the .cab then becomes the XML metadata (which also compresses rather well). Of course in this case you can also use bsdiff if it’s already installed — I’ve not yet decided if it makes sense for fwupd to runtime require tools like bspatch as these could be needed by the firmware builder bubblewrap functionality, or if it could just be included as statically linked binaries in the .cab file. Comments welcome.

Building local firmware in fwupd

Most of the time when you’re distributing firmware you have permission from the OEM or ODM to redistribute the non-free parts of the system firmware, e.g. Dell can re-distribute the proprietary Intel Management Engine as part as the firmware capsule that gets flashed onto the hardware. In some cases that’s not possible, for example for smaller vendors or people selling OpenHardware. In this case I’m trying to help Purism distribute firmware updates for their hardware, and they’re only able to redistribute the Free Software coreboot part of the firmware. For reasons (IFD, FMAP and CBFS…) you need to actually build the target firmware on the system you’re deploying onto, where build means executing random low-level tools to push random blobs of specific sizes into specific unnecessarily complex partition formats rather than actually compiling .c into executable code. The current solution is a manually updated interactive bash script which isn’t awesome from a user-experience or security point of view. The other things vendors have asked for in the past is a way to “dd” a few bytes of randomness into the target image at a specific offset and also to copy the old network MAC address into the new firmware. I figured fwupd should probably handle this somewhat better than a random bash script running as root on your live system.

I’ve created a branch that allows you to ship an archive (I’m suggesting using the simple .tar format, as the .cab file will be compressed already) within the .cab file as the main “release”. Within the .tar archive will be a startup.sh file and all the utilities or scripts needed to run the build operation, statically linked if required. At firmware deploy time fwupd will explode the tar file into a newly-created temp directory, create a bubblewrap container which has no network and limited file-system access and then run the startup.sh script. Once complete, fwupd will copy out just the firmware.bin file and then destroy the bubblewrap container and the temporary directory. I’ve not yet worked out how to inject some things into the jail, for instance we sometimes need the old system firmware blob if we’re applying a bsdiff rather than just replacing all the data. I’m tempted to just mount /var/lib/fwupd/builder/ into the jail as read-only and then get the fwupd plugin to create the required data there at startup before the jail gets created.

Not awesome, but more reliable and secure than just running random bash files as root. Comments welcome.

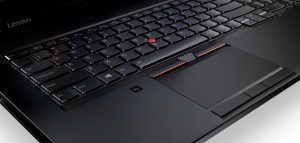
The embedded color sensor in the ThinkPad P70

Last week at GUADEC Christian gave me a huge laptop to borrow with the request to “make the color sensor work in Fedora”.

This thing is a beast: the display is 17″ and 4K resolution, two GPUs, two hard-disks and a battery. It did not fit in my laptop bag, only just squeezed in my suitcase, and weighed a metric ton. I was pretty confident I could make the color sensor work, as I previously reverse engineered the Huey and we had existing support for the embedded Huey as found in the W700 ThinkPad. Just like the W700, the sensor is located in the palm-rest, and so the laptop lid needs to be shut (and the display kept on) when showing calibration patches. I told Christian it should be a case of adding an unlock code, another PID to the udev rules and then we should be good. How wrong could I be!

Lets look on what’s shipped by default with the Laptop. In Microsoft Windows 10, the Pantone application prompts you to recalibrate your display once per week. When you manually run the calibration wizard, it asks you to choose your display temperature and also the gamma value for the curve, defaulting to D65 whitepoint and 2.2 gamma.

It then asks you to shut the lid and uses a combination of flashing the Thinkpad red-dot LED and using sound effects to show you the progress of the calibration. By opening the lid a tiny fraction we can see the pattern is as follows:

  1. Black offset
  2. Red primary
  3. Green primary
  4. Blue primary
  5. Red gamma ramp, 7 steps
  6. Green gamma ramp, 7 steps
  7. Blue gamma ramp, 7 steps

The USB traffic was intercepted for two runs, and dumped to CSV files. These were further post-processed by a python script to filter down and to help understand the protocol used.

From completely reverse engineering the protocol, we can show that the Pantone X-Rite sensor in the palm-rest of the P70 is nothing more than a brightness sensor with a display-specific primary correction matrix. You can’t actually get a RGB or XYZ color out of the sensor, the only useful thing that it can do is linearize the VCGT ramps, and with only 7 measurements for each channel I’m surprised it can do anything very useful at all.

Is it not known how the sensor and calibration tool can create an ICC profile without hardcoding the primaries in the sensor EEPROM itself, and this is probably what happens here. Whilst the sensor would be able to linearize a display where the hardware-corrected backlight suddenly becomes non-linear, it is completely unable to return a set of display primaries. Said another way, the sensor can’t tell the difference between a 100% red and 100% blue patch.

These findings also correlate with the findings from AnandTech who say that calibrating the display with the embedded sensor actually makes the LCD worse when measuring saturation accuracy, whitepoint and grayscale accuracy.

If you’re serious about color calibration, please don’t use the built-in sensor, and if you are buying a top-end Xeon system save a few dollars and don’t bother with the color sensor. For $20 extra Pantone could have used a calibrated XYZ one-piece sensor from MAZeT, which would have given them a true “color sensor” that could have sampled much quicker and with true XYZ-adapted readings.

The irony is of course, you can’t even use the HueyCOLOR sensor as a ambient light sensor. As the device is in the palm-rest, you frequently cover it with your hand — and any backlight adjustment would feed back into the sensor causing the backlight to flash.

If you actually want to make a colord sensor driver for this hardware we’d need to extend the capability bitfield to show it’s only capable of brightness, and also continue parsing the EEPROM to find the spectral sensitivities, but that’s not something that I think is useful to do.

If you want to know about the low-level protocol used and more information about the device, I’ve written some notes which document the protocol used. Disappointing.

Using a reverse-style application IDs in your application

Many upstream applications are changing their application ID from something like boxes.desktop to org.gnome.Boxes.desktop so they can be packaged as flatpaks. Where upstream doesn’t yet have this, we rewrite the desktop file in flatpak-builder so it can be packaged and deployed safely. However, more and more upstreams are building flatpaks and thus more and more apps seem to be changing desktop ID every month.

This poses a problem for the ODRS review system: When we query using the reverse-DNS-style we don’t match the hundreds of reviews submitted against the old ID. This makes the application look bad, and users file bugs against GNOME Software saying it’s broken either because “no reviews are showing up”, or that “a previously 5 star application with 30 reviews is now 2 stars with just one review”.

This also happens when companies get taken over, or when the little toy project moves from a hosting site to a proper home, e.g. com.github.FeedReader to org.gnome.FeedReader.

So, what can we do? AppData (again) to the rescue. Adding the following XML to the file allows new versions of gnome-software to do the right thing; we then get reviews and ratings for both the old and new names.

  <provides>
    <id>old-name.desktop</id>
  </provides>

If you renamed your application in the last couple of years, I’d love you to help out and add this tag to your .appdata.xml file – in all supported branches if possible. I can’t promise cookies, but your application will have more reviews and that can’t be a bad thing. Thanks!

fwupd 0.9.5 and new goodies

I’ve just released the latest version of fwupd from the development branch. 0.9.5 has the usual bug fixes, translation updates and polish, but also provides two new goodies:

We now support for updating Logitech peripherals over a protocol helpfully called DFU, which is not to be confused with the standard USB DFU protocol. This allows us to update devices such as the K780 keyboard over the Unifying layer. Although it takes a few minutes to complete, it works reliably and allows us to finally fix the receiver end of the MouseJack vulnerability. Once the user has installed the Unifying dongle update and in some cases a peripheral update they are secure again. The K780 update is in “testing” on the LVFS if anyone wants to try this straight away. You should send huge thanks to Logitech as they have provided me access to the documentation, hardware and firmware engineers required to make this possible. All the released Logitech firmwares will move to the “stable” state once this new fwupd release has hit Fedora updates-testing.

The other main feature in this release is the Intel Management Engine plugin. The IME is the source of the recent AMT vulnerability that affects the “ME blob” that is included in basically every consumer PC sold in the last decade. Although we can’t flash the ME blob using this plugin, it certainly makes it easy to query the hardware and find out if you are running a very insecure system. This plugin is more that inspired by the AMT status checker for Linux by Matthew Garrett, so you should send him cookies, not me. Actually updating the ME blob would be achieved using the standard UEFI UpdateCapsule, but it would mean your vendor does have to upload a new system firmware to the LVFS. If you’ve got a Dell you are loved, other vendors are either still testing this and don’t want to go public yet (you know who you are) or don’t care about their users. If you still don’t know what the LVFS is about, see the whitepaper and then send me an email. Anyway, obligatory technical-looking output:

$ fwupdmgr get-devices
  Guid:                 2800f812-b7b4-2d4b-aca8-46e0ff65814c
  DeviceID:             /dev/mei
  DisplayName:          Intel AMT (unprovisioned)
  Plugin:               amt
  Flags:                internal
  Version:              9.5.30
  VersionBootloader:    9.5.30

If the AMT device is present, and the display name has provisioned and the AMT version is between 6.0.x and 11.2.x, and you have not upgraded your firmware, you are vulnerable to CVE-2017-5689 and you should disable AMT in your system firmware. I’ve not yet decided if this should bubble up to the session in the form of a notification bubble, ideas welcome.

The new release is currently building for Fedora, and might be available in other distributions at some point.

Updating Logitech Hardware on Linux

Just over a year ago Bastille security announced the discovery of a suite of vulnerabilities commonly referred to as MouseJack. The vulnerabilities targeted the low level wireless protocol used by Unifying devices, typically mice and keyboards. The issues included the ability to:

  • Pair new devices with the receiver without user prompting
  • Inject keystrokes, covering various scenarios
  • Inject raw HID commands

This gave an attacker with $15 of hardware the ability to basically take over remote PCs within wireless range, which could be up to 50m away. This makes sitting in a café quite a dangerous thing to do when any affected hardware is inserted, which for the unifying dongle is quite likely as it’s explicitly designed to remain in an empty USB socket. The main manufacturer of these devices is Logitech, but the hardware is also supplied to other OEMs such as Amazon, Microsoft, Lenovo and Dell where they are re-badged or renamed. I don’t think anybody knows the real total, but by my estimations there must be tens of millions of affected-and-unpatched devices being used every day.

Shortly after this announcement, Logitech prepared an update which mitigated some of these problems, and then again a few weeks later prepared another update that worked around and fixed the various issues exploited by the malicious firmware. Officially, Linux isn’t a supported OS by Logitech, so to apply the update you had to start Windows, and download and manually deploy a firmware update. For people running Linux exclusively, like a lot of Red Hat’s customers, the only choice was to stop using the Unifying products or try and find a Windows computer that could be borrowed for doing the update. Some devices are plugged in behind racks of computers forgotten, or even hot-glued into place and unremovable.

The MouseJack team provided a firmware blob that could be deployed onto the dongle itself, and didn’t need extra hardware for programming. Given the cat was now “out of the bag” on how to flash random firmware to this proprietary hardware I asked Logitech if they would provide some official documentation so I could flash the new secure firmware onto the hardware using fwupd. After a few weeks of back-and-forth communication, Logitech released to me a pile of documentation on how to control the bootloader on the various different types of Unifying receiver, and the other peripherals that were affected by the security issues. They even sent me some of the affected hardware, and gave me access to the engineering team that was dealing with this issue.

It took a couple of weeks, but I rewrote the previously-reverse-engineered plugin in fwupd with the new documentation so that it could update the hardware exactly according to the official documentation. This now matches 100% the byte-by-byte packet log compared to the Windows update tool. Magic numbers out, #define’s in. FIXMEs out, detailed comments in. Also, using the documentation means we can report sensible and useful error messages. There were other nuances that were missed in the RE’d plugin (for example, making sure the specified firmware was valid for the hardware revision), and with the blessing of Logitech I merged the branch to master. I then persuaded Logitech to upload the firmware somewhere public, rather than having to extract the firmware out of the .exe files from the Windows update. I then opened up a pull request to add the .metainfo.xml files which allow us to build a .cab package for the Linux Vendor Firmware Service. I created a secure account for Logitech and this allowed them to upload the firmware into a special testing branch.

This is where you come in. If you would like to test this, you first need a version of fwupd that is able to talk to the hardware. For this, you need fwupd-0.9.2-2.fc26 or newer. You can get this from Koji for Fedora.

Then you need to change the DownloadURI in /etc/fwupd.conf to the testing channel. The URI is in the comment in the config file, so no need to list it here. Then reboot, or restart fwupd. Then you can either just launch GNOME Software and click Install, or you can type on the command line fwupdmgr refresh && fwupdmgr update — soon we’ll be able to update more kinds of Logitech hardware.

If this worked, or you had any problems please leave a comment on this blog or send me an email. Thanks should go to Red Hat for letting me work on this for so long, and even more thanks to Logitech to making it possible.

Recently released applications in GNOME Software

By popular request, there is now a list of recently updated applications in the gnome-software overview page.

Upstream applications have to do two things to be featured here:

  1. Have an upstream release within the last 2 months (will be reduced as the number of apps increases)
  2. Have upstream release notes in the AppData file

Quite a few applications from XFCE, GNOME and KDE have already been including <release> tags and this visibility should hopefully encourage other projects to do the same. As a small reminder, the release notes should be small, and easily understandable by end users. You can see lots of examples in the GNOME Software AppData file. Any questions, please just email me or leave comments here. Thanks!