For the last few days I’ve been working on the ODRS, the review server used by GNOME Software and other open source software centers. I had to do a lot of work initially to get the codebase up to modern standards, but now it has unit tests (86% coverage!), full CI and is using the latest versions of everything. All this refactoring allowed me to add some extra new features we’ve needed for a while.
The first feature changes how we do moderation. The way the ODRS works means that any unauthenticated user can mark a review for moderation for any reason in just one click. This means that it’s no longer shown to any other user and requires a moderator to perform one of three actions:
- Decide it’s okay, and clear the reported counter back to zero
- Decide it’s not very good, and either modify it or delete it
- Decide it’s spam or in any way hateful, and delete all the reviews from the submitter, adding them to the user blocklist
For the last few years it’s been mostly me deciding on the ~3k marked-for-moderatation reviews with the help of Google Translate. Let me tell you, after all that my threshold for dealing with internet trolls is super low. There are already over 60 blocked users on the ODRS, although they’ll never really know they are shouting into /dev/null…
One change I’ve made here is that it now takes two “reports” of a review before it needs moderation; the logic being that a lot of reports seem accidental and a really bad review is already normally reported by multiple people in the few days after it’s been posted. The other change is that we now have a locale-specific “bad word list” that submitted reports are checked against at submission time. If they are flagged, the moderator has to decide on the action before it’s ever shown to other users. This has already correctly flagged 5 reviews in the couple of days since it was deployed. If you contributed to the spreadsheet with “bad words” for your country I’m very grateful. That bad word list will be available as a JSON dump on the ODRS on Monday in case it’s useful to other people. I fully expect it’ll grow and change over time.

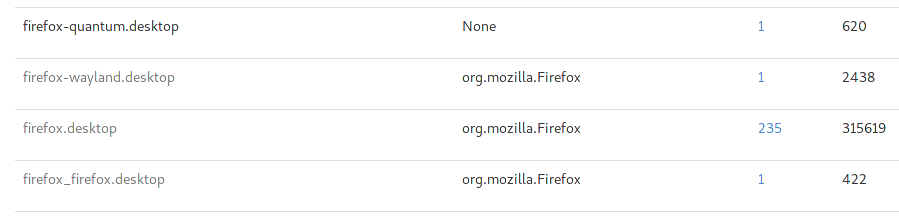
The other big change is dealing with different application IDs. Over the last decade some applications have moved from “launchable-style” inkscape.desktop IDs to AppStream-style IDs like org.inkscape.Inkscape.desktop and are even reported in different forms, e.g. the Flathub-inspired org.inkscape.Inkscape and the Snappy io.snapcraft.inkscape-tIrcA87dMWthuDORCCRU0VpidK5SBVOc. Until today a review submitted against the old desktop ID wouldn’t match for the Flatpak one, and now it does. The same happens when we get the star ratings which means that apps that change ID don’t start with a clean slate and inherit all the positivity of the old version. Of course, the usual per-request ordering and filtering is done, so older versions than the one requested might be shown lower than newer versions anyway.
This is also your monthly reminder to use <provides><id>oldname.desktop</id></provides> in your metainfo.xml file if you change your desktop ID. That includes you Flathub and Snapcraft maintainers too. If you do that client side then you at least probably get the right reviews if the software center does the right thing, but doing it server side as well makes really sure you’re getting the reviews and ratings you want in all cases.
If all this sounds interesting, and you’d like to know more about the ODRS development, or would like to be a moderator for your language, please join the mailing list and I’ll post there next week when I’ve made the moderator experience nicer than it is now. It’ll also be the place to request help, guidance and also ask for new features.