Vernor Vinge using GIMP

Following the link from Luis’ blog, I discovered the mini-site about Vernor Vinge‘s novel “Rainbows End” (winner of the 2007 Hugo Award).

Besides a full text version of the book, that mini-site also contains some simple illustrations made by the author.  Looking at the bottom of the “Outer” image, I saw the following copyright notice: “Vernor Vinge, 2006 (Using the GIMP)”

This is not entirely surprising, considering that he is a friend of Free Software and even a member of the award committee for the FSF Award for the Advancement of Free Software. But still, it is nice to see a well-known SF author who is also a GIMP user. As a GIMP developer and SF fan, this made me happy.

I doubt that Vernor Vinge will ever read this blog, but for the next illustrations I would recommend using Inkscape for the line art and text. This would lead to better results than using GIMP alone. 😉

Cyclomatic complexity in GIMP code

After reading Xan’s article The Cyclomatic Horror From Outer Space analyzing the complexity of some GTK functions, I was curious and I wanted to run the same test in the GIMP source tree in order to see what parts of the code would be the hardest to test. This test is very simple and can be summarized as counting the number of decision points in every function in a program (so you get an idea of the number of possible code paths).

I did as suggested and I started with “apt-get install pmccabe“, followed by “pmccabe app/*/*.c | sort -nr | head -10” to get the 10 functions with the highest (worst) results. This gave me the following table:

Cyclomatic complexity Lines of code Function name
113 892 gimp_display_shell_canvas_tool_events
100 123 layers_actions_update
69 416 update_box_rgb
61 359 border_region
60 445 siox_foreground_extract
56 452 render_image_tile_fault
54 327 combine_inten_a_and_inten_a_pixels
53 194 gimp_plug_in_procedure_add_menu_path
47 275 gimp_drawable_offset
46 240 gimp_vector_tool_oper_update

According to the CMU page on cyclomatic complexity, numbers between 21 and 50 reveal a “complex, high risk program” and numbers above 50 only occur in an “untestable program (very high risk)“.

What does this mean for GIMP? Not much. But if you touch one of these functions, please be careful… you might break things and it will be very hard to find where the bugs are hiding in that code.

Mapping JPEG compression levels between Adobe Photoshop and GIMP 2.4

Some GIMP users who follow tutorials written for Adobe Photoshop are sometimes confused when they see statements like “Save your image using quality 8 or 9 in order to get good results” because this obviously does not match the scale from 0 to 100 used by GIMP (and other software based on the IJG JPEG library).

While working on some improvements for GIMP’s JPEG plug-in, I investigated the compression levels used by various programs and cameras. The analysis of several sample images allowed me to build the following mapping table (slightly updated since I posted a similar message to the gimp-web mailing list in August):

  • Photoshop quality 12 <= GIMP quality 98, subsampling 1×1,1×1,1×1
  • Photoshop quality 11 <= GIMP quality 96, subsampling 1×1,1×1,1×1
  • Photoshop quality 10 <= GIMP quality 93, subsampling 1×1,1×1,1×1
  • Photoshop quality 9 <= GIMP quality 92, subsampling 1×1,1×1,1×1
  • Photoshop quality 8 <= GIMP quality 91, subsampling 1×1,1×1,1×1
  • Photoshop quality 7 <= GIMP quality 90, subsampling 1×1,1×1,1×1
  • Photoshop quality 6 <= GIMP quality 91, subsampling 2×2,1×1,1×1
  • Photoshop quality 5 <= GIMP quality 90, subsampling 2×2,1×1,1×1
  • Photoshop quality 4 <= GIMP quality 89, subsampling 2×2,1×1,1×1
  • Photoshop quality 3 <= GIMP quality 89, subsampling 2×2,1×1,1×1
  • Photoshop quality 2 <= GIMP quality 87, subsampling 2×2,1×1,1×1
  • Photoshop quality 1 <= GIMP quality 86, subsampling 2×2,1×1,1×1
  • Photoshop quality 0 <= GIMP quality 85, subsampling 2×2,1×1,1×1

The quality settings in Adobe Photoshop include not only the compression factor that influences the quantization tables, but also the type of chroma subsampling performed on the image. The higher quality levels use no subsampling, while the lower ones use 2×2 subsampling. The strange transition between Photoshop quality 6 and 7 (quality 6 having a higher equivalent IJG quality than 7) can be explained by the difference in subsampling: since quality 6 has less color information to encode, the size of the file will be smaller anyway, even if more coefficients are preserved in the quantization step.

You may also be surprised by the fact that the default GIMP JPEG quality level (85) matches the lowest quality offered by Photoshop: quality 0. This makes sense if you consider that the default “Save” offered by Photoshop is designed for high-quality images, so the losses should be minimized. But if you want to save images for web publishing, then Photoshop has a separate “Save for Web” feature that can save images using lower quality levels:

  • Photoshop save for web 100 <= GIMP quality 98, subsampling 1×1,1×1,1×1
  • Photoshop save for web 90 <= GIMP quality 96, subsampling 1×1,1×1,1×1
  • Photoshop save for web 80 <= GIMP quality 93, subsampling 1×1,1×1,1×1
  • Photoshop save for web 70 <= GIMP quality 90, subsampling 1×1,1×1,1×1
  • Photoshop save for web 60 <= GIMP quality 85, subsampling 1×1,1×1,1×1
  • Photoshop save for web 50 <= GIMP quality 86, subsampling 2×2,1×1,1×1
  • Photoshop save for web 40 <= GIMP quality 79, subsampling 2×2,1×1,1×1
  • Photoshop save for web 30 <= GIMP quality 74, subsampling 2×2,1×1,1×1
  • Photoshop save for web 20 <= GIMP quality 70, subsampling 2×2,1×1,1×1
  • Photoshop save for web 10 <= GIMP quality 60, subsampling 2×2,1×1,1×1

This mapping between Photoshop and GIMP quality levels for JPEG is not exact and is intentionally pessimistic for GIMP. There is some safety margin, so it is possible to decrease the GIMP quality level a bit and still get a file that is as good as the one saved by Photoshop.

Reminder: if you think that you will need to re-edit an image later, then you should never save it only in JPEG format. Always keep a copy in XCF format (GIMP’s native file format) so that you can edit it without losing any additional information.

Another reminder: using a JPEG quality level below 50 or above 98 is not a good idea. Saving a JPEG image using quality 99 or 100 is just a waste of disk space. You should use a different file format instead (such as PNG or TIFF). And below quality 50, you lose so much that it would be better to rescale your image and use a lower resolution before trying to compress it further.

Print shops and posters

At the end of last year, my wife Isabelle asked me if I could create some postcards for the association she works for. The idea was to have something that can serve both as a greeting card for the new year and an indication that they have recently moved into new offices. After a couple of iterations with POV-Ray and GIMP, I eventually managed to create something that she and her colleagues were happy with. I created a winter scene showing their front door (modelled from photos), some cardboard boxes in front of it and some trees in the background instead of the ugly wall that is there in reality.

Later, she asked me to create some posters showing different versions of this scene. I re-rendered the winter scene at a higher resolution (approx. 3000 * 2000) and I also created a summer scene in which the snow is gone, the grass is greener and there are leaves on the trees. Here are some smaller versions of these images:

winter scene
summer scene

I gave Isabelle a CD-ROM containing these images and she went to the cheapest print shop nearby to get them printed on posters (100 * 70cm). At that size, the resolution of the images is 75dpi. I thought that it would be good enough for a poster that is designed to be viewed from some distance.

Well, it turns out that the employee of that shop discouraged Isabelle from printing the posters because they were not at 300dpi. She claimed that the images would look bad because of the low resolution. On the other hand, she looked at the samples that I had given to my wife (printed on photo paper) and she said that she would not be able to get the same quality on posters. Go figure. Oh, and she also said that her computer could not read that strange PNG format, but fortunately I had also included a JPEG version.

Anyway, she asked for 300dpi so she will get them. For 100 * 70cm, 300dpi means about 12000 * 8000 pixels, for a total of 97 megapixels. I wish I had a camera that could take photos at that resolution. I estimated that re-rendering the image with POV-Ray would take a couple of weeks using my fastest computer (which just died anyway – see my previous entry), so I simply let GIMP scale up the image and I only recreated the parts in which the details could be interesting. In the process, GIMP asked me if I really wanted to create an image that took more than 1 GB. Well, sure, that’s what the shop asked for! I will burn these files on a CD now. I hope that they will not complain that the image is too large for their computer to handle…

Features and remote controls

Jimmac posted a very interesting journal entry about “more features” and a comparison with remote controls. I thought about it a bit and started typing a comment to his blog, but as it grew longer and longer I decided to move it here so that I have a bit more space…

This nice comparison with a remote control made me think about how I use mine. The device that controls my TV (and VCR) has a little flip hiding the “advanced” buttons. I do not have a photo of my remote control, but I found one that is reasonably similar. The top part until the red power button can be opened to reveal more buttons.
(photo of a remote control)

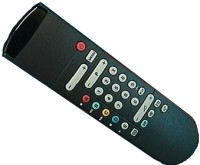
The basic buttons such as channel selection, volume and start/stop for the VCR are always visible. If you lift the flip, you get extra buttons for selecting input sources (e.g., DVD player or camera) or outputs, changing the parameters of the display and other exotic stuff. As it turns out, two of the “advanced” buttons on my remote control are as worn out as the channel and volume selection buttons that are among the “normal” buttons. So I am very glad that these buttons exist, otherwise the device would have been far less useful to me. On the other hand, I understand that they are hidden under a flip because some other people (whether they are a majority or a minority is irrelevant) would probably never use them. Even myself, I do not need to see all buttons all the time.

The comparison with this little device that I use almost every day is very interesting to me. And I take some lessons from it: the designers of this device could not predict which buttons I would use most frequently. They modeled this device for a slightly different class of users, yet I enjoy using it because the “advanced” buttons that I need are still within reach when I need them.

In case you cannot guess where I’m heading yet, let me add that the “advanced” buttons are not visible by default so that they do not confuse those who do not need them, but they are easily discoverable and once you get to them, they look and behave exactly like the other buttons. I do not need to open my TV and flip a few DIP switches to get to the advanced options. Translated in the GNOME or GIMP world, this means that I would have a default set of features that I can play with but also some advanced settings that are easily accessible from the application without having to resort to some other obscure tool such as a gconf editor.

I do not really need to have “everything at my fingertips” and be confused by huge configuration dialogs for every little feature. In fact, I prefer to have the less frequently used options hidden away, as long as there is an easy way to access them whenever I need them. It is essential for these advanced options and features to be discoverable, so the dialog that contains the basic options should give a visible hint that more stuff exists but is hidden (using an expander for the dialog or an “advanced options” button or whatever).

Also, even if I do not use some of the other “advanced” buttons on the remote control, I do not think that I would have bought that TV set if I had not seen that these options were available.

Update: moved the image and its description up a bit.

Resurrecting GIMP metadata

It has been a long time since I last updated the metadata code in GIMP CVS. It is annoying how real life gets in the way… In fact, my contributions to the GIMP have been almost nonexistant in the last months, except for some minor contributions to the help pages. But I will take advantage of the Christmas break to get back to that metadata code.

First I have to fix some outstanding issues with the model (based on XMP) so that it is easier to link the model and the GUI. Currently, opening the File->Properties window leads to an ugly collection of empty widgets. Once the model and the GUI are correctly linked, it should be possible to have correct values displayed in these widgets and to update the model when the values are edited by the user.

Once this first step is done, it should be much easier to work on the remaining parts: adding pretty widgets in the properties window, converting to and from EXIF and IPTC, and eventually moving some of the code currently residing in gimp/plug-ins/metadata/ into a library so that plug-ins could link this code directly instead of using some functions through the PDB. I will write more about this once the first step is done.

Back from GUADEC

GUADEC 6 in Stuttgart was a great event, as expected. Compared to the first GUADEC in Paris, some things were a bit different (the way the event was organized, the number and size of the sponsors, the keynote speeches, etc.) but many things were the same (great hackers presenting their stuff, great discussions after the presentations). Talking with people was probably the most important part of that event: meeting other GIMP developers and also some hackers that I had not met before. Now that I have recovered from the party(ies) and lack of sleep, I could write a lot about GUADEC. But instead, I will make it short and just say that it was a lot of fun.

I came back from GUADEC with more than 600 MB of photos. I still have to find a way to publish them somewhere, in case some people would like to see their pretty faces (or not so pretty, especially after the party). Anyway, I will take care of that when I am back from vacation and from a business trip, so that will not be done in the next two weeks.

Attribution-ShareAlike 3.0
This work is licensed under a Attribution-ShareAlike 3.0.