Wait, what?
Back in the day Glade used to generate code which was messy if was not handled properly, eventually everyone agreed it was better to use libglade instead and load the UI interface from a xml file, something that got consolidated with the advent of GtkBuilder in GTK+
So if it’s better for applications, shouldn’t be the same for classes?
I believe so, this is why I am continuing the work that Tristan started in composite-widget-templates GTK+ branch in my own branch named composite-template.
The idea is pretty simple, instead of hand coding composite children in _init(), like most widget classes do or in _constructor() where they should all we need to do is set a template in _class_init() as follow
gtk_container_class_set_template (container_class, "foobar.ui", GTK_CONTAINER_TEMPLATE_FILE); |
and voilà! GtkContainer class will build your children from that template using GtkBuilder at construction time. If you need to expose an internal child then all you have to do is declare it as follow
gtk_container_class_set_template (container_class, "foobar.ui", GTK_CONTAINER_TEMPLATE_FILE); gtk_container_class_declare_internal_child (container_class, TRUE, G_STRUCT_OFFSET (FooBarPrivate, vbox), "vbox"); |
And if you do not like the idea of depending on a file, like I do, for your widget class to work you can use a string or even better a GResource.
but Juan, what about performance?
Obviously there is some extra overhead in the parsing but is not going to be significant in a medium/big size project that already uses GtkBuilder for it’s main interface. That being said if we want to optimize things the easy way would be to use EXI (Efficient XML Interchange) format which is basically a XML binary format, it would save use some memory space and the need to actually parse the UI definition. The hard way would be to rethink GtkBuilder internal data model and transform it into a binary format that can be saved persistently. Implementing either of these approaches at the GMarkup level would not only be helpful for composite classes but more importantly for applications with big UI files.
Really wait, Say that again!
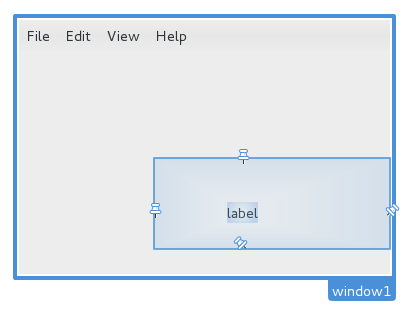
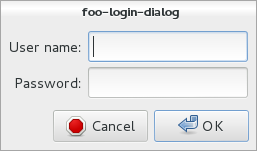
Ok, I should probably had started with an example, lets say you have a login dialog like this
With the following C source: foo-login-dialog.h foo-login-dialog.c
This code show the differences implementing a composite object the regular way and using templates. Note that USE_TEMPLATE macro is used to choose either implementation at compile time.
#include "foo-login-dialog.h" struct _FooLoginDialogPrivate { GtkWidget *username_entry; GtkWidget *password_entry; }; enum { LOGIN, LAST_SIGNAL }; static guint login_dialog_signals[LAST_SIGNAL] = { 0 }; G_DEFINE_TYPE (FooLoginDialog, foo_login_dialog, GTK_TYPE_DIALOG); void on_dialog_response (FooLoginDialog *dialog, gint response_id) { FooLoginDialogPrivate *priv = dialog->priv; const gchar *username, *password; if (response_id != GTK_RESPONSE_OK) return; username = gtk_entry_get_text (GTK_ENTRY (priv->username_entry)); password = gtk_entry_get_text (GTK_ENTRY (priv->password_entry)); g_signal_emit (dialog, login_dialog_signals[LOGIN], 0, username, password); } static void foo_login_dialog_init (FooLoginDialog *dialog) { FooLoginDialogPrivate *priv; priv = G_TYPE_INSTANCE_GET_PRIVATE (dialog, FOO_TYPE_LOGIN_DIALOG, FooLoginDialogPrivate); dialog->priv = priv; #ifndef USE_TEMPLATE GtkWidget *content_area; GtkWidget *action_area; GtkWidget *grid; GtkWidget *label; GtkWidget *button; content_area = gtk_dialog_get_content_area (GTK_DIALOG (dialog)); action_area = gtk_dialog_get_action_area (GTK_DIALOG (dialog)); grid = gtk_grid_new (); g_object_set (grid, "margin", 6, NULL); gtk_grid_set_column_spacing (GTK_GRID (grid), 6); gtk_grid_set_row_spacing (GTK_GRID (grid), 4); gtk_box_pack_start (GTK_BOX (content_area), grid, TRUE, TRUE, 0); label = gtk_label_new ("User name:"); gtk_widget_set_halign (label, GTK_ALIGN_END); gtk_grid_attach (GTK_GRID (grid), label, 0, 0, 1, 1); priv->username_entry = gtk_entry_new (); gtk_widget_set_hexpand (priv->username_entry, TRUE); gtk_grid_attach (GTK_GRID (grid), priv->username_entry, 1, 0, 1, 1); label = gtk_label_new ("Password:"); gtk_widget_set_halign (label, GTK_ALIGN_END); gtk_grid_attach (GTK_GRID (grid), label, 0, 1, 1, 1); priv->password_entry = gtk_entry_new (); gtk_widget_set_hexpand (priv->password_entry, TRUE); gtk_entry_set_visibility (GTK_ENTRY (priv->password_entry), FALSE); gtk_entry_set_activates_default (GTK_ENTRY (priv->password_entry), TRUE); gtk_grid_attach (GTK_GRID (grid), priv->password_entry, 1, 1, 1, 1); button = gtk_button_new_from_stock ("gtk-cancel"); gtk_dialog_add_action_widget (GTK_DIALOG (dialog), button, GTK_RESPONSE_CANCEL); button = gtk_button_new_from_stock ("gtk-ok"); gtk_widget_set_can_default (button, TRUE); gtk_dialog_add_action_widget (GTK_DIALOG (dialog), button, GTK_RESPONSE_OK); gtk_widget_grab_default (button); g_signal_connect_swapped (priv->username_entry, "activate", G_CALLBACK (gtk_widget_grab_focus), priv->password_entry); gtk_window_set_resizable (GTK_WINDOW (dialog), FALSE); g_signal_connect (dialog, "response", G_CALLBACK (on_dialog_response), NULL); #endif } static void foo_login_dialog_finalize (GObject *object) { G_OBJECT_CLASS (foo_login_dialog_parent_class)->finalize (object); } static void foo_login_dialog_login (FooLoginDialog *self, const gchar *username, const gchar *password) { g_message ("%s user: [%s] password: [%s]", __func__, username, password); } static void foo_login_dialog_class_init (FooLoginDialogClass *klass) { GObjectClass *object_class = G_OBJECT_CLASS (klass); GtkDialogClass *parent_class = GTK_DIALOG_CLASS (klass); g_type_class_add_private (klass, sizeof (FooLoginDialogPrivate)); object_class->finalize = foo_login_dialog_finalize; klass->login = foo_login_dialog_login; login_dialog_signals[LOGIN] = g_signal_new ("login", G_OBJECT_CLASS_TYPE (klass), G_SIGNAL_RUN_LAST, G_STRUCT_OFFSET (FooLoginDialogClass, login), NULL, NULL, NULL, G_TYPE_NONE, 2, G_TYPE_STRING, G_TYPE_STRING); #ifdef USE_TEMPLATE gtk_container_class_set_template (GTK_CONTAINER_CLASS (klass), "foologindialog.ui", GTK_CONTAINER_TEMPLATE_FILE); gtk_container_class_declare_internal_child (GTK_CONTAINER_CLASS (klass), TRUE, G_STRUCT_OFFSET (FooLoginDialogPrivate, username_entry), "username_entry"); gtk_container_class_declare_internal_child (GTK_CONTAINER_CLASS (klass), TRUE, G_STRUCT_OFFSET (FooLoginDialogPrivate, password_entry), "password_entry"); #endif } GtkDialog * foo_login_dialog_new () { return g_object_new (FOO_TYPE_LOGIN_DIALOG, NULL); } |
main.c: a simple program using such class, this is included in foo-login-dialog.c for convenience
#include <gtk/gtk.h> #include "foo-login-dialog.h" int main (int argc, char **argv) { GtkDialog *dialog; gtk_init (&argc, &argv); dialog = foo_login_dialog_new (); gtk_widget_show_all (GTK_WIDGET (dialog)); gtk_dialog_run (dialog); } |
You can compile it with a line like this
gcc -export-dynamic -o foo-login-dialog main.c foo-login-dialog.c \
 `pkg-config --libs --cflags gtk+-3.0` -DUSE_TEMPLATE
GtkBuilder template “foologindialog.ui”
<?xml version="1.0" encoding="UTF-8"?> <interface> <!-- interface-requires gtk+ 3.0 --> <template class="FooLoginDialog" parent="GtkDialog" id="this"> <property name="can_focus">False</property> <property name="border_width">5</property> <property name="type_hint">dialog</property> <signal name="response" handler="on_dialog_response" swapped="no"/> <child internal-child="vbox"> <object id="dialog-vbox1"> <property name="can_focus">False</property> <property name="orientation">vertical</property> <property name="spacing">2</property> <child internal-child="action_area"> <object id="dialog-action_area1"> <property name="can_focus">False</property> <property name="layout_style">end</property> <child> <object id="button1"> <property name="label">gtk-cancel</property> <property name="use_action_appearance">False</property> <property name="visible">True</property> <property name="can_focus">True</property> <property name="receives_default">True</property> <property name="use_action_appearance">False</property> <property name="use_stock">True</property> </object> <packing> <property name="expand">False</property> <property name="fill">True</property> <property name="position">0</property> </packing> </child> <child> <object id="button2"> <property name="label">gtk-ok</property> <property name="use_action_appearance">False</property> <property name="visible">True</property> <property name="can_focus">True</property> <property name="can_default">True</property> <property name="has_default">True</property> <property name="receives_default">True</property> <property name="use_action_appearance">False</property> <property name="use_stock">True</property> </object> <packing> <property name="expand">False</property> <property name="fill">True</property> <property name="position">1</property> </packing> </child> </object> <packing> <property name="expand">False</property> <property name="fill">True</property> <property name="pack_type">end</property> <property name="position">0</property> </packing> </child> <child> <object id="grid1"> <property name="visible">True</property> <property name="can_focus">False</property> <property name="row_spacing">4</property> <property name="column_spacing">6</property> <child> <object id="label1"> <property name="visible">True</property> <property name="can_focus">False</property> <property name="halign">end</property> <property name="label" translatable="yes">User name:</property> </object> <packing> <property name="left_attach">0</property> <property name="top_attach">0</property> <property name="width">1</property> <property name="height">1</property> </packing> </child> <child> <object id="label2"> <property name="visible">True</property> <property name="can_focus">False</property> <property name="halign">end</property> <property name="label" translatable="yes">Password:</property> </object> <packing> <property name="left_attach">0</property> <property name="top_attach">1</property> <property name="width">1</property> <property name="height">1</property> </packing> </child> <child> <object id="username_entry"> <property name="visible">True</property> <property name="can_focus">True</property> <property name="hexpand">True</property> <property name="invisible_char">●</property> <signal name="activate" handler="gtk_widget_grab_focus" object="password_entry" swapped="yes"/> </object> <packing> <property name="left_attach">1</property> <property name="top_attach">0</property> <property name="width">1</property> <property name="height">1</property> </packing> </child> <child> <object id="password_entry"> <property name="visible">True</property> <property name="can_focus">True</property> <property name="hexpand">True</property> <property name="visibility">False</property> <property name="invisible_char">●</property> <property name="activates_default">True</property> </object> <packing> <property name="left_attach">1</property> <property name="top_attach">1</property> <property name="width">1</property> <property name="height">1</property> </packing> </child> </object> <packing> <property name="expand">False</property> <property name="fill">True</property> <property name="position">1</property> </packing> </child> </object> </child> <action-widgets> <action-widget response="-6">button1</action-widget> <action-widget response="-5">button2</action-widget> </action-widgets> </template> </interface> <?xml version="1.0" encoding="UTF-8"?> <interface> |
Since this example sets the template from a relative path the file foologindialog.ui has to be in the current working directory when you run the program.
And last but not least you need composite-templates Gtk+ branch for this to work
$ git clone git://git.gnome.org/gtk+
$ cd gtk+
$ git checkout -b composite-templates origin/composite-templates