Ubuntu China LoCo Team resigning and nomination meeting

Yesterday, we held a meeting about Ubuntu China LoCo Team resigning and nomination, and talked a lot about our LoCo team’s future activities.

Meeting minutes:
1.What is Ubuntu loco contact? [happyaron]
2.Vote for new loco contact, and the new contact decided is Eleanor Chen. (10 Pros, 0 Cons, 4 not voted)
3.Discussed about FullCircle China team’s work.
4.Made decisions about participating the Ubuntu Global Jam, and proposed for opening a classroom for teaching people who are interested in becoming an MOTU.
5.All participants agree with organizing more community activities, but not get a conclusion on when is the best time for starting a Ubuntu user group at Beijing.

Here is the meeting log (Chinese):
ubuntu-cn-meeting.log

Covert flac to mp3

Some time we have to use mp3 format because our moveable devices commonly don’t support flac/ogg, thus I need to convert a .flac file to mp3. It’s very simple:
First of all, install flac and lame package from your distribution’s repository.
Then, using the following command to actually covert the file.
1.flac -d filename.flac
This will output an filename.wav in the same directory.
2.lame filename.wav
Now a fresh filename.mp3 is lying in the same directory.

Enjoy!

Lucid release party in Beijing!

Ubuntu China LoCo Community is going to host a party at 2:00 PM, on May 8th in the Traktirr Russian Restaurant, Beijing, in order to celebrate the release of Ubuntu 10.04 LTS. Everybody, from newbie to hacker, is warmly welcomed. We will invite some people to give lectures about Ubuntu, but what is truly important is, we hope that everybody can participate in the party! We sincerely wish that all of you can have fun here. Remember that there are a cake, some free CDs of Ubuntu 10.04 LTS and other souvenirs waiting for you!

Simplified Chinese version of Ubuntu Desktop Course

After a period’s work, Ubuntu Desktop Course has been translated to Simplified Chinese, the content has already adapted to 9.10, most of them are ready for 10.04. We are happy to announce this to public and wish this course can help more people who speak Chinese enjoy and share Free Software.

HTML view:
http://people.ubuntu.com/~happyaron/udc-cn/
PDF generation still have some problems.

This work is licensed under Creative Commons 3.0 Attribution No-Commercial Share-Alike .

Proposed PPA and key management enhancement for Ubuntu Tweak

Ubuntu Tweak is a magical tool for users to configure Ubuntu easier, it has a growing amount of users. I propose to make some enhancement to provide better PPA and key security.
We need to have a GPG key pair to sign and verify texts to make sure the key hash list is credible. And I prefer SHA128/256 to be our hash for key file fingerprints because some users are considering MD5/SHA1 is not so reliable today. We are just verify some key files, so such performance degradation is bearable.
Now I will describe what will it do actually when a user install/upgrade a Ubuntu Tweak.
We need to prompt to import a GPG public key to users keyring for the first time a user start Ubuntu Tweak and go to the PPA tunning section, or when he deleted or changed the key in his keyring. Every time the application should check current user’s keyring to find the a key’s fingerprint, and the key ID is our preshipped version in our program(do not worry about someone has changed this value, we have the procedure to verify it).
Then prompt the user we need to update our application data online, including PPA and their key definitions. And UTCOM need to provide a LATEST version file as well as the current version of data. We UT checks for update, it compare the LATEST version and determine whether it need to update the data. Such action can be done once a week or twice (of course the first run we need do it as well).
The data pack should contain the following content:
1.Public key fingerprint which we have mentioned before, this is used to verify the key once the data pack has been extracted.
2.source.list.d entries
3.PPA keys
4.PPA key fingerprint (hash, sha256 perhaps)

When download finishes, the application first verify the data package with its signature (can be achieve with another text file contains the tar file’s hash, and sign that text with GPG method). If everything goes correct, extract the package and find out the GPG key fingerprint and compare it with the system installed one (what we used to verify the tar pack just now), when the verify works, we can believe the data is reliable, and check hash of other key files.

Every time Ubuntu Tweak add a PPA, it should check the PPA list it downloaded and verified, so we can believe the program won’t add PPA that we haven’t check.

Getting NetworkManager work with pppoe connection on Ubuntu 9.10

When Ubuntu 9.10 releases, pppoe connection via NetworkManager is impossible because some bug in it. So I switched to the traditional but workable way – pppoeconf, now the problem seems to be solved when using nm team PPA, so I plan to turn back.
But during my process, there are some other problems. Firstly nm cannot handle the connections automatically; secondly we cannot edit connections system wide.

Here are the correct steps:

First, add “NetworkManager daily trunk builds for ubuntu” PPA:

deb http://ppa.launchpad.net/network-manager/trunk/ubuntu karmic main
deb-src http://ppa.launchpad.net/network-manager/trunk/ubuntu karmic main

Second, comment out line “exec pppd call dsl-provider” in /etc/ppp/pppoe_on_boot, that is to say disable my previous “pppoe on boot” setting which is configured by pppoeconf.

Third, rename /etc/network/interfaces to backup file. NetworkManager will only handle connections which haven’t declared in interfaces, if you didn’t any tunning on such file, you can delete it, but backup before doing any change is a good habit, :)

Forth, edit /usr/share/polkit-1/actions/org.freedesktop.network-manager-settings.system.policy , find out the line contains “System policy prevents modification of system settings”, and below it there is a “auth_admin_keep“, change it to “yes“. This will enable you to edit a system wide connection. If you consider this will do harm to your security, then revert the change once you have set up your connection correctly.

Fifth, reboot your system, because these settings won’t take effects even though you have run “sudo services network-manager restart” and “sudo services networking restart”.

Now it is working on my system, cheers!

Quotation in ConTeXt

This time I read the guide on ConTeXt Wiki and learned some basic commands doing quotation.
Not very much today in fact.
1.single quotes (‘):

\quote{some text}

2.double quotes (“):

\quotation{some text}

3.long quote sections:
For single quote:

\startquote ... \stopquote

For double quotes:

\startquotation ... \stopquotation

4.Nested quotations:
Add following lines first:

\setupdelimitedtext
  [quotation]
  [1]
  [left={\symbol[leftquotation]},
   right={\symbol[rightquotation]}]
 
\setupdelimitedtext
  [quotation]
  [2]
  [left={\symbol[leftquote]},
   right={\symbol[rightquote]}]
 
\setupdelimitedtext
  [quotation]
  [3]
  [left={\symbol[leftquotation]},
   right={\symbol[rightquotation]}]

Then try with:

\starttext
Testing, \quotation{A long quotation in which one character says,
\quotation{Eh? What am I supposed to say? Something like, \quotation
{Quotations in this sentence are nested}?}} testing, 1, 2, 3.
\stoptext

Font fallback in ConTeXt Mininals

Indubitably, I need to remix Chinese and English in one document. But English characters in Chinese fonts aren’t look good in most time as others, so font fallback is needed here.
First, make a English font as a fallback of Chinese font:

\definefontsynonym[song][name:adobesongstd]
\definefontfallback[hereos][name:texgyreherosregular][0x0000-0x0400]
\definefontsynonym[fbsong][song][fallbacks=hereos]
 
\definefont[newsong][fbsong]
\setscript[hanzi]
 
\starttext
\newsong 夹杂 English 的中文文本
\stoptext

This means we use texgyreherosregular as the fallback English font and name it as hereos, 0x0000-0x0400 is the interval of English characters in UTF-8 encoding. Then make “fbsong” the new font that is the remix of song (adobesongstd) and fallback hereos (texgyreherosregular).
But on the tutorial I am following, the author said such action will lose some feature when ConTeXt processing English, so change to using a Chinese font as a fallback of English font:

\definefontsynonym[hereos][name:texgyreherosregular]
\definefontfallback[song][name:adobesongstd][0x00400-0x2FA1F]
\definefontsynonym[fbsong][hereos][fallbacks=song]
\definefont[newsong][fbsong]
\setscript[hanzi]
 
\starttext
\newsong 夹杂~English~的中文文本
\stoptext

Then I’ve rewritten my type-myfonts.tex with fallback font:

\starttypescript[serif][fbfont]
 
\definefontsynonym[enserif][name:dejavuserif]
\definefontsynonym[enserifbd][name:dejavuserifbold]
\definefontsynonym[enserifit][name:dejavuserifitalic]
\definefontsynonym[enserifbi][name:dejavuserifbolditalic]
 
\definefontfallback[umingcn][name:arplumingcn][0x00400-0x2FA1F]
 
\definefontsynonym[Serif][enserif][fallbacks=umingcn]
\definefontsynonym[SerifBold][enserifbd][fallbacks=umingcn]
\definefontsynonym[SerifItalic][enserifit][fallbacks=umingcn]
\definefontsynonym[SerifBoldItalic][enserifbi][fallbacks=umingcn]
 
\stoptypescript
 
\starttypescript [sans][fbfont]
 
\definefontsynonym[ensans][name:dejavusans]
\definefontsynonym[ensansbd][name:dejavusansbold]
\definefontsynonym[ensansob][name:dejavusansoblique]
\definefontsynonym[ensansbo][name:dejavusansboldoblique]
 
\definefontfallback[ukaicn][name:arplukaicn][0x00400-0x2FA1F]
 
\definefontsynonym[Sans][ensans][fallbacks=ukaicn]
\definefontsynonym[SansBold][ensansbd][fallbacks=ukaicn]
\definefontsynonym[SansOblique][ensansob][fallbacks=ukaicn]
 
\definefontsynonym[SansBoldOblique][ensansbo][fallbacks=ukaicn]
 
\stoptypescript
 
\starttypescript [mono][fbfont]
 
\definefontsynonym[enmono][name:dejavusansmono]
\definefontsynonym[enmonobd][name:dejavusansmonobold]
\definefontsynonym[enmonoob][name:dejavusansmonooblique]
\definefontsynonym[enmonobo][name:dejavusansmonoboldoblique]
 
\definefontfallback[microhei][name:wenquanyimicroheimono][0x00400-0x2FA1F]
 
\definefontsynonym[Mono][enmono][fallbacks=microhei]
\definefontsynonym[MonoBold][enmonobd][fallbacks=microhei]
\definefontsynonym[MonoOblique][enmonoob][fallbacks=microhei]
 
\definefontsynonym[MonoBoldOblique][enmonobo][fallbacks=microhei]
 
\stoptypescript
 
\starttypescript[myfonts]
\definetypeface[myfonts][rm][serif][fbfont]
\definetypeface[myfonts][ss][sans][fbfont]
\definetypeface[myfonts][tt][mono][fbfont]
\stoptypescript

And here is an example:

\usetypescriptfile[type-myfonts]
\usetypescript[myfonts]
\setupbodyfont[myfonts,rm,12pt]
\setupbodyfontenvironment [default] [em=italic] % slanted is default emphasize in ConTeXt
\setscript[hanzi]
 
\pdfoptionpdfminorversion=6
\pdfcompresslevel=9
 
\starttext
 
\startcomment
this is a test comment, you shouldn't see me.
\stopcomment
 
我们在运行 \CONTEXT{}
 
\rm 这是 fbfont 里的 serif,dejavuserif+arplumingcn \\
\ss 这是 fbfont 里的 sans,dejavusans+arplukaicn \\
\tt 这是 fbfont 里的 mono,dejavusansmono+wenquanyimicroheimono \\
 
\stoptext

“setupbodyfontenvironment” is a command that tell ConTeXt our body’s font environment, here we change nothing but emphasis to italic instead of default slanted face.
“%” is used to take comments and the TeX engine won’t do anything with items after it to the line’s ending. Multi-lines comments can be achieved by using “\startcomment … \stopcomment”.
“\pdfoptionpdfminorversion” is the setting for pdf option in minor version, and we can have a table to list it:
* (1993) – PDF 1.0 / Acrobat 1.0
* (1994) – PDF 1.1 / Acrobat 2.0
* (1996) – PDF 1.2 / Acrobat 3.0
* (1999) – PDF 1.3 / Acrobat 4.0
* (2001) – PDF 1.4 / Acrobat 5.0
* (2003) – PDF 1.5 / Acrobat 6.0
* (2005) – PDF 1.6 / Acrobat 7.0
* (2006) – PDF 1.7 / Acrobat 8.0
* (2008) – PDF 1.7, Adobe Extension Level 3 / Acrobat 9.0
The value of “pdfoptionpdfminorversion” is that x in “1.x”, in this example, “\pdfoptionpdfminorversion=6”, we set the version to PDF 1.6, correspond to Acrobat 7.0. The default setting is version 5 – PDF 1.5 for Acrobat 6.0.
“pdfcompresslevel” is the compress level of output pdf file, 0 is the least and 9 highest. Default setting is 0.
“\CONTEXT” is a sequence to produce the effect of sinking e in TEX. Other interesting are “\LATEX” “\TEX”, also “\LaTeX” and “\TeX” is acceptable, but I didn’t find how to produce a LaTeX2e, not “\LaTeXe” in LaTeX.
The {} after “\CONTEXT{}” tell the TeX engine don’t eat all extra whitespace and empty lines.
“\\” means force line breaking, we cannot use “\newline” as LaTeX does.

Font model in ConTeXt – quick view from a starter

There are three basic fonts in Chinese, Song, Hei and Fangsong, corresponding to Serif, Sans and Monospace in Latin characters. Another category is numbers, it is recognized as a separate category by ConTeXt.
Using Adobe’s three fonts as a example, we can define type-myfonts.tex, a typescript file:

\starttypescript[serif][zhfont]
    \definefontsynonym[Serif][name:adobesongstd]
    \definefontsynonym[SerifBold][name:adobesongstd]
    \definefontsynonym[SerifItalic][name:adobesongstd]
    \definefontsynonym[SerifBoldItalic][name:adobesongstd]
\stoptypescript
 
\starttypescript [sans][zhfont]
    \definefontsynonym[Sans][name:adobeheitistd]
    \definefontsynonym[SansBold][name:adobeheitistd]
    \definefontsynonym[SansItalic][name:adobeheitistd]
    \definefontsynonym[SansBoldItalic][name:adobeheitistd]
\stoptypescript
 
\starttypescript [mono][zhfont]
    \definefontsynonym[Mono][name:adobefangsongstd]
    \definefontsynonym[MonoBold][name:adobefangsongstd]
    \definefontsynonym[MonoItalic][name:adobefangsongstd]
    \definefontsynonym[MonoBoldItalic][name:adobefangsongstd]
\stoptypescript
 
\starttypescript[myfonts]
    \definetypeface[myfonts][rm][serif][zhfont]
    \definetypeface[myfonts][ss][sans][zhfont]
    \definetypeface[myfonts][tt][mono][zhfont]
\stoptypescript

Explanation by line:
“\starttypescript[serif][zhfont]” means starting a typescript profile, named “serif” and classify it in “zhfont”;
“\definefontsynonym[Serif][name:adobesongstd]” means start a font synonym definition, and assign “Serif” to “adobesongstd”;
“\stoptypescript” means finishing a profile.
We need to pay some attention at the last profile, that is to say “\definetypeface[myfonts][rm][serif][zhfont]”, we define the typeface series “myfonts” in this profile, and this line represent the “rm”, roman, face is assigned to serif, which we have defined in previous profiles, and “ss” fo “sans”, “tt” for “teletype” or rather “monospace” as we know.
Then write another file, save as test.tex:

\usetypescriptfile[type-myfonts]
\usetypescript[myfonts]
\setupbodyfont[myfonts,rm,12pt]
 
\starttext
所有动物都生而平等,但有些动物比其他动物更平等
\ss 所有动物都生而平等,但有些动物比其他动物更平等
\tt 所有动物都生而平等,但有些动物比其他动物更平等
\stoptext

For explanation, “\usetypescriptfile[type-myfonts]” tell the TeX engine to find a typescript file named type-myfonts.tex in the same directory as current file, and include the contents here; \usetypescript[myfonts]” tell it we are using “myfonts” typescript set as defined in type-myfonts.tex; “\setupbodyfont[myfonts,rm,12pt]” is telling that set the body font to myfonts’s rm style, with 12pt as the size.
Between “\starttext”…”\stoptext” is the text, first line using default font, \rm, and second line change to \ss finaly \tt.
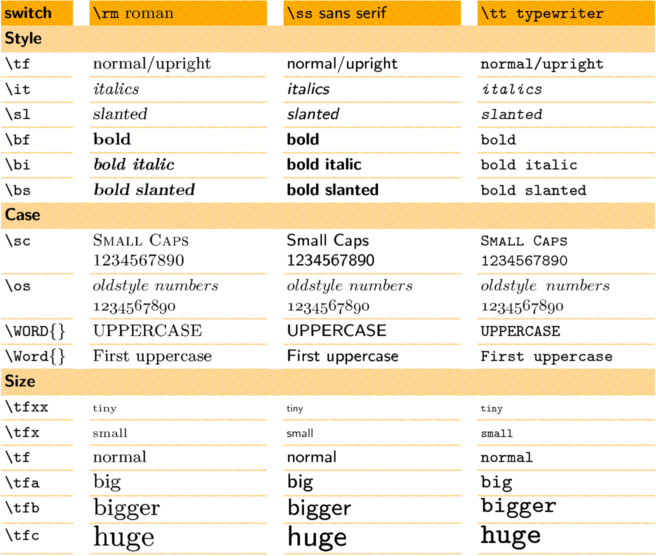
Here is a list to tell font model:
Font model from ConTeXt wiki
Next we need to make ConTeXt know how to wrap lines for Chinese, that is, to break a long sentence into lines in a page. What we need to do is add “\setscript[hanzi]” to the header. Another example of test.tex:

\usetypescriptfile[type-myfonts]\usetypescript[myfonts]\setupbodyfont[myfonts,rm,12pt]
 
\setscript[hanzi]
 
\starttext
明亡后,朝鲜和日本认为中国已亡,日本从此蔑称中国为“支那”。明治维新后,自认为华夏正统的日本曾打着“攘夷主义”的旗号发动甲午战争等对清战争。


\stoptext

Installing ConTeXt Minimals

I’ve chosen to study a TeX, and finally choose ConTeXt because it uses LuaTeX engine that can support Chinese with less pain than using LaTeX as well as someone is complaining about XeTeX may output a lower quality. I don’t know who’s true, but according to my own perception, ConTeXt Minimals with LuaTex may be the best choice, so I start this category of blog to track my course studing it.
Today, I am trying to install it and output my first result file.

Installation is quite easy:

mkdir ~/usr/context && cd ~/usr/context
wget http://minimals.contextgarden.net/setup/first-setup.sh

It will call rsync and use ruby to achieve this, so make sure they are installed on system.

sh first-setup.sh

This will give you a dev-shot of ConTeXt Minimals, if a stable version is needed, run the following instead:

sh first-setup.sh --context=current

I continue with the dev version. Note, every time we want do an update of the program or move it somewhere else, we need to run the command above to make all things work.
If we don’t have a connective Internet available but still want to change the directory, we may run the following command in the context/ folder with tex/ under it:

mtxrun --verbose --script ./bin/mtx-update.lua --update --make --force --engine=all --context=beta --texroot=$PWD/tex $@

Next, make sure there are fonts needed installed, on my system it’s /usr/share/fonts, with wqy-zenhei and wqy-microhei as my Chinese fonts and others like DejaVu and Droid as English fonts.
We need to refresh the system’s font cache before continue, otherwise some fonts won’t work.

sudo fc-cache -f

Then add the system’s font directory to setuptex, which file is placed at ~/usr/context/tex/setuptex in my installation, add the following line at the end of file:

export OSFONTDIR=/usr/share/fonts

Reload font cache for ConTeXt:

mtxrun --script fonts --reload

Generate a list of usable fonts:

mtxrun --script fonts --list --all > font-names.txt

First row represents the font name we will use in our tex file, second is descriptions like font name in true life, the third line is the path to the font file in system.
Finally source the setuptex file to make this environment sensible for current console:

source ~/usr/context/tex/setuptex

Now, we’ve finished setting up a environment that can work.
The easiest example may be like this:

\starttext
Hello world!
\stoptext

Have another test with Chinese:

\definefont[uming][name:arplumingcn]               
\starttext
\uming  
终于看到中文了!
\stoptext

First line assign “uming” as “arplumingcn”, that is “uming” will be used in the following of this file to represent the “arplumingcn”, which is the name of this font that we can see in the first row of former generated font-names.txt.
Second line tell the program we are starting the text, and the next line tell it we are choosing font “uming” for following text. And the last line tell it the text is finished.
I save the file as hello.tex, and use this command to produce the result:

context hello

also we can use hello.tex, but like other Tex environment, ConTeXt knows that it is processing a TeX file so the suffix can be omitted safely.
The the program print many things to our console and finally stopped with several hello.* files in our working directory, and hello.pdf is lying there.
This work by Aron Xu is licensed under a Creative Commons Attribution-NonCommercial-ShareAlike 3.0 Unported.