It’s been a while since my initial post about BuildStream and I’m happy to see that it has generated some discussion.
Since then, here at Codethink we’ve made quite a bit of progress, but we still have some road to travel before we can purport to solve all of the world’s build problems.
So here is a report on the progress we’ve made in various areas.
Infrastructure
Last time I blogged, project infrastructure was still not entirely sorted. Now that this is in place and will remain fixed for the foreseeable future, I’ll provide the more permanent links:
Links to the same in previous post have been updated
A note on GitLab
Gitlab provides us with some irresistible features.
Asides from the Merge Request feature which really does lower the barrier to contributing patches, the pre-merge CI pipelines allow us to ensure the test cases run prior to accepting any patch and are a deciding factor to remain hosted on GitLab for our git repository in lieu of creating a repo on git.gnome.org.
Another feature we get for free with GitLab’s pipeline feature is that we can automatically publish our documentation generated from source whenever a commit lands on the master branch, this was all very easy to setup.
User Experience
A significantly large portion of a software developer’s time is spent building and assembling software. Especially in tight debug and test loops, the seconds that it takes and menial tasks which stand in between an added printf() statement and a running test to reproduce some issue can make the difference between tooling which is actually helpful to the user, or just getting in the way of progress.
As such, we are paying attention to the user experience and have plans in place to ensure the most productive experience is possible.
Here are some of the advancements made since my first post
Presentation
Some of the elements we considered as important when viewing the output of a build include:
- Separation and easy to find log files. Many build tools which use a serial build model will leave you with one huge log file to parse and figure out what happened, which is rather unwieldy to read. On the other hand, tools which exercise a parallelized build model can leave you searching through log directories for the build log you are looking for.
- Constant feedback of what is being processed. When your build appears to hang for 30 minutes while all of your cores are being hammered down by a WebKit build, it’s nice to have some indication that a WebKit build is in fact taking place.
- Consideration of terminal width. It’s desirable however not always possible, to avoid wrapping lines in the output of any command line interface.
- Colorful and aligned output. When viewing a lot of terminal output, it helps to use some colors to assist the user in identifying some output they may be searching for. Likewise, alignment and formatting of text helps the user to parse more information with less frustration.
Here is a short video showing what the output currently looks like:
I’m particularly happy about how the status bar remains at the bottom of the terminal output while the regular rolling log continues above. While the status bar tells us what is going on right now, the rolling log above provides detail about what tasks are being launched, how long they took to complete and in what log files you can find the detailed build log.
Note that colors and status lines are automatically disabled when BuildStream is not connected to a tty. Interactive mode is also automatically disabled in that case. However using the bst –log-file /path/to/build.log … option will allow you to preserve the master build log of the entire session and also work in interactive mode.
Job Control
Advancements have also been made in the scheduler and how child tasks are managed.
When CNTL-C is pressed in interactive mode, all ongoing tasks are suspended and the user is presented with some choices:
- continue – Carries on processing and queuing jobs
- quit – Carries on with ongoing jobs but stops queuing new jobs
- terminate – Terminates any ongoing jobs and exits immediately
Similarly, if an ongoing build fails in interactive mode, all ongoing tasks will be suspended while the user has the same choices, and an additional choice to debug the failing build in a shell.
Unfortunately continuing with a “repaired” build is not possible at this time in the same way as it is with JHBuild, however one day it should be possible in some developer mode where the user accepts that anything further that is built can only be used locally (any generated artifacts would be tainted as they don’t really correspond to their deterministic cache keys, those artifacts should be rebuilt with a fix to the input bst file before they can be shared with peers).
New Element Plugins
For those who have not been following closely, BuildStream is a system for the modeling and running of build pipelines. While this is fully intended for software building and the decoupling of the build problem and the distribution problem; in a more abstract perspective it can be said that BuildStream provides an environment for the modeling of pipelines, which consist of elements which perform mutations on filesystem data.
The full list of Element and Source plugins currently implemented in BuildStream can be found on the face page of the documentation.
As a part of my efforts to fully reproduce and provide a migration path for Baserock’s declarative definitions, some interesting new plugins were required.
meson
The meson element is a BuildElement for building modules which use meson as their build system.
Thanks goes to Patrick Griffis for filing a patch and adding this to BuildStream.
compose
The compose plugin creates a composition of its own build dependencies. Which is to say that its direct dependencies are not transitive and depending on a compose element can only pull in the output artifact of the compose element itself and none of its dependencies (a brief explanation of build and runtime dependencies can be found here)
Basically this is just a way to collect the output of various dependencies and compress them into a single artifact, that with some additional options.
For the purpose of categorizing the output of a set of dependencies, we have also introduced the split-rules public data which can be read off of the the dependencies of a given element. The default split-rules are defined in BuildStream’s default project configuration, which can be overridden on a per project and also on a per element basis.
The compose element makes use of this public data in order to provide a more versatile composition, which is to say that it’s possible to create an artifact composition of all of the files which are captured by a given domain declared in your split-rules, for instance all of the files related to internationalization, or the debugging symbols.
Example:
kind: compose
description: Initramfs composition
depends:
- filename: gnu-toolchain.bst
  type: build
- filename: initramfs/initramfs-scripts.bst
  type: build

config:
  # Include only the minimum files for the runtime
  include:
  - runtime
The above example takes the gnu-toolchain.bst stack which basically includes a base runtime with busybox, and adds to this some scripts. In this case the initramfs-scripts.bst element just imports an init and shutdown script required for the simplest of initramfs variations. The output is integrated; which is to say that things like ldconfig have run and the output of those has been collected in the output artifact. Further, any documentation, localization, debugging symbols etc, have been excluded from the composition.
script
The script element is a simple but powerful element allowing one to stage more than one set of dependencies into the sandbox in different places.
One set of dependencies is used to stage the base runtime for the sandbox, and the other is used to stage the input which one intends to mutate in some way to produce output, to be collected in the regular /buildstream/install location.
Example:
kind: script
description: The compressed initramfs
depends:
- filename: initramfs/initramfs.bst
  type: build
- filename: foundation.bst
  type: build

config:
  base: foundation.bst
  input: initramfs/initramfs.bst

  commands:
  - mkdir -p %{install-root}/boot
  - (find . -print0 | cpio -0 -H newc -o) |
    gzip -c > %{install-root}/boot/initramfs.gz
This example element will take the foundation.bst stack element (which in this context, is just a base runtime with your regular shell tools available) and stage that at the root of the sandbox, providing the few tools and runtime we want to use. Then, still following the same initramfs example as above, the integrated composition element initramfs/initramfs.bst will be staged as input in the /buildstream/input directory of the build sandbox.
The script commands then simply use the provided base tools to create a gzipped cpio archive inside the /buildstream/install directory, which will be collected as the artifact produced by this script.
A bootable system
Another thing we’ve been doing since last we touched base is providing a migration path for Baserock users to use BuildStream.
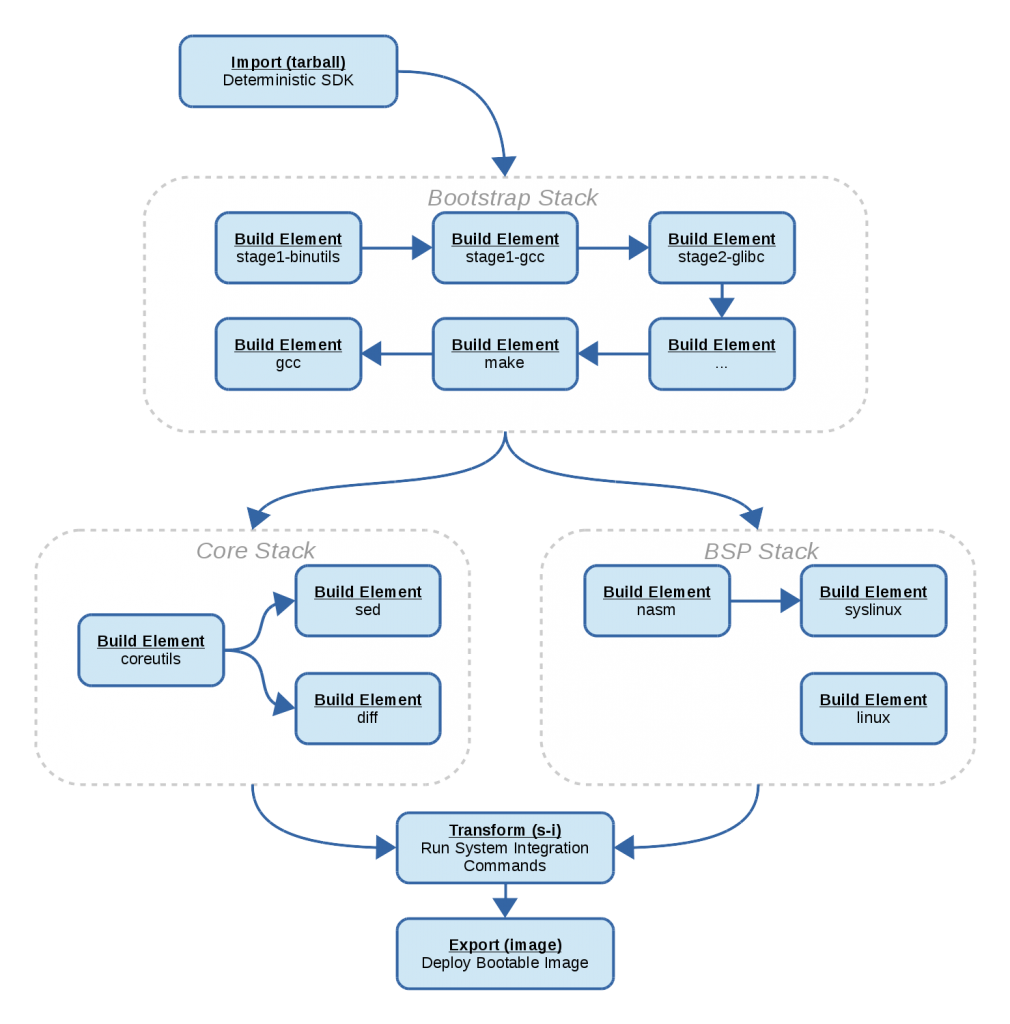
This is a particularly interesting case for BuildStream because Baserock systems provide metadata to build a bootable system from the ground up, from a libc and compiler boostrapping phase all the way up to the creation and deployment of a bootable image.
In this way we cover a lot of ground and can now demonstrate that bootstrapping, building and deploying a bootable image as a result is all possible using BuildStream.
The bootstrap
One of the more interesting parts is that the bootstrap remains almost unchanged, except for the key ingredient which is that we never allow any host tools to be present in the build sandbox.
The working theory is that whenever you bootstrap, you bootstrap from some tools. If you were ever able to obtain these tools in binary form installed on your computer, then it should also be possible to obtain them in the form of a chrootable sysroot (or “SDK”).
Anyone who has had a hand in maintaining a tree of build instructions which include a bootstrap phase from host tooling to first get off the ground (like buildroot or yocto) will have lived through the burden of vetting new distros as they roll out and patching builds so as to work “on the latest debian” or whatnot. This whole maintenance aspect is simply dropped from the equation by ensuring that host tools are not a variable in the equation but rather a constant.
Assembling the image
When it comes time to assemble an image to boot with, there are various options and it should not be such a big deal, right ? Well, unfortunately it’s not quite that simple.
It turns out that even in 2017, the options we have for assembling a bootable file system image as a regular unprivileged user are still quite limited.
Short of building qemu and using some virtualization, I’ve found that the only straight forward method of installing a boot loader is with syslinux on a vfat filesystem. While there are some tools around for manipulating ext2 filesystems in user space but these are largely unneeded anyway as static device nodes and assigning file ownership to arbitrary uid/gids is mostly unneeded when using modern init systems. In any case recent versions of e2fsprogs provide an option for populating the filesystem at creation time.
Partitioning an image for your file systems is also possible as a regular user, but populating those partitions is a game of splicing filesystem images into their respective partition locations.
I am hopeful however that with some virtualization performed entirely inside the build sandbox, we can achieve a much better outcome using libguestfs. I’m not altogether clear on how supermin and libguestfs come together but from what I understand, this technology will allow us to mount any linux supported filesystem in userspace, and quite possibly without even having (or using) the supporting filesystem drivers in your host kernel.
That said, for now we settle for the poor mans basic tooling and live with the restriction of having our boot partition be a vfat partition. The image can be created using the script element described above.
Example:
kind: script
description: Create a deployment of the GNOME system
depends:
- filename: gnome/gnome-system.bst
  type: build
- filename: deploy-base.bst
  type: build

variables:
  # Size of the disk to create
  #
  # Should be able to calculate this based on the space
  # used, however it must be a multiple of (63 * 512) bytes
  # as mtools wants a size that is devisable by sectors (512 bytes)
  # per track (63).
  boot-size: 252000K

  rootfs-size: 4G
  swap-size: 1G
  sector-size: 512

config:
  base: deploy-base.bst
  input: gnome/gnome-system.bst

  commands:

  - |
    # Split up the boot directory and the other
    #
    # This should be changed so that the /boot directory
    # is created separately.

    cd /buildstream
    mkdir -p /buildstream/sda1
    mkdir -p /buildstream/sda2

    mv %{build-root}/boot/* /buildstream/sda1
    mv %{build-root}/* /buildstream/sda2

  - |
    # Generate an fstab
    cat > /buildstream/sda2/etc/fstab << EOF
    /dev/sda2 / ext4 defaults,rw,noatime 0 1
    /dev/sda1 /boot vfat defaults 0 2
    /dev/sda3 none swap defaults 0 0
    EOF

  - |
    # Create the syslinux config
    mkdir -p /buildstream/sda1/syslinux
    cat > /buildstream/sda1/syslinux/syslinux.cfg << EOF
    PROMPT 0
    TIMEOUT 5

    ALLOWOPTIONS 1
    SERIAL 0 115200

    DEFAULT boot
    LABEL boot

    KERNEL /vmlinuz
    INITRD /initramfs.gz

    APPEND root=/dev/sda2 rootfstype=ext4 init=/sbin/init
    EOF

  - |
    # Create the vfat image
    truncate -s %{boot-size} /buildstream/sda1.img
    mkdosfs /buildstream/sda1.img

  - |
    # Copy all that stuff into the image
    mcopy -D s -i /buildstream/sda1.img -s /buildstream/sda1/* ::/

  - |
    # Install the bootloader on the image, it will load the
    # config file from inside the vfat boot partition
    syslinux --directory /syslinux/ /buildstream/sda1.img

  - |
    # Now create the root filesys on sda2
    truncate -s %{rootfs-size} /buildstream/sda2.img
    mkfs.ext4 -F -i 8192 /buildstream/sda2.img \
              -L root -d /buildstream/sda2

  - |
    # Create swap
    truncate -s %{swap-size} /buildstream/sda3.img
    mkswap -L swap /buildstream/sda3.img

  - |

    ########################################
    #        Partition the disk            #
    ########################################

    # First get the size in bytes
    sda1size=$(stat --printf="%s" /buildstream/sda1.img)
    sda2size=$(stat --printf="%s" /buildstream/sda2.img)
    sda3size=$(stat --printf="%s" /buildstream/sda3.img)

    # Now convert to sectors
    sda1sec=$(( ${sda1size} / %{sector-size} ))
    sda2sec=$(( ${sda2size} / %{sector-size} ))
    sda3sec=$(( ${sda3size} / %{sector-size} ))

    # Now get the offsets in sectors, first sector reserved
    # for MBR partition table
    sda1offset=1
    sda2offset=$(( ${sda1offset} + ${sda1sec} ))
    sda3offset=$(( ${sda2offset} + ${sda2sec} ))

    # Get total disk size in sectors and bytes
    sdasectors=$(( ${sda3offset} + ${sda3sec} ))
    sdabytes=$(( ${sdasectors} * %{sector-size} ))

    # Create the main disk and do the partitioning
    truncate -s ${sdabytes} /buildstream/sda.img
    parted -s /buildstream/sda.img mklabel msdos
    parted -s /buildstream/sda.img unit s mkpart primary fat32 \
       ${sda1offset} $(( ${sda1offset} + ${sda1sec} - 1 ))
    parted -s /buildstream/sda.img unit s mkpart primary ext2 \
       ${sda2offset} $(( ${sda2offset} + ${sda2sec} - 1 ))
    parted -s /buildstream/sda.img unit s mkpart primary \
       linux-swap \
       ${sda3offset} $(( ${sda3offset} + ${sda3sec} - 1 ))

    # Make partition 1 the boot partition
    parted -s /buildstream/sda.img set 1 boot on

    # Now splice the existing filesystems directly into the image
    dd if=/buildstream/sda1.img of=/buildstream/sda.img \
      ibs=%{sector-size} obs=%{sector-size} conv=notrunc \
      count=${sda1sec} seek=${sda1offset}

    dd if=/buildstream/sda2.img of=/buildstream/sda.img \
      ibs=%{sector-size} obs=%{sector-size} conv=notrunc \
      count=${sda2sec} seek=${sda2offset}

    dd if=/buildstream/sda3.img of=/buildstream/sda.img \
      ibs=%{sector-size} obs=%{sector-size} conv=notrunc \
      count=${sda3sec} seek=${sda3offset}

  - |
    # Move the image where it will be collected
    mv /buildstream/sda.img %{install-root}
    chmod 0644 %{install-root}/sda.img
As you can see the script element is a bit too verbose for this type of task. Following the pattern we have in place for the various build elements, we will soon be creating a reusable element with some more simple parameters (filesystem types, image sizes, swap size, partition table type, etc) for the purpose of whipping together bootable images.
A booting demo
So for those who want to try this at home, we’ve prepared a complete system which can be built in the build-gnome branch of the buildstream-tests repository.
BuildStream now requires python 3.4 instead of 3.5, so this should hopefully be repeatable on most stable distros, e.g. debian jessie ships 3.4 (and also has the required ostree and bubblewrap available in the jessie-backports repository).
Here are some instructions to get you off the ground:
mkdir work
cd work

# Clone related repositories
git clone git@gitlab.com:BuildStream/buildstream.git
git clone git@gitlab.com:BuildStream/buildstream-tests.git

# Checkout build-gnome branch
cd buildstream-tests
git checkout build-gnome
cd ..

# Make sure you have ostree and bubblewrap provided by your distro
# first, you will also need pygobject for python 3.4

# Install BuildStream as local user, does not require root
# If this fails, it's because you lack some required dependency.
cd buildstream
pip install --user -e .
cd ..

# If you've gotten this far, then the following should also succeed
# after many hours of building.
cd buildstream-tests
bst build gnome/gnome-system-image.bst

# Once the above completes, there is an image which can be
# checked out from the artifact cache.
#
# The following command will create ~/VM/sda.img
#
bst checkout gnome/gnome-system-image.bst ~/VM/

# Now you can use your favorite VM to boot the image, e.g.:
qemu-system-x86_64 -m size=1024 ~/VM/sda.img

# GDM is currently disabled in this build, once the VM boots
# you can login as root (no password) and in that VM you can run:
systemctl start gdm

# And the above will bring up gdm and start the regular
# gnome-initial-setup tool.
With SSD storage and a powerful quad core CPU, this build completes in less than 5 hours (and pretty much makes full usage of your machine’s resources all along the way). All told, the build will take around 40GB of disk space to build and store the result of around 500 modules. I would advise having at least 50GB of free space for this though, especially to account for some headroom in the final step.
Note: This is not an up to date GNOME system based on current modulesets yet, but rather a clone/conversion of the system I tried integrating last year using YBD. I will soon be starting on creating a more modular repository which builds only the components relevant to GNOME and follows the releases, for that I will need to open some dialog and sort out some of the logistics.
Note on modularity
The mentioned buildstream-tests repository is one huge repository with build metadata to build everything from the compiler up to a desktop environment and some applications.
This is not what we ultimately want, because first off, it’s obviously a huge mess to maintain and you dont want your project to be littered with build metadata that you’re not going to use (which is what happens when forking projects like buildroot). Secondly, even when you are concerned with building an entire operating system from scratch, we have found that without modularity, changes introduced in the lower levels of the stack tend to be pushed on the stacks which consume those modules. This introduces much friction in the development and integration process for such projects.
Instead, we will eventually be using recursive pipeline elements to allow modular BuildStream projects to depend on one another in such a way that consuming projects can always decide what version of a project they depend on will be used.
