Aboriginal YBD – An exploration in cross building

The last couple of months at Codethink have been an exploration into cross compiling, or rather, cross compiling without the hassle of cross compiling.

In brief, this post is about an experimental technique for cross building operating systems we’ve come up with, in which we use a virtual machine to run the builds, a cross compiler over distccd to do the heavy lifting and a virtfs 9p mount to share the build directory with the guest build slave.

Lets start at the beginning

In a recent post, I showcased a build of GNOME from scratch. This was created using the ybd build tool to build GNOME from Baserock YAML definitions.

Once we had a working system, I was asked if I could repeat that for arm. There was already a build story for building arm with Baserock definitions, but getting off the ground to bootstrap it was difficult, and the whole system needs to be built inside an arm emulator or on arm hardware. We started looking at improving the build story for cross compilation.

We examined a few approaches…

Full traditional cross compile

Some projects, such as yocto or buildroot, provide techniques for cross compiling an entire OS from scratch.

I did a writeup on the complications involved in cross building systems
in this email, but in summary:

  • The build process is complex, packages need to be compiled for both the $host and $target all the way up the stack, since modules tend to provide tooling which needs to run on the build host, usually by other modules which depend on it (i.e. icu-config or pkg-config).
  • Building involves trickery, one needs to setup the build environment very specifically so that host tools are run in the build scripts of a given module, this setup varies from module to module depending on the kind of build scripts they use.
  • The further up the stack you get, the more modules tend to expect a self hosting (or native) build environment. This means there is a lot of friction in maintaining something like buildroot, it can involve in some cases very strange autogen/configure incantations and in worse cases, downstream patches need to be maintained just to get it to work.
  • Sometimes you even encounter projects which compile C programs that are not distributed, but only used to generating header files and the like during the build, and often these programs are not compiled specifically with $HOST_CC but directly with $CC.

In any case, this was obviously not a viable option. If one wants to be able to build the bleeding edge on a regular basis, cross compiling all the way up the stack involves too much friction.

The scratchbox2 project

This was an avenue which shows promise indeed. The scratchbox project allows one to setup a build environment that is completely tweaked for optimal build performance, using qemu user mode emulation, and much, much more.

I took a look at the internals PDF document and, while I remain impressed, I just don’t think this is the right fit.

The opening statement of the referred pdf says:

Documenting a system as complex as Scratchbox 2 is not an easy task.

And this is no understatement by any means. Scratchbox’s internal design is extremely difficult to grasp, there are many moving parts and details to this build environment; all of which, at least at face value, I perceive to be potential points of failure.

Scratchbox 2 inserts itself in between the qemu user mode emulator and the host operating system and makes decisions, based on configuration data the user needs to provide, about what tooling can be used during a build, and what paths are really going to be accessed.

In short, scratchbox 2 will sometimes call host tools and run them directly without emulation, and sometimes it will use target tools in user mode emulation, these are managed by a virtual filesystem “view” and both execution modes will see the underlying filesystem in different ways. This way you basically get the fastest solution possible: you run a host cross compiler to build binaries for the target at build time, you run host built coreutils and shells and perl and such at configure time, and if you are well configured, you presumably only ever run target binaries in user emulation when those are tools which were built in your build and need to run during the build.

Scratchbox is what you get when you try to get the maximum performance out of a virtualized native build environment. And it is a remarkable feat, but I have reservations about depending on something as complex as this:

  • Will be able to easily repeat the same build I did today in 10 years from now and easily obtain the same result ?
  • If something ever goes wrong, will it always be possible to find an engineer who is easily capable of fixing it ?
  • When creating entirely new builds, how much effort is going to go into setting up and configuring the scratchbox environment ?

But we’re getting closer, scratchbox2 provides a virtualized environment so that when compiling, your upstream packages believe that they are in a native environment, removing that friction with upstreams and allowing one to upgrade modules without maintaining obscure build instructions and downstream patches.

The Aboriginal Linux project

This is the approach we took as a starting point, it’s not the fastest as a build environment but has some values which align quite nicely with our goals.

What Aboriginal Linux provides, is mostly just a hand full of shell scripts which allow one to bootstrap for a given architecture quite elegantly.

When running the Aboriginal build itself, you just have to tell it what the host and target architectures are, and after the build completes, you end up with the following ingredients:

A statically linked, relocatable $host -> $target cross compiler

This is interesting, you get a gcc which you can untar on any machine
of the given $host architecture and it will compile for $target

A minimal system image to run on the target

This includes:

    • A minimal kernel configured for that arch
    • Busybox / Toybox for your basic utilities
    • Bash for your basic shell utilities
    • A native compiler for the target arch
    • distcc
    • An init.sh to boot the system

A set of scripts to launch your kernel & rootfs under qemu

These scripts are generated for your specific target arch so they “just work”, and they setup the guest so that distcc is plugged into the cross compiler you just built.

A couple of nice things about Aboriginal

Minimal build requirements

Running the Aboriginal scripts and getting a build requires:

ar, as, nm, ranlib, ld, cc, gcc, g++, objdump, make and sh

The build starts out by setting up an environment which has access to these, and only these binaries.

This highly controlled early stage build environment is attractive to me because I think the chances are very high that in 10 years I can launch the same build script and get a working result, this is to be at the very base of our stack.

Elegant configuration for bootstrapping targets

Supporting a target architecture in Aboriginal Linux is a bit tricky but once it’s done it should remain reliable and repeatable.

Aboriginal keeps some target configuration files which are sourced at various stages of the build in order to determine:

  • Extra compiler flags for building binutils & gcc and libc
  • Extra configuration options for the kernel build
  • Magical obscure qemu incantation for bringing up the OS in qemu

Getting a compiler, kernel and emulator tuple to work is a delicate dance of matching up these configurations exactly. Once that is done however, it should basically keep working forever.

The adventure begins

When I started testing things, I first just wanted a proof of concept, lets see if we can build our stack from within the Aboriginal Linux emulator.

In my first attempts, I built all the dependencies I needed to run python and git, which are basically the base requirements for running the ybd build tool. This was pretty smooth sailing except that I had to relocate everything I was building into a home directory (read-only root). By the time I started to build baserock’s definitions though I hit a wall. I, quite innocently, wanted to just go ahead and build glibc with Aboriginal’s compiler, thinking no big deal right ? Boy was I wrong.

First problem was that glibc, seems to care a great deal about what compiler is used to build it, and the last GPLv2 version of gcc was not going to cut it. Surprisingly, the errors I encountered were not about the compiler not supporting a recent C standard or such, it was explicitly about gcc – glibc has a deep longing desire to be compiled with gcc, and a moderately recent version of it at that.

Aboriginal Linux had frozen at the very latest releases (and even git commits) of packages which were still available under GPLv2. It took some convincing but since that toolchain is getting old, Rob Landley agreed that it would be desirable, in a transitional period until llvm is ready, to have an optional build mode allowing one to build Aboriginal Linux using the newer GPLv3 contaminated toolchain.

So, I set myself to work and, hoping that it would just cost me a weekend (wrong again), cooked up a branch which supports an option to compile Aboriginal with GCC 5.3 and binutils 2.25.1. A report of the changes this branch introduced can be found on the aboriginal mailing list.

In this time I became intimately acquainted with building compilers and cross compilers. As I mentioned, Aboriginal has a very neat build model which bootstraps everything, running build.sh basically runs like:

CROSS_COMPILER_HOST=i686 SYSIMAGE_TYPE=ext2 ./build.sh armv5l

So essentially you choose the host arch and target arch (both of which need to have support, i.e. a description file like this one in the aboriginal sources), and then the build runs in stages, sourcing the description files for the said architecture depending on what it’s building along the way.

Because I spent considerable time on this, and am still sufficiently fascinated, I’m going to give a break down of the process here.

1.) Build host tooling

First we create a host directory where we will install tools we want to use during the build, we intentionally symlink to only a few minimal host tools that we require be on your system, these are your host compilers, linkers, a functional shell and make implementation.

Then, we build toybox, busybox, e2fsprogs and distcc, basically any tools which we actually have a chance of running on your host.

2.) Build a stage 1 cross compiler for ${target}

This is the compiler we’re going to use to build everything that is going to run on your target qemu guest image, including of course the native compiler.

In this step we build gcc, musl libc and then gcc again, we build gcc again in order to complete the runtime and get libstdc++.

Previous versions of Aboriginal did not require this second build of gcc, but since GCC folks decided to start using C++, we need a C++ capable cross compiler to build the native compiler.

3.) Build a stage 1 cross compiler for ${host}

This is the first step towards building your statically linked and relocatable cross compiler, which you’ll want to be plugging into distcc and using on any machine of the given ${host} arch.

This step is run in exactly the same way as the previous step, except that we are building a cross compiler from your real host -> ${host}

4.) Build the full ${host} -> ${TARGET} cross compiler

In this stage we will use the cross compiler we built in the previous step, in order to build a cross compiler which runs on ${host} and produces code for ${target}. Neither of these have to be the host arch you are actually running on, you could be building a cross compiler for arm machines to build x86 code on a mips, if you were that sadistic.

In this second stage compiler the setup is a bit different, we start out by compiling musl libc right away and just build gcc once, since we already have a full compiler and we already have musl libc compiled for the target ${host}.

Note: This is actually called a “Canadian Cross”, and no, I was also surprised to find out that it is not named after a tattoo one gets when joining a fringe religious group in Canada.

5.) Build the native compiler

Now, in exactly the same way we build the Canadian Cross, we’re going to build a native compiler using the stage 1 cross compiler for ${target}.

This compiler is cross compiled to run on target, and configured to produce code for the same target, so it is a cross compiled native compiler.

6.) Build the kernel and system image

Finally, we use our stage 1 cross compiler again to compile the kernel which will run in qemu, and the root filesystem which has a few things in it. The root filesystem includes toybox, busybox, make, bash and distcc.

We wrap this up with a few scripts, an init.sh to run on the resulting guest image and a run-emulator.sh script which is generated to just “know” how to properly bring up this guest.

A word on the ccwrap compiler frontend

Before moving on, I should say a word or two about the compiler frontend ccwrap.c.

I mentioned before that the cross compiler Aboriginal creates is statically linked and relocatable. This is achieved with the said frontend to the compiler tooling, who’s purpose in life is to fight GCC’s desire to hard code itself into the location you’ve compiled it to, tooth and nail.

ccwrap counters gcc’s tactics by sitting in place of gcc, cc, g++, c++ and cpp, and figuring out the real location of standard includes and linking stubs, and then calling into the original gcc binaries using a modified set of command line arguments; adding -nostdinc and -nostdlib where necessary, and providing the include paths and stubs to the command line.

This is a violent process, and gcc puts up a good fight, but the result is that the cross compiler you generate can be untarred anywhere on any host of the correct ${host} architecture, and it will just run and create binaries for ${target}, building and linking against musl libc by default (more on libc further down).


To port this all to work with new GCC and binutils versions, I needed to find the right patches for gcc and binutils, these are all mostly upstream already in unreleased versions of gcc and binutils. Then I had to reconstruct the building of the stage 1 compilers so that it builds with C++ support, and finally iron out remaining kinks.

This part was all pretty fun to wrap my head around, hope it was also enjoyable to read about 🙂

The travel from musl libc to glibc

So after all that, we have an Aboriginal Linux setup which is capable of building glibc, but the ride is not over ! When building a whole operating system, there is a small chance that someone out there used C++, if we’re going to distribute a glibc based system, we’re probably also going to want to have a libstdc++ that is actually linked against that glibc.

Well, that was what I was thinking, in fact; it runs deeper than this, gcc itself provides libgcc.a and it’s start/end stubs which compliment the host libc’s start/end stubs, but also provides a shared library and a libgcc_eh.so which need to be linked against the host libc.

In any case, at this stage I was a bit worried that the musl-linked gcc compiler I had might not be capable of building and linking programs against the new glibc. Of course it should work, this is just a standards compliant compiler on one hand and a standard C library on the other, but seeing that gcc / glibc entanglement runs so deeply, we had to be sure.

After some time building and rebuilding glibc and gcc on a puny armv5l qemu emulator I found the magic concoction which makes the build pass. For glibc the build pretty much runs smoothly, you first have to install the appropriate linux kernel includes and tell glibc that –with-headers=/usr/include, lest it tread off the beaten path, and go searching obscure host-triple prefixed paths all on it’s own.

To build the gcc runtimes (so that you get the desired libstdc++), you actually have to build gcc as if you were building a cross compiler.

In the armv5l transition from musl libc to GNU libc, you would tell it that:

--build=armv5l-thingamajiggie-musleabi
--host=armv5l-thingamajiggie-musleabi
--target=armv5l-thingamajiggie-gnueabi

With this setup, it will build all the host tooling using the existing musl libc which our existing compiler is hardwired to use, but when building the runtimes, it will look into ${prefix} and find the glibc we previously compiled, linking the gcc runtimes against the fresh glibc.

And yeah, it’s actually important to specify ‘-musleabi’ and ‘-gnueabi’ in the host triples specifically, gcc’s build scripts will parse the triples and behave differently depending on what suffix you give it.

In my setup, I did not want to use the new compiler, just the runtimes. So I did a custom install of the gcc runtimes in precisely the way that the aboriginal frontend expects to find them.

At this stage, we can now use environment variables to tell the Aboriginal compiler frontend how to behave, telling it the runtime linker we want to use and where it should look for it’s start stubs and end stubs and such.

Once we have installed glibc and new gcc runtimes into a chroot staging area on the target emulator, we can now set the following env vars:

CCWRAP_DYNAMIC_LINKER=/lib/ld.so
CCWRAP_TOPDIR=/usr

And gcc will look for standard headers and library paths in /usr and use the dynamic linker installed by glibc.

Now we can compile C and C++ programs, against glibc and glibc based libstdc++, using our nifty compiler which was built against, and statically linked, to musl libc.

What we have done with this ?

The next step was integrating all of this into the YBD build tool and use the Aboriginal compilers and emulator image to virtually cross-compile baserock definitions from whatever host you are running.

What we have now is a build model that looks something like this:

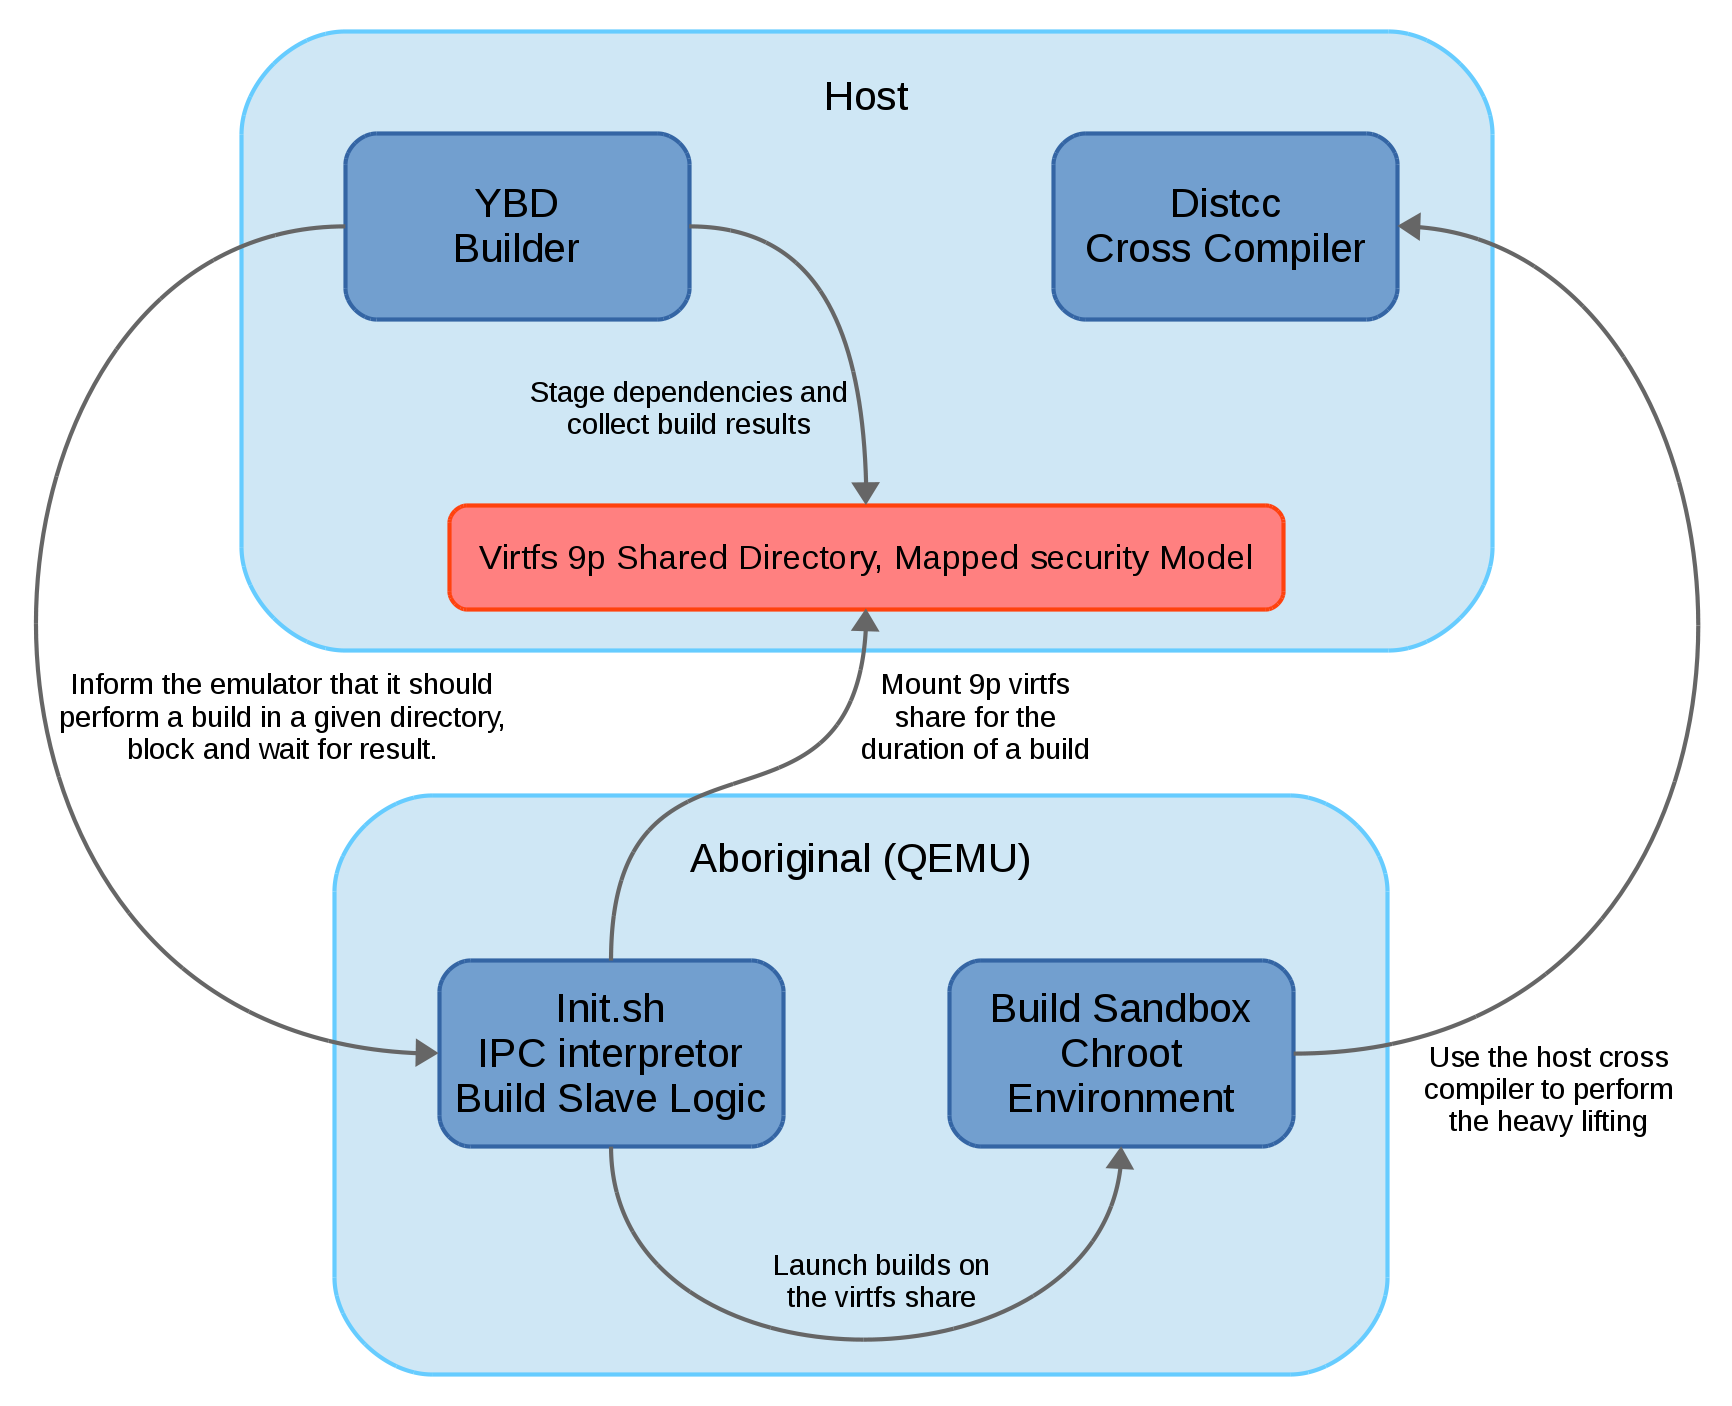
I’ll just take a bit more space here to give a run down of what each component is doing.

YBD Builder

The YBD builder tool remains mostly unchanged in my downstream branch.

Mostly it differs inasmuch as it no longer performs the builds in a chroot sandbox, but instead marshals those builds to slaved Aboriginal guests running in qemu emulators (plural of course, because we want to parallelize the builds as much as dependencies and host resources allow).

What YBD does is basically:

  • Clones the sources to be built from git, all sources are normalized into git repositories hosted on the trove.
  • Stages dependencies, i.e. results of previous builds into a sysroot in a temporary directory for a build, this is done in the virtfs staging grounds.
  • Stages the git repository into the build directory
  • Tells a running emulator that it’s time to build
  • Waits for the result
  • If successful, collects the build results and creates an “artifact” (tarball).

Also, of course YBD parses the YAML definitions format and constructs and navigates a dependency graph.

IPC Interpretor / Modified Init.sh

This component currently lives in the aboriginal controller repository, but should eventually be migrated into the YBD build tool itself as it makes little sense to have this many moving parts.

This is essentially some host side shell scripts, and some guest side shell scripts. The guest is launched in a specific way so as to run in the background and listen to commands over the virtio serial port (this IPC needs to be fixed, it’s a shaky thing and should probably be done over the actual network instead of the serial ports).

Build Sandbox

The build sandbox is just your basic chroot calling shell script, except that it is a bit peculiar in the way it does things.

  • It conditionally stages toybox/busybox if and only if tools are not already found in the staging area
  • It stages statically linked binaries only and is perfectly operational in the absence of any libc

Well, not all that peculiar I guess.

Virtfs 9p shared directory

Here is another, really fun part of this experimental build process.

Qemu has support for exporting a shared directory which can be accessed by the guest kernel if it is compiled with:

CONFIG_VIRTIO=y
CONFIG_VIRTIO_PCI=y
CONFIG_VIRTIO_PCI_LEGACY=y
CONFIG_NET_9P=y
CONFIG_NET_9P_VIRTIO=y

When a guest mounts -t 9p the exported directory, qemu will basically just perform the reads and writes on the guests behalf.

More interestingly, qemu provides a few security models, the basic being passthrough, which just reads and writes using the qemu launching user’s credentials. In any case, qemu can only access the underlying filesystem using the credentials it has. However qemu does provide a security model called “mapped” (or “mapped-file” which we ended up using).

Firstly, of course the shared directory is practical because it allows the host running YBD tool to stage things in the same directory where they will be built by the emulator, but things become interesting when the emulator is installing files under specific uids/gids, or creating device files which should be shipped in the resulting OS – basically anything that normally requires root.

Using the “mapped-file” security model allows the guest emulator to believe that it, as root, can manipulate the 9p mounted filesystem as root for all intents and purposes. On the actual underlying filesystem that qemu is writing to, everything will be created in mode 0600 and belong to the user running qemu, but extra metadata about the files qemu creates are going to go into corresponding files in a .virtfs_metadata directory.

The solution we came up with (I had much help in this area from Rob Taylor), was to write a small translation layer which allows us to also interact with the virtfs staging directory on the host side. What this translation layer does is basically:

  • Collect build results and create “real” tarballs from these results. The regular user is not allowed to create device files or files which belong to root, but it is at least allowed to own a tarball containing such files
  • The reverse of the previous; stage the content of a real tarball into a virtfs staging ground, so that files are extracted under the users credentials but the correct virtfs metadata is created so that the guest (build slave) will see the right thing
  • Stage files and directories into the virtfs staging grounds. This part is required for extracted git repositories which we intend to build.

This way, the whole operating system image can potentially be built from scratch by a regular user on the host.

Summary

At this, unfinished stage, I have built over 300 of the ~420 components which go into the basic GNOME system using this method of compilation to build for armv5l on my x86_64 laptop. The only build instructions which needed to be changed in order to build these were the base compiler and glibc builds, and a couple of minor changes to get some packages to build on armv5l.

Most of the kinks have been ironed out, I still have to build over 100 high level components and deploy and test the resulting image, but the higher up the stack you get the less problems you tend to encounter, I presume we’re through the worst of it.

Performance wise, this will never be as fast as scratchbox, however it’s possible that we explore qemu’s user mode emulation at some point. The problem with performance is the more you optimize here, the more nasty hacks you introduce (if say, you want to run host perl while building in the emulator), and the less comprehensive build system you end up with. We will try to keep a nice balance here and prioritize on repeatability and the convenience this can offer in terms of bootstrapping an OS with baserock build instructions on new architectures.

I can say however that regarding performance, libtool is probably next on the chopping block. It serves basically no purpose when building on linux, and building libtool objects costs about 8 to 10 times the time as simply compiling a regular object over distcc.

I will have to put this work down for a while as I have other work landing on my plate which requires attention, so I hope there will be an army of developers to continue this work in my absence 🙂

If you would like to try and repeat this work, a HOWTO can be found at the bottom of this email. Note that in that email, we had not yet tried the virtfs mapped security model which solves the problem of building as a regular user, however the instructions to get a build off the ground are still valid.

For now I see this as an interesting research project, we have tried some pretty new and interesting things, I am curious to see where this will lead us.

And, special thanks are owed to Rob Landley for giving me pointers along the way while navigating the Aboriginal build system, and for being generally entertaining in #toybox in freenode. Also thanks to Rob Taylor for digging into the qemu sources and coming up with the wild idea of man handling the virtfs mapped metadata.


DX Hackfest & FOSDEM

This is one of those back to work posts you intend to write and then kick yourself for forgetting… after a few starts this week I finally managed to squeeze in the time to finish this post.

Last week thanks to Codethink, I was able to travel to Brussels and attend the DX Hackfest followed by FOSDEM. What follows is a run down of things we did there.

Day 0

The Hackfest started on the 27th so I had arrived in Brussels on the 26th bright and early, after around 16 hours of travel including the layover. Feeling hungry, I stumbled out of my hotel room which was downtown by Sainte-Catherine square to fetch a kebab sandwhich. I was thoroughly enjoying my messy pita and fries at a small kebab shack beside the church and by coincidence Juan Pablo was moseying by, admiring the view and taking pictures of the church. With a healthy streak of spicy mayonnaise dripping down my face I called out his name so as not to miss him.

Juan and I had a bit of a chance to talk about what things Glade we could accomplish in our short time in Brussels.

Of course, property bindings came up, which is something that we have wanted for a long time, and Denis Washington had attempted before as his gsoc project.

No, we did not implement that, but here are a few reasons why we determined it was a no go for a few days of intense hacking:

Property Sensitivity

Glade has a notion about object properties having a sensitive or insensitive state, this is determined and driven by the widget adaptor of the object type owning a given property. This is typically used in cases where it makes no sense to set a given property, for instance we make the GtkLabel’s wrap mode property insensitive when the label is not set to wrap.

When considering that a property can be set up as a binding target, it stands to reason that the bound property editor should also be insensitive, as it makes no sense to give it a value if it’s value is driven by another property. Further, it may also make no sense to allow binding of a property at all if the given target property is meaningless in the current widget’s configuration. So, for instance when setting a GtkButton to use custom content instead of the icon name & label, we would have to undoably clear the binding state of the icon name property as well as it’s value.

Cut, Copy & Paste

When we cut, copy and paste in Glade we do so with branches of an object hierarchy. Some interesting new cases we would have to handle include:

  • When we paste a hierarchy in which contains a property source/target pair, we should have the new target property re-routed to the copied source object property.
  • When we paste a hierarchy which contains a bound property for which the source object is outside of the pasted hierarchy, we should maintain that binding in the pasted hierarchy so that it continues to reference the same out-of-hierarchy source.
  • When we paste a hierarchy which contains a bound property for which the source object is outside of the pasted hierarchy, but paste it in a separate project / glade file, the originally bound property should be cleared as it refers to a source property that is now in a different project.

So, after having considered some of the complexities of this, we decided not to be over ambitious and set our sights on lower hanging fruit.

Day 1

On day one we met up relatively bright and early at the betacowork space where the hackfest took place. Some of the morning was spent looking at the agenda and seeing if there were specific things people wanted to talk about, however, as Glade has a huge todo list it makes little sense to think too far ahead about bright and shiny desirable features so I did not add anything to the agenda.

Juan and I had decided that we can absolutely support glade files which do not always specify the ID field, which GtkBuilder has not been requiring for some time now. The benefit of adding this seemingly mundane feature to Glade is mostly better support for Glade files in the wild. Since the ID field is not required by GtkBuilder anymore, it turns out that many hand written files in the wild can no longer be loaded in Glade.

We spent around an hour discussing what issues we might face, and decided the path of least resistance would be to always have an ID internally under a special prefix __glade_unnamed_, so we just avoid serialization of the ID of those objects which are unnamed and we invent them as we load files that omit the ID.

Further, we ensure at all times that if an object is referred to as a property of another object, it must always have an explicit name. We achieve the rollover when running the object selection dialog, if any object is selected as a property of another object; the referred object is given a traditional name like label1 undoably while assigning that reference.

By the end of the day this was working pretty well…

Day 2

By now we thought we had pretty much everything covered for the ID’less widgets, and then we encountered the <action-widgets> of GtkDialog and GtkInfoBar.

These have the unfortunate history of being implemented in an odd way, and I’m not sure how far back this dates, but historically you would denote an action widget by giving it a Response ID integer property and placing the widget in the action area. Since some version of GTK+ 3.x (or possibly even 3.0 ?) we need to refer to these action widgets by their ID in the Glade file and serialize an <action-widgets> node containing those references.

This should ideally be changed in Glade so that the dialog & infobar have actual references to the action widgets (consequently forcing them to have an ID), and probably have another object selection dialog allowing one to select widgets inside of the GtkDialog / GtkInfoBar hierarchy as action widgets. If however the <action-widgets> semantic is newer than GTK+ 3.0 then it gets quite tricky to make this switch and still support the older semantics of adding buttons with response IDs into the action area.

In any case, we settled on simply forcing the action widgets to have an ID at save time, without any undo support, for the singular case of GtkDialog/GtkInfoBar action widgets, disturbingly this also includes autosave, and annoyingly modifies the Glade datamodel without any undoable user interaction, but it’s the corner case hack.

After this road block, and ironing out a few other obstacles (like serializing the ID’s even if they dont exist when launching the preview, which requires an ID to preview)… we were able to at least nail this feature by the end of Day 2.

I also closed this bug by ensuring we dont handle scroll events in the already scrolling property editor, something we probably should have done many years ago.

Also, Juan Pablo revived the old school logo (for those who recall the flaming globe logo) in Glade’s workspace so the workspace is a little more fancy. This tribute to the older logo has in fact has been present for years in the loading screen. Unfortunately… there is only a small number of users who work on projects which contain thousands of widgets, so most of you have been missing out on the awesome old logo tribute, which will now appear in it’s full glory in the background of Glade’s workspace.

Day 3

By now we are getting a bit tired, this post hasn’t covered the more gory details but as we were in Brussels, of course we had the responsibility of sampling every kind of beer. By around 4 pm I was falling asleep at my desk, but before that I was able to make a pass through the GTK+ widget catalog and update it with new deprecations and newly added properties and signals, in some cases updating the custom editors to integrate the new properties nicely. For instance GtkLabel now has a “lines” property which is only sensitive and relevant if ellipsis and word wrapping are enabled simultaneously.

We also fixed a few more bugs.

FOSDEM

And then there was FOSDEM, my first time attending this conference, I was planning on sleeping in but managed to arrive around 10am.

I enjoyed hanging around the booths and mingling mostly, which led to a productive conversation with Andre Klapper about various bug tracking and workflow solutions. I attended some talks in the distros dev room; Sam Thursfield gave his talk about the benefits of using declarative and structured data to represent build and integration instructions in build systems. I also enjoyed some libreoffice talks.

By the end of the second day and just in the nick of time, I was informed that if I had not gotten a waffle from a proper waffle van at the venue, then I had not really been to FOSDEM”. I hurried along and was lucky enough to catch one of the last waffles off of a closing van, which was indeed the most delicious waffle I’ve ever tasted.

I guess the conclusion is that waffles are not what FOSDEM is all about, and that’s a good thing – I’d rather be eating a waffle at a conference about free software, than writing free software at a conference about waffles.


A build of GNOME from scratch

Hi all, long time no blog !

As is usual when a long time has passed without blogging, we end up with a mish mash of subjects which, ideally should go into separate posts. Sorry about that, I’ve titled this post “A build of GNOME from scratch” because that’s what I’ll be focusing on most here.

First, I have been out of touch for some time with GNOME, mostly because I have been involved with my own Canada based startup company which has been juicing me for every spare hour of work I could lay my hands on. This of course takes a toll on your life in general so the time has come to slow down the pace a bit for the sake of retaining a small measure of sanity.

So this is mostly why I have not been involved in GNOME as much as I would have liked in recent years, but fear not; I am back and hope to be solving problems *cough* causing trouble on a regular basis again 🙂

New Employment

In late 2015, I have started to play for team Codethink.

I am very happy with the new arrangement for a number of reasons. One of them of course being that I will be able to make some FOSS contributions again in the course of my work. The other reason, is that when it comes to consulting company logos there is no competition, we obviously have the coolest logo:

logo

But seriously, I am both proud and humbled to be working along side such a talented group of individuals.

A build of GNOME from scratch

The majority of the work I’ve been doing so far with Codethink has been to build and integrate a GNOME reference build with the Baserock build system.

I’ll probably return at some point to give a more thorough explanation of exactly what Baserock is and what it is not, but that is not the point of this post, suffice to say that it is a build system and as of the close of 2015 it includes a reference build of GNOME which is quite functional and fairly well integrated.

Some of the things I’m happy about:

Input Methods

When booting the Baserock GNOME image, you can choose your language and input method. This just works, launch the control center and enter the “Region and Languages”, choose your input method, and it just works.

GNOME in Korean, entering text in Nautilus using hangul input method

I have yet to see a distribution which does this. To get my Korean input method working, I usually have to ask google about it, find out what packages I need to install (sometimes with multiple ways to set it up) and in some cases I’ve needed to inject things into my environment manually to get it working.

Online Desktop

The online desktop experience works throughout the user experience. This means we’ve sorted out PAM hell and have the keyring unlocked with the user login.

It also means that we’ve got gnome-initial-setup working properly again after some bitrot. So when you create the first regular user on the OS with gnome-initial-setup, the online accounts credentials get handed off to the new user seamlessly (the above linked patch still needs to be merged upstream, though).

Of course, if you’ve setup online accounts, you will get all that sugar such as GNOME Shell notifications of events in your online account calendar, and ability to access your online account emails in Evolution, etc.

Location Services

Geoclue also works, so when you boot up your GNOME system for the first time, geoclue guesses your timezone automatically, even if you’ve selected a locale.

Audio / Video

Audio and Video works for most popular formats, pulseaudio is working and all of the important GStreamer bits are there.

Firing up epiphany will allow you to watch (and listen to) videos on the web, except for youtube (but that’s ok, epiphany also does not play youtube videos on my debian system, apparently there are still things in WebKitGtk blocking that).

Most core GNOME apps

Most of the core GNOME apps are integrated with a few exceptions.

gnome-applications

All of the apps you see in the screenshot actually work… Which sounds pathetic, but I assure you it’s more than just building the apps themselves, there are unfortunately many subtle details to get right in a fully integrated desktop experience, and we’re not quite there yet but pretty darn close.

Where this is all going right now is not entirely decided. For starters, the GNOME build will serve as a better real world test case for the Baserock infrastructure.

There is talk about scripting this so as to output nightly images, so that one could potentially try out a bleeding edge nightly GNOME image fresh from git master at any time.

Crashing the party in Brussels

I will be crashing the DX hackfest in Brussels at the end of the month. I’ve inserted myself in the list next to Juan Pablo because I’m so shy that I would prefer to lurk in his shadow 🙂

I hope to close a lot of Glade bugs at the hackfest and get closer to the goal of properly supporting all of the UI files in the GTK+ tree. I also look forward to hearing more about Builder and seeing what we can do on our side to make that developer experience better.

This coding sprint for Glade is of course brought to you by Codethink, and I would like to personally thank Codethink for the opportunity to attend FOSDEM for the first time.

Application Bundles Revisited

This is a follow up post on the one I made earlier this week on Glade application bundles.

What I had hoped to be a simple bundling experience turned out to actually take me all week to complete, but hey, you get what you pay for. And I’m very happy with the outcome so it was well worth the effort.

The new test bundle can be found here, and I’m very proud to announce that we require exactly the 2.7 ABI form glibc.

We still require fontconfig/freetype/Xlib libraries to be present on the target host to run what is inside the bundle, and we still require libz and a moderately old version of libglib to actually unpack the bundle.

For the AppImageKit glib & zlib dependencies, I plan to make those static dependencies so that they will not even be required, but first I must do battle with CMake to make that happen.


How can I use this to bundle my GTK+ application ?

This is a question I’ve been expecting to hear (and have been hearing). As the last iteration was only a spike, it involved a very ‘LFS’ technique of manually preparing the bundle, but that has been fixed this week and now you can use the bundling mechanism with a collection of customized jhbuild scripts.

Here is an outline of what we have in our build/linux/ directory, which can serve as a good template / starting point for others to bundle their application:

  • README: A step by step instructions for generating the bundle
  • jhbuildrc: A custom jhbuildrc for building the bundle
  • AppRun: A script to run your GTK+ app from inside the bundled environment
  • PrepareAppDir.sh: A script to post-process the built stack including GTK+, it’s dependencies and your app
  • LibcWrapGenerator.vala: A program for generating libcwrap.h
  • modulesets/bundle.modules: A self-contained moduleset for building the stack
  • modulesets/patches/: A few downstream patches needed to build/run the bundle
  • triggers/: Some custom jhbuild post-installation triggers

People are welcome to copy this build/linux subdirectory into their project and try to build their own GTK+ based application bundles.

Different applications will have different requirements, you will certainly need to modify AppRun and bundle.modules.


Hand to hand combat with glibc

Most of my work this week has revolved around doing hand to hand combat with glibc. I do feel a bit resentful that gcc does not provide any -target-abi-version=glibc,2.7 sort of command line option, as this work would be much better suited to the actual compiler and linker, however with libcwrap.h and it’s generator, I’ve emerged victorious from this death match.

The technique employed to get the whole stack to depend on glibc 2.7 ABI involves using the .symver directive like so:

__asm__(".symver memcpy, memcpy@GLIBC_2.2.5");

The symbol memcpy() changed in libc’s 2.14 ABI to behave more like memmove(), however linking to the new symbol causes your application to require libc 2.14 ABI, which of course we don’t want. The above .symver directive ensures that you will link to the version of memcpy() which is provided by the glibc 2.2.5 ABI.

However the problem is more intense than just this, there are many symbols in libc with various versions and what we want is to be able to simply choose a target version. The LibcWrapGenerator.vala program takes care of this.

Running the generator on a given platform will call objdump on your system libc libraries and inspect which symbols exist, which of them can be safely accessed without any .symver directive, which symbols can be redirected to their most recent version before your arbitrary target ABI version and finally, of course, which ones simply are not available, for instance the fallocate symbol:

__asm__(".symver fallocate, fallocate@GLIBC_DONT_USE_THIS_VERSION_2.10");

The fallocate symbol was actually initially introduced in the 2.10 ABI, and simply cannot be used when targeting the glibc 2.7 ABI.

The nice thing about the above directive, is that it will cause an informative linker error when you try to link any program using fallocate() against glibc. Some of my patches work around these problems (for instance cairo uses longjump() in it’s test cases, so my patch simply disables these test cases when building for the bundle), in other cases this is totally transparent. For the case of fallocate above; libglib will try to use it if it’s available, but with the forced include of the generated “libcwrap.h” file, glib simply fails to find fallocate at configure time and happily functions without it.

This technique was borrowed from the now defunct autopackage project which used a bash script with awk to generate the header file in question, however this script stopped working for glibc runtimes >= 2.10. A newer port of that old script to vala was created by Jan Niklas Hasse in 2011 which was a good starting point, but still failed to generate the correct output. Today I put my (non-existent) vala skills to the test and now have a working version of this nifty header generator, salvaged from the autopackage wreckage.


More Testing !

I will of course appreciate any more testing of the new bundle, for any systems with the glibc 2.7 ABI or later. We did prove that the bundle works properly for a CentOS 6 system which is already a good start.

I would be interested however to know if other people can build the bundle following my README file in our build/linux directory, specifically I’m looking for cases where you have a very new glibc ABI, generate a new libcwrap.h, and let’s see if the bundling process still works, and also let’s see if we can run the bundled glade on very old systems, generated from very new systems.


That’s all, I think I’ve covered all the ground I intended to in this post… so please try this at home ! 🙂

And enjoy bundling your own GTK+ applications 🙂


Application Bundles for Glade

This week started out with a search for some mechanism for building portable bundles for 64bit GNU/Linux systems. I looked at various bundler implementations, 0install, chakra, Alexander Larsson’s glick and glick2 to name a few of the implementations I found. Finally I found this gem called AppImageKit by Simon Peter (I refer to my own fork of his repository because it contains some patches I needed, however there is a pull request, which I think is the custom when doing things on github.com).

Before I continue, I should make clear what were my motivations and why I chose AppImageKit over any other existing options.

Why Bundled Applications ?

Bundled applications is a concept prominent in OSX and has been considered and reconsidered a lot by the general GNOME/GNU/Linux communities, I refer to Alex’s blog for some ideas on the concepts of bundling applications, you may also want to read this article by Lennart Poettering on the subject of Sandboxed Applications for GNOME (if you haven’t already seen his talk).

So first let me explain the motivations behind my hacking:

  • I wanted to make bleeding edge versions of Glade available to a wider user base. While many serious developers will naturally have a copy of GTK+ master from git.gnome.org built locally (as naturally you target next generation software for the apps you create), we still have many users who are just not into creating a relocated build system and building everything themselves.
  • Pretty much the same as the above point, I don’t want users to have to lag 3 years behind our development just because they decided to run a stable operating system (this should be a no brainer, really).
  • Finally, I wanted a method of distributing portable binaries of proprietary applications, without the fuss of wallowing around in the muck of creating rpms and debian packages for every different system out there, I want to just create one bundle which will run pretty much everywhere with X11 and 64bit linux. Yes, time to throw eggs and tomatoes at me in public. Just because I’ve contributed lots and lots of my own time to work on free software for ‘free as in beer’, and have been a proponent of Free Software for my own idealistic reasons (I just believe that code developed in public is held to a higher standard of quality), doesn’t mean that all the software I write is going to be free software.

Why did I choose AppImageKit ?

If you’re already familiar with the scene of Application Bundles out there, then you’ve already probably guessed why I made my choice.

In my search for application bundling mechanisms out there, I found a few options (as I mention in the beginning of this post). I quickly realized that most of the projects I found were either targeting a specific OS/distribution (i.e. chakra) or at least required the user to install some kind of mechanism to run the bundle (i.e. 0install). While I really do respect and admire the work done by Alexander and the advocacy by Lennart, pushing for a new concept of packaging in GNU/Linux systems, my requirements were simply different (and perhaps once sandboxed applications for GNOME actually exist, I will be able to switch to that new mechanism).

My requirement is, again, to be able to download and run an application on your 64bit GNU/Linux platform, I don’t care if it’s Fedora, GNOME OS, Debian, Arch Linux, Ubuntu, Chakra, I just wanted it to run.

How does it work ?

After reading the first paragraphs of the AppImageKit documentation I was sold. This is a simple and nifty idea of simply creating a compressed ISO image with an ELF binary header, it uses libz to decompress itself and fuse to mount itself into a temporary directory, and then it just runs a script, letting you modify your environment and launch your App from within the unpacked bundle environment (actually the AppRunScript.sh is my own addition to AppImageKit). It also uses libglib for some obscure reason, so the best practice is to build the bundling mechanism with the oldest version of libglib possible (as this will become a base runtime requirement for the user).

So basically the requirements are:

  • C runtime libraries
  • libfuse, with a fuse capable kernel
  • libz
  • libglib (as old as possible)

After that, the system requirements depend entirely on what you put in the bundle.

Please test my Glade bundle !

After 2 days of hacking I was finally able to get a GTK+ application running (Glade) with the Adwaita theme fully functional, and self contained. This involved much ldd and strace in the bundle environment, ensuring that the runtime doesn’t touch any system libraries or auxiliary data, the discovery of this nifty chrpath tool, and much grepping through various sources and figuring out how to properly relocate these modules with environment variables. I had to strangle Pango, until it finally yielded, after I thoroughly deformed pango’s face with this downstream patch. I also needed to rediscover hicolor-icon-theme’s location on fdo, since everything breaks down without an index.theme file in the right place (one of the various things jhbuild forgets to do properly).

You might be interested to peek at the README which is a thorough breakdown on how to create portable bundles of Glade in the future, the application startup script is also of particular interest as it shows what environment variables you really need to relocate GTK+ apps.

Finally, I was able to produce this bundle.

In addition to the AppImageKit system requirements listed above, we require:

  • X11 libraries
  • fontconfig
  • freetype

(Technically these could also be included in the bundle, it would require that we install fonts as well, and I just wanted to avoid that telling myself that most GNU/Linux distributions have this already).

The above bundle should be able to ‘just run’, just download it and run it without any special privileges… PLEASE !

We will greatly appreciate any testing on various 64bit GNU/Linux platforms, after some testing we will start to advertise downloadable bundles of bleeding edge Glade for any users of stable GNU/Linux distributions.

And of course, Enjoy !

Smart & Fast Addressbooks

This post is a sort of summary of the work we’ve done on the Addressbook for Evolution Data Server this year at Openismus. As I demonstrated in my previous post, Evolution’s addressbook is now riddled with rich locale sensitive features so I won’t cover the sorting features, you can refer to the other post for that.


Understanding Phone Numbers

This is another really nice feature which I admit has been driving me up the wall for the last year. I’ll try to sum it up one last time here so hopefully I don’t have to ever concern myself too much with the topic again 😉

Before I get into it, I should start with describing the problem which we’ve addressed (I can’t say solved as I don’t believe there really is any ultimate solution for this problem).

So, this problem is particular to the implementation of a hand phone device, which implies the following conditions:

  • Users will enter any kind of data into the addressbook and call it a phone number. This most typically involves phone numbers entered as local numbers, sometimes it includes fully qualified international numbers for contacts who live abroad, and can also include text such as “ask jenny for her number next time”, as a rule, anything goes.
  • Addressbooks are typically a collection of vCards, this is a point of interest as using a standard format for contacts allows one to send vCards back and forth, which means that you cannot consider yourself in control of the data you store on your device. Instead a vCard can come from a synchronization of contacts from your laptop’s email client, or passed over bluetooth, the vCard can come from anywhere, containing any data it pleases and calling that a phone number.
  • When initiating an outbound call, the cellular modem firmware will send a string of numbers to the carrier, this will either succeed or fail. It’s tempting at this stage to consider and store the result of this operation, but unclear if the modem firmware will tell you the fully qualified number of the successful outbound call, and unreasonable to attempt a call just to determine such a thing.
  • When the firmware announces an incoming call, there will be a fully qualified E.164 phone number available (E.164 is a standard international phone number format).

Two obvious use cases now present a difficulty:

  • Let’s say the user starts entering a phone number somewhere in the UI, perhaps with the intent of initiating a phone call, or just with the intent of searching for a contact. We know that the user entered ‘just about anything’ as a phone number, we know that the vCard might have come from an external source (the same user might not have entered the phone number to begin with), and of course, we want to find the correct contact, and we want to find that contact right now.
  • Let’s imagine also, just for a moment, that your hand phone implementation might actually receive a phone call (not all of your users are so popular that they actually receive calls, but this is, after all, what your device is for ;-)). So now we have access to a fully qualified E.164 number for the incoming call, and an addressbook full of these vCards, which have, ya know, whatever the user decided to enter as a phone number. We of course want to find the single unique matching contact for that incoming phone number, and we want it even more righter and nower than in the other use case listed above (just in case, you know designers, maybe they want something crazy like displaying the full name of the contact who’s calling you instead of the phone number).

A common trick of the trade to handle these cases is to perform a simple heuristic which involves normalizing the number in your vCards (to strip out spaces and characters such as ‘-‘ and ‘.’) and then perform a simple suffix match against the incoming caller’s fully qualified phone number. This was admittedly a motivation behind our implementation of optimized suffix matching last year.

But let’s pretend that you’re not satisfied with this heuristic, you know you can do better, and you want to impress the crowd. Well now you can do just that ! assuming of course that you use Evolution’s addressbook in your device architecture (but of course you do, what else would you use ?).


Locale sensitive phone number interpretations

Again the International Components for Unicode (ICU) libraries come to the rescue, this time with the libphonenumber helper library on google code, which is now an optional dependency for Evolution Data Server (my painful experience compiling this heap of libphonenumber code begs me to make an unrelated comment: somebody school these guys in the ways of Automake, this CMake experience is just about the worst offence you can make to a downstream packager, or someone like me, who just needs to build it).

So what is a locale sensitive interpretation of a phone number ? Why do we need that ?

  • Some countries have different call prefixes for outgoing calls to leave the country. I believe this is ‘0’ in North America but it can vary. Even more confusing, take a country like Brazil with many competing cellular carriers, in the case of Brazil you have multiple valid calling prefixes to place a call outside of the country, each one with a different, competing rate.
  • Some locales, like in all locale sensitive affairs, have different preferences about how a phone number is composed, i.e. do we use a space or a dash or a decimal point as a separator ? do we interpret a trailing number preceded by a decimal as an extension code ? or as the final component of a local phone number ?
  • Some locales permit entirely different character sets to be used for numbers, and users might very well prefer to enter phone numbers in their native language script rather than entering standard numeric characters.

Using libphonenumber allows us to make the best possible guess of what the fully qualified E.164 number would be for an arbitrary string entered by the user in a given locale. It also provides us with useful information such as whether the phone number contained an extension code, whether the number had a leading 0 (special case for Italy) and whether the parsed phone number string had a country code. Actually libphonenumber will also make a guess at what the country code would be, but we’re not interested by that feature.

To leverage this feature in Evolution’s addressbook, one should make use of the following APIs:

  • The function e_phone_number_is_supported() can be called at runtime to determine if your installation of Evolution Data Server was compiled with support for phone numbers (as libphonenumber is only a soft dependency, this should be checked).
  • When creating a new addressbook, the ESourceBackendSummarySetup should be used to configure the E_CONTACT_TEL field into the addressbook ‘quick search’ configuration, and it should be configured with the special index E_BOOK_INDEX_PHONE so that interpreted phone numbers will be stored in SQLite for quick phone number matching.
  • Whether your addressbook is configured for quick phone number searches or not, so long as phone numbers are supported in your build then you have the capacity of leveraging the phone number matching semantics in the regular way with EBookQuery.

Three queries exist which can be used for phone number matching, at differing match strengths.

A typical query that you would use to search for, say equality at the national number strength level, would look like this:

EBookQuery *query = e_book_query_field_test (E_CONTACT_TEL,
                                             E_BOOK_QUERY_EQUALS_NATIONAL_PHONE_NUMBER,
                                             "user entered, or E.164 number");

With the above query one can use the regular APIs to fetch a contact list, filter a view, or filter a cursor.


Addressbooks on Crystal Meth

One thing that is really important of course in contacts databases, is speed, lots and lots of speed 🙂

While last year we’ve made considerable improvements, and already gained much speed for the addressbook, now contacts are inserted, deleted, modified and as specially fetched righter and nower than ever.

I should start by mentioning that in the last two weeks I’ve committed a complete rewrite of the old SQLite code which handles addressbooks, finally overcoming this bug, and turning what used to look like this (shudders) into something much more intelligible (sigh of relief). The net results in performance, can be observed here.

While I’d love to go over the vast improvements I’ve made in the code, and new features added, let’s just go through some highlights of the new benchmarks as I’ve been writing this post for a few hours already 😉

First some facts about the addressbook configuration, since that makes a great difference in the meaning of the benchmark output.

  • E_CONTACT_GIVEN_NAME   – Forced fallback search routines (no index)
  • E_CONTACT_FAMILY_NAME  – Prefix Index, Suffix Index
  • E_CONTACT_EMAIL – Prefix Index, Suffix Index
  • E_CONTACT_TEL – Prefix Index, Suffix Index

The red line in the benchmarks is what is now in EDS master (although marked as “Experimental” in the charts). The comparisons are based on addressbooks opened in Direct Read Access mode, i.e. books are opened with e_book_client_connect_direct().

And now some of the highlights:

contact-saving
Total time to save all contacts, with varying numbers of contacts to add.

In the above chart we’re basically seeing the time we save by using prepared statements for batch inserts, instead of generating the same query again and again.


Time to fetch a contact by email prefix

Prefix searches on contact fields which have multiple values (stored in a separate table) such as email addresses and phone numbers, now have good performance for addressbooks containing over 200,000 contacts (I was unable to test 409,600 contacts, as the benchmarks themselves require a lot of memory to keep a set of vCards and EContacts in memory).


filter-by-long-given-name-prefix
Fallback routine performed on the prefix searches of the given name

Here we see no noticeable change in the speed of fetching contacts with the fallback routine (i.e. no data to compare in SQLite columns, vCard parsing involved).

This is interesting only because in my new code base, we no longer fetch all contacts into memory and compare the list one by one, but instead install a function into SQLite to perform the fallback routine over the course of a full table scan. This is much more friendly to your memory consumption, and comes at no decrease in the performance of queries which hit the fallback routine.


Resident memory usage over the course of the benchmark progress

Here we see the memory usage of the entire benchmark process including the evolution-addressbook-factory process over the course of the benchmarks (each dot from left to right is a measurement taken after each benchmark runs). Note that we have 200,000 contacts and vCards loaded into memory for the sake of the benchmarks to verify results for each speed test (hence the initial spikes at the beginning of the benchmark progress).

The noticeable drop in memory usage can be attributed to how the new backend is more friendly on system memory when performing fallback search routines.

Take a look at the full benchmarks including the csv file here. I should note that the ‘fetch-all-contacts.png’ benchmark indicated a bug where I was not detecting a special case (a wildcard query which should simply list all results), that has been fixed and the benchmark for it doesn’t apply with current Evolution Data Server master.

Anyway, it’s late and time for pizza 🙂

I hope you’ve all enjoyed the show !


Get your contacts sorted

Hi all, I’ve been short on blog posts this summer and realize, after the fact, that I’ve not blogged once about the cursor API we’ve been cooking up at Openismus this year.

I’d like to present to you an interesting and unique new feature which will be available in the GNOME platform for 3.12, the cursor API to iterate over contacts in Evolution Data Server which has recently landed in git master.

Of course, the ability to sort a list of contacts and iterate over them efficiently can not be unique. I do think we have a solid API, and we support cursors in direct read access (bypassing D-Bus) but I’d really like to highlight some of the new internationalization features this API brings with it, allowing one to easily implement rich locale awareness in contact browsing applications.

Rich locale sensitive sorting with ICU

The cursor iterates over contacts in the order specified by the cursor’s configuration, and does so using a locale sensitive sort.

The ICU libraries provide a much richer set of collation options than the standard glibc’s implementation of strcoll() and friends. For the contacts database, specific ICU collation rules are preferred in order to get the sort order most appropriate for an addressbook (we normally prefer ‘phonebook’ order as opposed to a ‘dictionary’, ‘phonetic’ or other flavours of sort order).

Dynamic locale changes

So your device / desktop has a locale setting ?

Want your device / app / desktop to transition seamlessly from one locale to another ?

This won’t be a problem for your contact browsing interface. EDS’s addressbook will update it’s locale automatically when it’s notified of a system locale change (via the org.freedesktop.locale1 interface), automatically sorting the contacts in the new sort order and updating the active alphabet (cursor positions are necessarily lost and reset at locale change time).

Alphabet Introspection

Contact browsers, for your hand phone or your email application, are fun to navigate when you can jump to a given letter, or have some feedback showing what letter in your alphabet which you are currently browsing.

But what happens when your application must be usable in English, Greek, Japanese and Arabic ?

The ICU libraries again come to the rescue, providing us with tools we can use to display and navigate through characters and positions which are valid in the user’s active alphabet / script.

The new cursor API leverages this feature to make locale sensitive alphabetic browsing easy.

Diagram explaining how alphabetic positions relate to a contact list
Diagram explaining how alphabetic positions map onto a contact list

Since ICU provides us with functionality to determine what text should sort under which alphabetic position in the active alphabet, we are able to generate a sort key which will sort in between characters in a given alphabet.

This allows us to solve the problem of navigating to the position ‘E’ in the alphabet reliably and in the right place, as one must have knowledge of which variation of the letter ‘E’ (upper or lower case variations of e, é, è, ë, ê, etc…) sorts lowest in the active locale.

Documentation and Examples

This time around I wrote an obscene amount of documentation and a fully functional alphabetically sorted example contact browser.

Please enjoy the pretty diagrams and code snippets while writing your locale aware contact browsing applications 🙂

Below is the example contact browser first in en_US and then in ja_JP, unfortunately I did not take the time to add contact data from many locales (so there are no Japanese names listed there, instead all of the names in Latin script sort below the active Japanese alphabet).

Example contact browser en_US locale
Example contact browser en_US
Example contact browser in ja_JP locale
Example contact browser ja_JP

Composite templates lands in Vala

This is another journal entry relating to the composite template saga. It’s been a little over a month now since Openismus was kind enough to sponsor my work on embedding of GtkBuilder xml directly into GtkWidget class data, allowing the automation of composite widget classes.

As of recently, composite template support has been merged into Vala master. This Vala improvement was brought to you by Luca Bruno, so if you find yourself saving a lot of time in your daily Vala development practice, please be encouraged to transfer at least part of these savings into Luca Bruno’s personal beer fund.

This is really exciting for me because this integration in high level languages is really what I’ve had in mind while working towards this goal. Of course, the developer experience would be greatly improved by IDE tools which use Glade’s core and additionally have knowledge of Vala syntax and provide some glue features to help automate these associations (having both Glade’s core and Vala’s parser and object structures in the same memory space would allow some awesome integration features)… at any rate, this is still a major milestone on the road to a bleeding edge developer experience.

From now on your UI developer experience should look like this

The new Vala constructs allowing one to integrate with GtkBuilder files and create composite widgets in Vala are documented here.

Using the Vala compiler in GNOME git master today, it is possible to compile this full demo.

And here is just a sample from that demo:

using Gtk;

[GtkTemplate (ui = "/org/foo/my/mywidget.ui")]
public class MyWidget : Box {
        public string text {
                get { return entry.text; }
                set { entry.text = value; }
        }

        [GtkChild]
        private Entry entry;

        public MyWidget (string text) {
                this.text = text;
        }

        [GtkCallback]
        private void button_clicked (Button button) {
                print ("The button was clicked with entry text: %s\n", entry.text);
        }

        [GtkCallback]
        private void entry_changed (Button button) {
                print ("The entry text changed: %s\n", entry.text);

                notify_property ("text");
        }
}

The above is basically what an example composite widget looks like in Vala code. Notice that there are three attributes which can be used to bind your class to a GtkBuilder xml file.

  • GtkTemplate: This attribute tells the compiler to bind your class with the specified .ui resource, it is up to you to ensure that the specified resource is compiled into your program (using GResource).
  • GtkChild: This indicates that the instance variable refers to an object defined in the template GtkBuilder xml
  • GtkCallback: This defines one of your object class methods as a callback suitable to be referred to in the GtkBuilder xml in <signal> statements. If a class method is defined as a [GtkCallback], then you can simply specify the method name as a handler in Glade’s signal editor and your method will be called in response to the signal emission defined in the GtkBuilder file.

A small challenge

Over recent years, we’ve been hearing various stories about what GNOME should ‘choose for an official binding’, my money has always been on Vala. This is not because I know how to write code in vala, it’s not because I feel comfortable with vala or anything of the sort.

My reasoning is simple:

  • Vala is a formalism that we control, since it is based on GObject it’s the most valid candidate to deliver the features which are specific to our platform in a comfortable way. Examples of this are the implied syntaxes which Vala provides to connect callbacks to GSignals, built-in language features for using asynchronous callbacks from GIO, and now, my favourite addition is of course the [GtkTemplate] syntax.
  • A programming language is a window into a feature set available in a given platform. It took me all of 2 days to learn Objective-C and after doing so it makes perfect sense that one would choose Objective-C with it’s platform specific feature set to integrate with the NextStep environment, because hey, that’s what it was created for (so why try to use basic C code, or Java to integrate with the NextStep environment if a customized Objective-C variant was explicitly created to make your developer experience richer for that platform ?)

So the challenge is this: Prove me wrong.

Do you have another favourite language binding for GNOME ?

If so, can you please extend your language’s formalism to define composite widget classes ?

Whether this is really a challenge or not is yet to be seen, I’m really curious 😉


DoggFooding in Glade

I’ve been meaning to write a short post showing what we’ve been able to do with Glade since we introduced composite widget templates in GTK+, the post will be as brief as possible since I’m preoccupied with other things but here’s a run over of what’s changed in the Dogg Food release.

Basically, after finally landing the composite template machinery (thanks to Openismus for giving me the time to do that), I couldn’t resist going the extra mile in Glade, over the weekends and such, to leverage the great new features and do some redesign work in Glade itself.

So please enjoy ! or don’t and yell very loudly about how you miss the old editor design, and make suggestions 🙂

Glade Preferences Dialog

Preferences Dialog Before
Preferences Dialog After


The old preferences dialog was a sort of lazy combo box, now that we have composite templates and create the interface using GtkBuilder, it was pretty easy to add the treeview and create a nicer interface for adding customized catalog paths.

Also there are some new features and configurations in the dialog, since the new Dogg Food release we now have an Autosave feature, and we optionally save your old file.ui to a file.ui~ backup every time you save. There are also some configurations on what kind of warnings to show when saving your glade file (since it can be annoying if you already know there are deprecated widgets, or unrecognized widgets and have the dialog popup every time you save).

Glade Project Properties

Project Properties Dialog Before
Project Properties Dialog After


Refactoring out the project properties dialog into a separate source file, and implementing the UI with Glade makes the GladeProject code more readable, also the UI benefits again, notice the not so clear “Execute” button has been moved to be a secondary dialog button (with a tooltip explaining what it does).

Also the new project attributes have been added to allow one to set the project’s translation domain or Composite Template toplevel widget.

Now that’s just the beginning, let’s walk through the new custom editors.

Button Editor

GtkButton Editor After
GtkButton Editor Before


Here’s where the fun starts, while we did have some custom editors before, they all had to be hand written, now I’ve added some base classes making it much easier to design the customized property editors with Glade.

First thing to notice is we have these check button property editors for some boolean properties which we can place wherever in the customized property editor layout (checkbuttons previously didnt make any sense in a layout where one always expects to see the title label on the left, and the property control on the right, in a table or grid layout).

Entry Editor Before

GtkEntry Editor Before (top portion)
GtkEntry Editor Before (bottom portion)


Entry Editor After

GtkEntry Editor After (top portion)
GtkEntry Editor After (bottom portion)


All around better layout I think, also we save space by playing tricks with the tooltip-text / tooltip-markup properties for the icons. While in reality GTK+ has separate properties, we just add a “Use Markup” check to the tooltip editor and use that to decide whether to edit the normal tooltip text property, or the tooltip markup property.

Image Editor

GtkImage Editor Before
GtkImage Editor After


Here we economize on space a bit by putting the GtkMisc alignment and padding details down at the bottom, also we group the “use-fallback” property with the icon name setting, since the fallback property can only apply to images that are set by icon name.

Label Editor

GtkLabel Editor Before
GtkLabel Editor After


Like the GtkImage Editor, we’ve grouped the GtkMisc properties together near the bottom. We also have generally better grouping all around of properties, hopefully this will help the user find what they are looking for more quickly. Another interesting thing is that the mnemonic widget editor is insensitive if “use-underline” is FALSE, when “use-underline” becomes selected, the mnemonic widget property can be set directly to the right of the “use-underline” property.

Widget Editor / Common Tab

Last but not least (of what we’ve done so far) is a completely new custom editor for the “Common” tab (perhaps we can do away with the “Common” tab altogether… use expanders where we currently have bold heading labels, now that we do it all with GtkBuilder script, sky is the limit really)

GtkWidget Editor Before (top portion)
GtkWidget Editor Before (bottom portion)


Widget Editor After

GtkWidget Editor After


Here again we play some tricks with the tooltip, so that we don’t have two separate property entries for “tooltip-text” and “tooltip-markup” but instead a simple switch deciding whether to set the tooltip as markup or not. The little “Custom” check button in there makes the tooltip editors insensitive and instead sets the “has-tooltip” property to TRUE, so that you can hook into the “query-tooltip” signal to create a custom tooltip window.

Now while these are just the first iterations of the new editor designs and layouts, the really great news is that we can now use Glade to design the layouts of Glade’s widget editors, so you can expect (and even request ;-)) better designs in the future. Also, we’re open to ideas, if you have any great ideas on how to make widget property editing more fun, more obvious, more usable… please share them with us in bugzilla or on our mailing list.


Extra amendment: Fitting images into blog post side by side has been a delicate exercise, it looks different in the editor, different at blogs.gnome.org, and again different on planet.gnome.org, just goes to show that I make for a terrible poster boy, not to mention I don’t post quite that often… anyway… hope the formatting of this post is endurable at least, it’s best viewed at blogs.gnome.org I think.

Announcing Composite Widget Templates

Hello fellow hackers, today we bring you a new feature which I believe can very much improve the GTK+/GNOME developer story.

This is a feature I’ve been planning for a long time (I originally blogged about it 3 years ago) so I’m very excited about it having finally landed in GTK+, it’s my hope and ambition that this feature will help shape the future of user interface programming with GTK+.

Before I continue, I have to thank Juan Pablo Ugarte for keeping the dream alive and talking about this at the last GUADEC. Also recognition must be given to Openismus GmbH for sponsoring my full time work on this for the last few weeks, the time to completely focus on this task would not have been afforded me without them.

Unfortunately this post will be a little terse, the one I had planned which is a bit more relaxed and has some comic relief will not be ready on time. So, at the risk of being taken seriously, let’s continue with a brief overview of the APIs introduced to GTK+ and the actions taken.

What are Composite Widget Templates ?

Composite Widget Templates are an association of GtkWidget class data with GtkBuilder xml, which is to say that the xml which defines a composite widget is now a part of the definition of a widget class or type.

This feature automates the creation of composite widgets without the need for directly accessing the GtkBuilder APIs and comes with a few features that help to bind a GtkWidget with it’s GtkBuilder xml.

As of yesterday, 23 composite widget classes in GTK+, from simple classes such as GtkFontButton or GtkVolumeButton to more complex widget classes such as GtkFileChooserDefault and GtkPrintUnixDialog have all been ported to remove all manual user interface creation code, in favour of GtkBuilder xml.

So, how can I use it ?

There are three or four new APIs added to GtkWidget which play on the class data, currently they will only be available in C, but if you have a little imagination, you can see how this can be very useful in higher level languages, by extending the syntax and adding some keywords (hint: I have vala in mind as a top candidate).

Before I go into the API details here, I would like to point out a complete working example which I created today while writing this post. To give it a try, you need of course GTK+ master from today (or yesterday). For those who are interested I suggest you download that small tarball, and build it with one simple ‘make’ command.

First, lets start with an example of how to bind your template to your widget class:

static void
my_widget_class_init (MyWidgetClass *klass)
{
  GtkWidgetClass *widget_class = GTK_WIDGET_CLASS (klass);

  /* Setup the template GtkBuilder xml for this class
   */
  gtk_widget_class_set_template_from_resource (widget_class, "/org/foo/my/mywidget.ui");
}

static void
my_widget_init (MyWidget *widget)
{
  /* Initialize the template for this instance */
  gtk_widget_init_template (GTK_WIDGET (widget));
}

So, to bind some GtkBuilder XML to a widget class, we need to call two functions:

  • gtk_widget_class_set_template_from_resource() binds some GtkBuilder XML to the class data
  • gtk_widget_init_template() initializes the template for a given instance, this is currently needed for the base C apis, but both could certainly be automated in a highlevel language.

Next, we have a function which creates an implicit relationship between some instance variables and some objects defined in the GtkBuilder XML:

struct _MyWidgetPrivate
{
  /* This is the entry defined in the GtkBuilder xml */
  GtkWidget *entry;
};

static void
my_widget_class_init (MyWidgetClass *klass)
{
  GtkWidgetClass *widget_class = GTK_WIDGET_CLASS (klass);
  GObjectClass *gobject_class = G_OBJECT_CLASS (klass);

  /* After having called gtk_widget_class_set_template_from_resource(), we can
   * define the relationship of the private entry and the entry defined in the xml.
   */
  gtk_widget_class_bind_child (widget_class, MyWidgetPrivate, entry);

  g_type_class_add_private (gobject_class, sizeof (MyWidgetPrivate));
}

In the above code, we’ve defined a relationship between the MyWidgetPrivate pointer named ‘entry’ and the object in the GtkBuilder XML of the same name ‘entry’. The entry will be available for access on the subclassed GtkWidget instance private data at any time after gtk_widget_init_template() was called, until the given widget is disposed (at which time the pointer will become NULL). GTK+ takes care of memory managing such automated pointers, so it is ensured to exist for the lifetime of your instances.

Again, with highlevel bindings in mind, this could be implemented as some syntactic sugar in the actual declaration of the instance variable.

Finally there is one more point of interest in the API which is Callbacks. Functions in your widget class code can be specified as Callbacks which serve as endpoints for any signal connections defined in the GtkBuilder XML.

/* A callback handling a "clicked" event from a button defined in the GtkBuilder XML */
static void
my_widget_button_clicked (MyWidget  *widget,
                          GtkButton *button)
{
  g_print ("The button was clicked with entry text: %s\n",
           gtk_entry_get_text (GTK_ENTRY (widget->priv->entry)));
}

static void
my_widget_class_init (MyWidgetClass *klass)
{
  GtkWidgetClass *widget_class = GTK_WIDGET_CLASS (klass);

  /* After having called gtk_widget_class_set_template_from_resource(), we can
   * declare callback ports that this widget class exposes, to bind with <signal>
   * connections defined in the GtkBuilder xml
   */
  gtk_widget_class_bind_callback (widget_class, my_widget_button_clicked);
}

Note that all signal connections defined in composite templates have the composite widget instance as user data by default.

In the above example code, my_widget_button_clicked() callback was declared with the assumption that the <signal> connection defined in the template was declared as ‘swapped’. Swapped signal connections are connections where the user data of the callback is returned first instead of the emitter. I think that this should be the default for composite widget callbacks as it blends in more naturally with normal class methods (where the class instance is always the first parameter).

This detail might not apply directly to higher level languages, which could achieve the above by adding some syntactic sugar in the declaration of a Callback method. Perhaps the instance will be implied as the ‘self’ variable.

I have also included some additional API to allow bindings to specify the GtkBuilderConnectFunc which should be used to make signal connections for a given widget class. I hope that bindings authors will contact me if they need any additional support in the GTK+ api to implement this.

Can I now use Glade to define my Composite Widget Templates ?

Of course silly ! That’s the whole point right ?

You’ll need Glade master from today as well, however I should be rolling a development snapshot with full support for this later this week as well.

All of GTK+’s composite widget classes have been recreated using Glade. Here is a screenshot of a GTK+ composite widget being edited in Glade:

Glade editing the GtkFileChooserDefault

Glade is still in it’s early stages supporting this, so there is hardly any features added here. I hope to work towards a brighter future where Glade can understand a multitude of composite widget templates as components of a single project, which will open the doors for some really nice and useful features.

Conclusion

All in all I have a lot to say about this work, but I’ll cut this blog post short for now, however I may be posting followups in the near future.

I’m very satisfied with this work, and I hope you will enjoy creating user interfaces as composite widget classes.