Taxes and section 174

7 years since my last post (2017!), so many exciting things to talk about: the AV1 video codec was released, we at Two Orioles wrote an AV1 encoder (Eve) and decoder (dav1d). Covid happened. I became a US citizen. Happily married for 15 years. My two boys are now teenagers (and behaving like it). So, let’s talk about … taxes?

In 2017, Congress enacted the Tax Cuts and Jobs Act, which (very briefly) reduces business (permanent) and personal (expires after 2025) tax rates by a few percent points, along with some “magic” to pay for it; some might remember the changes to SALT deductions. In 2023, during tax filing for 2022, more of that magic became clear: the 2017 law included 5-year-deferred changes to section-174, which covers expenses related to “Research & Experimentation” (R&E). The change requires all R&E expenses to be amortized over 5 (domestic) or 15 (foreign) years, and explicitly adds software development as a section-174 expense for tax purposes. This might sound innocent, but it hits small businesses hard.

Imagine a small software development business with $1M in revenue. It might employ 5 software developers ($150k/yr each – all at 50% effective tax rate in NY) plus legal/accounting/bookkeeping ($25k/yr) and office expenses ($25k/yr), leaving $1M - 5x $150k - $25k - $25k = $200k as business profit or taxable income. The profit flows through to the LLC/S-corp owners, who pay 50% tax over that also. Total taxes (federal + state + local) paid: 50% * (5x $150k + $200k) = $475k.

Starting 2022, initial-midyear amortizations means it can deduct only 10% of its R&E expenses (including salaries and office), which means the effective taxable income flowing through to the LLC/S-corp owners is now $1M - 10% * (5x $150k + $25k) - $25k = $897.5k, taxed at 50%, resulting in total taxes increasing to 50% * (5x $150k + 897.5k) = $823.75k. Of course, this money doesn’t actually exist, so the business will go broke unless it lays off some of its employees or the owners take out loans (bonus points for today’s high interest rates). This supposedly slowly resolves itself after 5 years, as long as the business doesn’t grow (i.e. hire new employees) and salaries of existing employees don’t go up: a pretty crazy economic policy to encourage innovation. It’s worse if you hire people outside the US, because now the amortization period is 15 years.

Congress should fix this, and there has been some (late, slow) progress in this area. Unfortunately, the media hasn’t caught on. The NYT blasted the proposed legislation as a “corporate giveaway” that “would benefit profitable companies” who “already pay too little in taxes”. The WSJ called it “at best a modest boost to investment incentives”. Maybe these journalists should read Michele Hansen’s tweet, which lists individual stories from small businesses (like mine) who were hurt by this change in tax law: tax increases by 500%, effective tax rates of 500%, hiring freezes, layoffs, loans, debt – and speaking from personal experience: lots of tears.

Dear Congress: small businesses need you – please fix section 174.

Posted in General | Leave a comment

Writing x86 SIMD using x86inc.asm

In multimedia, we often write vector assembly (SIMD) implementations of computationally expensive functions to make our software faster. At a high level, there are three basic approaches to write assembly optimizations (for any architecture):

  • intrinsics;
  • inline assembly;
  • hand-written assembly.

Inline assembly is typically disliked because of its poor readability and portability. Intrinsics hide complex stuff (like register count or stack memory) from you, which makes writing optimizations easier, but at the same time typically carries a performance penalty (because of poor code generation by compilers) – compared to hand-written (or inline) assembly. x86inc.asm is a helper developed originally by various x264 developers, licensed under the ISC, which aims to make writing hand-written assembly on x86 easier. Other than x264, x86inc.asm is also used in libvpxlibaom, x265 and FFmpeg.

This guide is intended to serve as an introduction to x86inc.asm for developers (somewhat) familiar with (x86) vector assembly (either intrinsics or hand-written assembly), but not familiar with x86inc.asm.

Basic example of how to use x86inc.asm

To explain how this works, it’s probably best to start with an example. Imagine the following C function to calculate the SAD (sum-of-absolute-differences) of a 16×16 block (this would typically be invoked as distortion metric in a motion search):

#include <stddef.h>
#include <stdint.h>
#include <stdlib.h>

typedef uint8_t pixel;
static unsigned sad_16x16_c(const pixel *src, ptrdiff_t src_stride,
                            const pixel *dst, ptrdiff_t dst_stride)
{
    unsigned sum = 0;
    int y, x;

    for (y = 0; y < 16; y++) {
        for (x = 0; x < 16; x++)
            sum += abs(src[x] - dst[x]);
        src += src_stride;
        dst += dst_stride;
    }

    return sum;
}

In x86inc.asm syntax, this would look like this:

%include "x86inc.asm"

SECTION .text

INIT_XMM sse2
cglobal sad_16x16, 4, 7, 5, src, src_stride, dst, dst_stride, \
                            src_stride3, dst_stride3, cnt
    lea    src_stride3q, [src_strideq*3]
    lea    dst_stride3q, [dst_strideq*3]
    mov            cntd, 4
    pxor             m0, m0
.loop:
    mova             m1, [srcq+src_strideq*0]
    mova             m2, [srcq+src_strideq*1]
    mova             m3, [srcq+src_strideq*2]
    mova             m4, [srcq+src_stride3q]
    lea            srcq, [srcq+src_strideq*4]
    psadbw           m1, [dstq+dst_strideq*0]
    psadbw           m2, [dstq+dst_strideq*1]
    psadbw           m3, [dstq+dst_strideq*2]
    psadbw           m4, [dstq+dst_stride3q]
    lea            dstq, [dstq+dst_strideq*4]
    paddw            m1, m2
    paddw            m3, m4
    paddw            m0, m1
    paddw            m0, m3
    dec            cntd
    jg .loop
    movhlps          m1, m0
    paddw            m0, m1
    movd            eax, m0
    RET 

That’s a whole lot of stuff. The critical things to understand in the above example are:

  • functions (symbols) are declared by cglobal;
  • we don’t refer to vector registers by their official typed name (e.g. mm0xmm0ymm0 or zmm0), but by a templated name (m0) which is generated in INIT_*;
  • we use mova, not movdqa, to move data between registers or from/to memory;
  • we don’t refer to general-purpose registers by their official name (e.g. rdi or edi), but by a templated name (e.g. srcq), which is generated (and populated) in cglobal – unless it is to store return values (eax);
  • use RET (not ret!) to return.
  • in your build system, this would be treated like any other hand-written assembly file, so you’d build an object file using nasm or yasm.

Let’s explore and understand all of this in more detail.

Understanding INIT_*cglobalDEFINE_ARGS and RET

INIT_* indicates what type of vector registers we want to use: MMX (mm0), SSE (xmm0), AVX (ymm0) or AVX-512 (zmm0). The invocation also allows us to target a specific CPU instruction set (e.g. ssse3 or avx2). This has various features:

  • templated vector register names (m0) which mirror a specific class of registers (mm0xmm0ymm0 or zmm0);
  • templated instruction names (e.g. psadbw) which can warn if we’re using instructions unsupported for the chosen set (e.g. pmulhrsw in SSE2 functions);
  • templated instruction names also hide VEX-coding (vpsadbw vs. psadbw) when targeting AVX;
  • aliases for moving data to or from full aligned (mova, which translates to movq for mm, (v)movdqa for xmm or vmovdqa for ymm registers), full unaligned (movu) or half (movh) vector registers;
  • convenience aliases mmsize and gprsize to indicate the size (in bytes) of vector and general-purpose registers.

For example, to write an AVX2 function using ymm registers, you’d use INIT_YMM avx2. To write a SSSE3 function using xmm registers, you’d use INIT_XMM ssse3. To write a “extended MMX” (the integer instructions introduced as part of SSE) function using mm registers, you’d use INIT_MMX mmxext. Finally, for AVX-512, you use INIT_ZMM avx512.

cglobal indicates a single function declaration. This has various features:

  • portably declaring a global (exported) symbol with project name prefix and instruction set suffix;
  • portably making callee-save general-purpose registers available (by pushing their contents to the stack);
  • portably loading function arguments from stack into general-purpose registers;
  • portably making callee-save xmm vector registers available (on Win64);
  • generating named and numbered general-purpose register aliases whose mapping to native registers is optimized for each particular target platform;
  • allocating aligned stack memory (see “Using stack memory”).

The sad_16x16 function declared above, for example, had the following cglobal line:

cglobal sad_16x16, 4, 7, 5, src, src_stride, dst, dst_stride, \
                            src_stride3, dst_stride3, cnt

Using the first argument (sad_16x16), this creates a global symbol <prefix>_sad_16x16_sse2() which is accessible from C functions elsewhere. The prefix is a project-wide setting defined in your nasm/yasm build flags (-Dprefix=name).

Using the third argument, it requests 7 general-purpose registers (GPRs):

  • on x86-32, where only the first 3 GPRs are caller-save, this would push the contents of the other 4 GPRs to the stack, so that we have 7 GPRs available in the function body;
  • on unix64/win64, we have 7 or more caller-save GPRs available, so no GPR contents are pushed to the stack.

Using the second argument, 4 GPRs are indicated to be loaded with function arguments upon function entry:

  • on x86-32, where all function arguments are transferred on the stack, this means that we mov each argument from the stack into an appropriate register;
  • on win64/unix64, the first 4/6 arguments are transferred through GPRs (rdirsirdxrcxR8R9 on unix64; rcxrdxR8R9 on win64), so no actual mov instructions are needed in this particular case.

This should also explain why we want to use templated register names instead of their native names (e.g. rdi), since we want the src variable to be kept in rcx on win64 and rdi on unix64. At this level inside x86inc.asm, these registers have numbered aliases (r0r1r2, etc.). The specific order in which each numbered register is associated with a native register per target platform depends on the function call argument order mandated by the ABI; then caller-save registers; and lastly callee-save registers.

Lastly, using the fourth argument, we indicate that we’ll be using 5 xmm registers. On win64, if this number is larger than 6 (or 22 for AVX-512), we’ll be using callee-save xmm registers and thus have to back up their contents to the stack. On other platforms, this value is ignored.

The remaining arguments are named aliases for each GPR (e.g. src will refer to r0, etc.). For each named or numbered register, you’ll notice a suffix (e.g. the q suffix for srcq). A full list of suffixes:

  • q: qword (on 64-bit) or dword (on 32-bit) – note how q is missing from numbered aliases, e.g. on unix64, rdi = r0 = srcq, but on 32-bit eax = r0 = srcq;
  • d: dword, e.g. on unix64, eax = r6d = cntd, but on 32-bit ebp = r6d = cntd;
  • w: word, e.g. on unix64 ax = r6w = cntw, but on 32-bit bp = r6w = cntw;
  • b: (low-)byte in a word, e.g. on unix64 al = r6b = cntb;
  • h: high-byte in a word, e.g. on unix64 ah = r6h = cnth;
  • m: the stack location of this variable, if any, else the dword alias (e.g. on 32-bit [esp + stack_offset + 4] = r0m = srcm);
  • mp: similar to m, but using a qword register alias and memory size indicator (e.g. on unix64 qword [rsp + stack_offset + 8] = r6mp = cntmp, but on 32-bit dword [rsp + stack_offset + 28] = r6mp = cntmp).

DEFINE_ARGS is a way to re-name named registers defined with the last arguments of cglobal. It allows you to re-use the same physical/numbered general-purpose registers under a different name, typically implying a different purpose, and thus allows for more readable code without requiring more general-purpose registers than strictly necessary.

RET restores any callee-save register (GPR or vector) from the stack that was pushed by cglobal, undoes any additional stack memory allocated for custom use (see “Using stack memory”). It will also call vzeroupper to clear the upper half of ymm registers (if invoked with INIT_YMM or higher). At the end, it calls ret to return to the caller.

Templating functions for multiple register types

At this point, it should be fairly obvious why we use templated names (r0 or src instead of rdi (unix64), rcx (win64) or eax (32-bit)) for general-purpose registers: portability. However, we have not yet explained why we use templated names for vector registers (m0instead of mm0xmm0ymm0 or zmm0). The reason for this is function templating. Let’s go back to the sad_16x16 function above and use templates:

%macro SAD_FN 2 ; width, height
cglobal sad_%1x%2, 4, 7, 5, src, src_stride, dst, dst_stride, \
                            src_stride3, dst_stride3, cnt
    lea    src_stride3q, [src_strideq*3]
    lea    dst_stride3q, [dst_strideq*3]
    mov            cntd, %2 / 4
    pxor             m0, m0
.loop:
    mova             m1, [srcq+src_strideq*0]
    mova             m2, [srcq+src_strideq*1]
    mova             m3, [srcq+src_strideq*2]
    mova             m4, [srcq+src_stride3q]
    lea            srcq, [srcq+src_strideq*4]
    psadbw           m1, [dstq+dst_strideq*0]
    psadbw           m2, [dstq+dst_strideq*1]
    psadbw           m3, [dstq+dst_strideq*2]
    psadbw           m4, [dstq+dst_stride3q]
    lea            dstq, [dstq+dst_strideq*4]
    paddw            m1, m2
    paddw            m3, m4
    paddw            m0, m1
    paddw            m0, m3
    dec            cntd
    jg .loop

%if mmsize >= 16
%if mmsize >= 32
    vextracti128    xm1, m0, 1
    paddw           xm0, xm1
%endif
    movhlps         xm1, xm0
    paddw           xm0, xm1
%endif
    movd            eax, xm0
    RET
%endmacro

INIT_MMX mmxext
SAD_FN 8, 4
SAD_FN 8, 8
SAD_FN 8, 16

INIT_XMM sse2
SAD_FN 16, 8
SAD_FN 16, 16
SAD_FN 16, 32

INIT_YMM avx2
SAD_FN 32, 16
SAD_FN 32, 32
SAD_FN 32, 64

This indeed generates 9 functions for square and rectangular sizes for each register type. More could be done to reduce binary size, but for the purposes of this tutorial, the take-home message is that we can use the same source code to write functions for multiple vector register types (mm0xmm0ymm0 or zmm0).

Some readers may at this point notice that x86inc.asm allows a programmer to use non-VEX instruction names (such as psadbw) for VEX instructions (such as vpsadbw), since you can only operate on ymm registers using VEX-coded instructions. This is indeed the case, and is discussed in more detail in “AVX three-operand instruction emulation” below. You’ll also notice how we use xm0 at the end of the function, this allows us to explicitly access xmm registers in functions otherwise templated for ymm registers, but will still correctly map to mm registers in MMX functions.

Templating functions for multiple instruction sets

We can also use this same approach to template multiple variants of a function that vary in instruction sets. Consider, for example, the pabsw instruction that was added in SSSE3. You could use templates to write two versions of a SAD version for 10- or 12-bits per pixel component pictures (typedef uint16_t pixel in the C code above):

%macro ABSW 2 ; dst/src, tmp
%if cpuflag(ssse3)
    pabsw   %1, %1
%else
    pxor    %2, %2
    psubw   %2, %1
    pmaxsw  %1, %2
%endif
%endmacro

%macro SAD_8x8_FN 0
cglobal sad_8x8, 4, 7, 6, src, src_stride, dst, dst_stride, \
                          src_stride3, dst_stride3, cnt
    lea    src_stride3q, [src_strideq*3]
    lea    dst_stride3q, [dst_strideq*3]
    mov            cntd, 2
    pxor             m0, m0
.loop:
    mova             m1, [srcq+src_strideq*0]
    mova             m2, [srcq+src_strideq*1]
    mova             m3, [srcq+src_strideq*2]
    mova             m4, [srcq+src_stride3q]
    lea            srcq, [srcq+src_strideq*4]
    psubw            m1, [dstq+dst_strideq*0]
    psubw            m2, [dstq+dst_strideq*1]
    psubw            m3, [dstq+dst_strideq*2]
    psubw            m4, [dstq+dst_stride3q]
    lea            dstq, [dstq+dst_strideq*4]
    ABSW             m1, m5
    ABSW             m2, m5
    ABSW             m3, m5
    ABSW             m4, m5
    paddw            m1, m2
    paddw            m3, m4
    paddw            m0, m1
    paddw            m0, m3
    dec            cntd
    jg .loop
    movhlps          m1, m0
    paddw            m0, m1
    pshuflw      m1, m0, q1010
    paddw            m0, m1
    pshuflw      m1, m0, q0000 ; qNNNN is a base4-notation for imm8 arguments
    paddw            m0, m0
    movd            eax, m0
    movsxwd         eax, ax
    RET
%endmacro

INIT_XMM sse2
SAD_8x8_FN

INIT_XMM ssse3
SAD_8x8_FN

Altogether, function templating allows for making easily-maintainable code, as long as developers understand how templating works and what the goals are. Templating can partially hide complexity of a function in macros, which can be very confusing and thus make code harder to understand. At the same time, it will significantly reduce source code duplication, which makes code maintenance easier.

AVX three-operand instruction emulation

One of the key features introduced as part of AVX – independent of ymm registers – is VEX encoding, which allows three-operand instructions. Since VEX-instructions (e.g. vpsadbw) in x86inc.asm are defined from non-VEX versions (e.g. psadbw) for templating purposes, the three-operand instruction support actually exists in the non-VEX versions, too. Therefore, code like this (to interleave vertically adjacent pixels) is actually valid:

[..]
    mova           m0, [srcq+src_strideq*0]
    mova           m1, [srcq+src_strideq*1]
    punpckhbw  m2, m0, m1
    punpcklbw      m0, m1
[..]

An AVX version of this function (using xmm vector registers, through INIT_XMM avx) would translate this literally to the following on unix64:

[..]
    vmovdqa    xmm0, [rdi]
    vmovdqa    xmm1, [rdi+rsi]
    vpunpckhbw xmm2, xmm0, xmm1
    vpunpcklbw xmm0, xmm0, xmm1
[..]

On the other hand, a SSE2 version of the same source code (through INIT_XMM sse2) would translate literally to the following on unix64:

[..]
    movdqa    xmm0, [rdi]
    movdqa    xmm1, [rdi+rsi]
    movdqa    xmm2, xmm0
    punpckhbw xmm2, xmm1
    punpcklbw xmm0, xmm1
[..]

In practice, as demonstrated earlier, AVX/VEX emulation also allows using the same (templated) source code for pre-AVX functions and AVX functions.

Using SWAP

Another noteworthy feature in x86inc.asm is SWAP, a assembler-time and instruction-less register swapper. The typical use case for this is to be numerically consistent in ordering data in vector registers. As an example: SWAP 0, 1 would switch the assembler’s internal meaning of the templated vector register names m0 and m1. Before, m0 might refer to xmm0 and m1 might refer to xmm1; after, m0 would refer to xmm1 and m1 would refer to xmm0.

SWAP can take more than 2 arguments, in which case SWAP is sequentially invoked on each subsequent pair of numbers. For example, SWAP 1, 2, 3, 4 would be identical to SWAP 1, 2, followed by SWAP 2, 3, and finally followed by SWAP 3, 4.

The ordering is re-set at the beginning of each function (in cglobal).

Using stack memory

Using stack memory in hand-written assembly is relatively easy if all you want is unaligned data or if the platform provides aligned stack access at each function’s entry point. For example, on Linux/Mac (32-bit and 64-bit) or Windows (64-bit), the stack upon function entry is guaranteed by the ABI to be 16-byte aligned. Unfortunately, sometimes we need 32-byte alignment (for aligned vmovdqa of ymm register contents), or we need aligned memory on 32-bit Windows. Therefore, x86inc.asm provides portable alignment. The fourth (optional) numeric argument to cglobal is the number of bytes you need in terms of stack memory. If this value is 0 or missing, no stack memory is allocated. If the alignment constraint (mmsize) is greater than that guaranteed by the platform, the stack is manually aligned.

If the stack was manually aligned, there’s two ways to restore the original (pre-aligned) stack pointer in RET, each of which have implications for the function body/implementation:

  • if we saved the original stack pointer in a general-purpose register (GPR), we will still have access to the original m and mp named register aliases in the function body. However, it means that one GPR (the one holding the stack pointer) is not available for other uses in our function body. Specifically, on 32-bit, this would limit the number of available GPRs in the function body to 6. To use this option, specify a positive stack size;
cglobal sad_16x16, 4, 7, 5, 64, src, src_stride, dst, dst_stride, \
                                src_stride3, dst_stride3, cnt
  • if we saved the original stack pointer on the (post-aligned) stack, we will not have access to m or mp named register aliases in the function body, but we don’t occupy a GPR. To use this option, specify a negative stack size. Note how we write a negative number as 0 - 64, not just -64, because of a bug in some older versions of yasm.
cglobal sad_16x16, 4, 7, 5, 0 - 64, src, src_stride, dst, dst_stride, \
                                    src_stride3, dst_stride3, cnt

After stack memory allocation, it can be accessed using [rsp] (which is an alias for [esp] on 32-bit).

Conclusion

This post was meant as an introduction to x86inc.asm, an x86 hand-written assembly helper, for developers (somewhat) familiar with hand-written assembly or intrinsics. It was inspired by an earlier guide called x264asm.

Posted in General | 1 Comment

Overview of the VP9 video codec

When I first looked into video codecs (back when VP8 was released), I imagined them being these insanely complex beasts that required multiple PhDs to understand. But as I quickly learned, video codecs are quite simple in concept. Now that VP9 is gaining support from major industry players (see supporting statements in December 2016 from Netflix and Viacom), I figured it’d be useful to explain how VP9 works.

Why we need video codecs

That new television that you’ve been dreaming of buying – with that fancy marketing term, UHD (ultra high-definition). In numbers, this is 3840×2160 pixels at 60 fps. Let’s assume it’s HDR, so 10 bits/component, at YUV-4:2:0 chroma subsampling. Your total uncompressed data rate is:

3840 x 2160 x 60 x 10 x 1.5 = 7,464,960,000 bits/sec =~ 7.5 Gbps

And since that would RIP your internet connection when watching your favourite internet stream, you need video compression.

Basic building blocks

A video stream consists of frames, and each frame consists of color planes. Most of us will be familiar with the RGB (red-green-blue) colorspace, but video typically uses the YUV (Y=luma/brightness, U/V=blue/red chroma difference) colorspace. What makes YUV attractive from a compression point-of-view is that most energy will be concentrated in the luma plane, which provides us with a focus point for our compression techniques. Also, since our eyes are less perceptive to color distortion than to brightness distortion, the chroma planes typically have a lower resolution. In YUV-4:2:0, the chroma planes have only half the width/height of the luma plane, so for 4K video (3840×2160), the chroma resolution is only 1920×1080 per plane:

VP9 also supports other chroma subsamplings, such as 4:2:2 and 4:4:4. Next, frames are sub-divided in blocks. For VP9, the base block size is 64×64 pixels (similar to HEVC). Older codecs (like VP8 or H.264) use 16×16 as base block size, which is one of the reasons they perform less well for high-resolution content. These blocks are the basic unit in which video codecs operate:

Now that the fundamentals are in place, let’s look closer at these 64×64 blocks.

Block decomposition

Each 64×64 block goes through one or more rounds of decomposition, which is similar to quad-tree decomposition used in HEVC and H.264. However, unlike the two partitioning modes (none and split) in quad-tree, VP9 block decomposition has 4 partitioning modes: none, horizontal, vertical and split. None, horizontal and vertical are all terminal nodes, whereas split recurses down at the next block level (32×32), where each of the 4 sub-blocks goes through a subsequent round of the decomposition process. This process can continue up until the 8×8 block level, where all partitioning modes are terminal, which means 4×4 is the smallest possible block size.

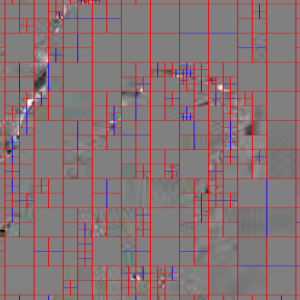
If you do this for the blocks we highlighted earlier, the full block decomposition partitioning (red) looks like this:


Next, each terminal block goes through the main block decoding process. First, a set of block elements are coded:

  • the segment ID allows selecting a per-block quantizer and/or loop-filter strength level that is different from the frame-wide default, which allows for adaptive quantization/loop-filtering. The segment ID also allows encoding a fixed reference and/or marking a block as skipped, which is mainly useful for static content/background;
  • the skip flag indicates – if true – that a block has no residual coefficients;
  • the intra flag selects what prediction type is used for prediction: intra or inter;
  • lastly, the transform size defines the size of the residual transform through which residual data is coded. The transform size can be 4×4, 8×8, 16×16 or 32×32, and cannot be larger than the block size. This is identical to HEVC. H.264 only supports up to 8×8.

Depending on the value of the transform size, a block can contain multiple transform blocks (blue). If you overlay the transform blocks on top of the block decomposition from earlier, it looks like this:

Inter prediction

If the intra flag is false, each block will predict pixel values by copying pixels from 1 or 2 previously coded reference frames at specified pixel offsets, called motion vectors. If 2 reference frames are used, the prediction values from each reference frame at the specified motion vector pixel offset will be averaged to generate the final predictor. Motion vectors have up to 1/8th-pel resolution (i.e. a motion vector increment by 1 implies a 1/8th pixel offset step in the reference), and the motion compensation functions use 8-tap filters for sub-pixel interpolation. Notably, VP9 supports selectable motion filters, which does not exist in HEVC/H.264. Chroma planes will use the same motion vector as the luma plane.

In VP9, inter blocks code the following elements.

  • the compound flag indicates how many references will be used for prediction. If false, this block uses 1 reference, and if true, this block uses 2 references;
  • the reference selects which reference(s) is/are used from the internal list of 3 active references per frame;
  • the inter mode specifies how motion vectors are coded, and can have 4 values: nearestmv, nearmv, zeromv and newmv. Zeromv means no motion. In all other cases, the block will generate a list of reference motion vectors from nearby blocks and/or from this block in the previous frame. If inter mode is nearestmv or nearmv, this block will use the first or second motion vector from this list. If inter mode is newmv, this block will have a new motion vector;
  • the sub-pixel motion filter can have 3 values: regular, sharp or smooth. It defines which 8-tap filter coefficients will be used for sub-pixel interpolation from the reference frame, and primarily effects the appearance of edges between objects;
  • lastly, if the inter mode is newmv, the motion vector residual is added to the nearestmv value to generate a new motion vector.

If you overlay motion vectors (using cyan, magenta and orange for each of the 3 active references) on top of the transform/block decomposition image from earlier, it’s easy to notice that the motion vectors essentially describe the motion of objects between the current frame and the reference frame. It’s easy to see that the purple/cyan motion vectors often have opposite directions, because one reference is located (temporally) before this frame, whereas the other reference is located (temporally) after this frame.

Intra Prediction

In case no acceptable reference is available, or no motion vector for any available reference gives acceptable prediction results, a block can use intra prediction. For intra prediction, edge (top/top-right, left and top-left) pixels are used to predict the contents of the current block. The exact mechanism through which the edge pixels are filtered to generate the predictor is called the intra prediction mode. There are three types of intra predictors:

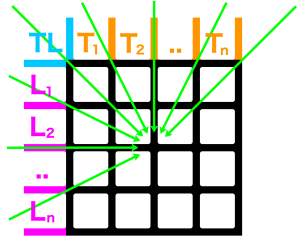
  • directional, with 8 different values, each indicating a different directional angle – see schematic;
  • TM (true-motion), where each predicted pixel(x,y) = top(x) + left(y) – topleft;
  • and DC (direct current), where each predicted pixel(x,y) = average(top(1..n) and left(1..n)).

This makes for a total of 10 different intra prediction modes. This is more than H.264, which only has 4 or 9 intra prediction modes (DC, planar, horizontal, vertical or DC and 8 directional ones) depending on the block size and plane type (luma vs. chroma), but also less than HEVC, which has 35 (DC, planar and 33 directional angles).

Although a mode is shared at the block level, intra prediction happens at the transform block level. If one block contains multiple transform blocks (e.g. a block of 8×4 will contain two 4×4 transform blocks), both transform block re-use the same intra prediction mode, so it is only coded once.

Intra prediction blocks contain only two elements:

  • luma intra prediction mode;
  • chroma intra prediction mode.

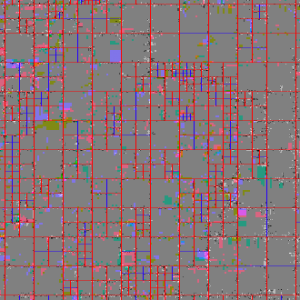
So unlike inter blocks, where all planes use the same motion vector, intra prediction modes are not shared between luma and chroma planes. This image shows luma intra prediction modes (green) overlayed on top of the transform/block decompositions from earlier:

Residual coding

The last part in the block coding process is the residual data, assuming the skip flag was false. The residual data is the difference between the original pixels in a block and the predicted pixels in a block. These pixels are then transformed using a 2-dimensional transform, where each direction (horizontal and vertical) is either a 1-dimensional (1-D) discrete cosine transform (DCT) or an asymmetric discrete sine transform (ADST). The exact combination of DCT/ADST in each direction depends on the prediction mode. Intra prediction modes originating from the top edge (the vertical intra prediction modes) use ADST vertically and DCT horizontally; modes originating from the left edge (the horizontal intra prediction modes) use ADST horizontally and DCT vertically; modes originating from both edges (TM and the down/right diagonal directional intra prediction mode) use ADST in both directions; and finally, all inter modes, DC and the down/left diagonal intra prediction mode use DCT in both directions. By comparison, HEVC only supports ADST combined in both directions, and only for the 4×4 transform, where it’s used for all intra prediction modes. All inter modes and all other transform sizes use DCT in both directions. H.264 does not support ADST.

  • DCT: 
  • ADST: 

Lastly, the transformed coefficients are quantized to reduce the amount of data, which is what provides the lossy part of VP9 compression. As an example, the quantized, transformed residual of the image that we looked at earlier looks like this (contrast increased by ~10x):

Coefficient arrays are coded into the bitstream using scan tables. The purpose of a transform is to concentrate energy in fewer significant coefficients (with quantization reducing the non-significant ones to zero or near-zero). Following from that, the purpose of scan tables is to find a path through the 2-dimensional array of coefficients that is most likely to find all non-zero coefficients while encountering as few zero coefficients as possible. Classically, most video codecs (such as H.264) use scan tables derived from the zig-zag pattern. VP9, interestingly, uses a slightly different pattern, where scan tables mimic a quarter-circle connecting points ordered by distance to the top/left origin. For example, the 8×8 zig-zag (left) and VP9 (right) scan tables (showing ~20 coefficients) compare like this:


In cases where the horizontal and vertical transform (DCT vs. ADST) are different, the scan table also has a directional bias. The bias stems from the fact that transforms combining ADST and DCT typically concentrate the energy in the ADST direction more than in the DCT direction, since the ADST is the spatial origin of the prediction data. These scan tables are referred to as row (used for ADST vertical + DCT horizontal 2-D transforms) and column (used for ADST horizontal + DCT vertical 2-D transforms) scan tables. For the 8×8 transform, these biased row (left) and column (right) scan tables (showing ~20 coefficients) look like this:


The advantage of the VP9 scan tables, especially at larger transform sizes (32×32 and 16×16) is that it leads to a better separation of zero- and non-zero-coefficients than classic zig-zag or related patterns used in other video codecs.

Loopfilter

The aforementioned processes allow you to compress individual blocks in VP9. However, they also lead to blocking artifacts at the edges between transform blocks and prediction blocks. To resolve that (i.e. smoothen unintended hard edges), VP9 imposes a post-block decoding loopfilter which aims to soften hard block edges. There are 4 separate loopfilters that run at block edges, modifying either 16, 8, 4 or 2 pixels. Smaller transforms allow only small filters, whereas for the largest transforms, all filters are available. Which one runs for each edge depends on filter strength and edge hardness.

On the earlier-used image, the loopfilter effect (contrast increased by ~100x) looks like this:

Arithmetic coding and adaptivity

So far, we’ve comprehensively discussed algorithms used in VP9 block coding and image reconstruction. We have not yet discussed how symbol aggregation into a serialized bitstream works. For this, VP9 uses an binary arithmetic range coder. Each symbol (e.g. an intra mode choice) has a probability table associated with it. These probabilities can either be global defaults, or they can be explicitly updated in the header of each frame (forward updates). Based on the entropy of the decoded data of previous frames, the probabilities are updated before the coding of next frames starts (backward updates). This means that probabilities effectively adapt to data entropy – but without explicit signaling. This is very different from how H.264/HEVC use CABAC, since CABAC uses per-symbol adaptivity (i.e. after each bit, the associated probability is updated – which is useful, especially in intra/keyframe coding) but resets state between frames, which means it can’t take advantage of entropic redundancy between frames. VP9 keeps probabilities constant during the coding of each frame, but maintains state (and adapts probabilities) between frames, which provides compression benefits during long stretches of inter frames.

Summary

The above should give a pretty comprehensive overview of algorithms and designs of the VP9 video codec. I hope it helps in understanding why VP9 performs better than older video codecs, such as H.264. Are you interested in video codecs and would you like to write amazing video encoders? Two Orioles, based in New York, is hiring video engineers!

Posted in General | 17 Comments

Displaying video colors correctly

Uncompressed (e.g. decoded) video frames are almost universally structured in planar YUV arrays containing lines of pixels. These YUV pixels will then be drawn on-screen, e.g. using a GL shader to do the YUV-to-RGB conversion. It sounds so simple, right? All you’d need is a 3×3 matrix containing the YUV-to-RGB matrix coefficients. The colorspace coefficients for YUV-to-RGB conversion depend on the colorspace of the video, e.g. something like Bt-601/709/2020 or SMPTE-170M/240M. Modern video codecs (such as H.264, HEVC and VP9) signal the colorspace in their bitstream header; VP9-in-ISO also allows signaling it in the container (vpcc atom). This should be simple.

rgbyuv_tango

Unfortunately, it’s not that simple. A fundamental problem is that RGB, like YUV, is device-dependent, i.e. it has a color matrix associated with it. The RGB color matrix (and transfer coefficients) define how particular pixel values in RGB (or YUV) are converted into photons beaming from your display device. The problem isn’t so much the signaling – it works just like colorspace signaling; the problem is what to do with that information.

First, what are color matrix coefficients and transfer characteristics? Let’s move back one step. Is there a universal (device-independent) way of specifying how many photons a pixel value should correspond to? It turns out there is! This is called the XYZ colorspace; the Y component is analogous to luminance (similar’ish to the Y component in YUV), and the X/Z components contain the chroma information – where Z is “quasi-equal” to the S-cone (blue) response in our eye. Conversion between XYZ and RGB is similar to conversion between YUV and RGB, in that it takes a 3×3 matrix with colormatrix coefficients. However, this isn’t regular RGB, but linearized RGB, which means that the increase in pixel component values correlates linearly with an increase in photon count. RGB pixel values from images or videos (whether coded directly as RGB or converted from YUV) are gamma-corrected. Gamma correction essentially increases the resolution of pixel values near zero, which is useful because the human eye is more sensitive to dark than to light values. In relevant standards, gamma correction is typically defined using transfer characteristics. The gamma-corrected RGB can then be converted to YUV after applying the gamma and then using the typical colorspace coefficients.

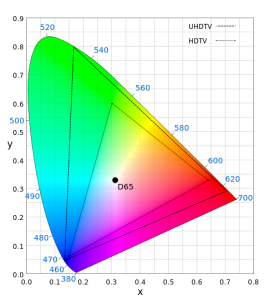
Why is this relevant? Imagine you have a digital version of a video file using Bt-2020 (“UHDTV”) colorspace. Let’s say I load these decoded YUV pixels in memory in my home computer and decide to display them, but my computer device only supports Bt-709 (“HDTV”). Will the colors display correctly? (Note that computer screens typically use the sRGB colorspace, which uses the same color matrix coefficients as Bt-709.) Let’s look at the color diagram:

Bt-709 (HDTV) and Bt-2020 (UHDTV) colorspaces

From wikipedia, by Sakurambo, derivative work of GrandDrake, licensed under CC BY-SA 3.0

Imagine a pixel at the corner of this color spectrum, e.g. a pixel with RGB values of R=1.0,G=0.0 and B=0.0. Will that pixel display in identical ways on HDTV and UHDTV devices? Of course not! Therefore, if the content was intended to be displayed on a HDTV device, but is instead displayed on an UHDTV device without additional conversion, the colors will be off. All of this without even starting to look at YUV/RGB conversion coefficients, which are also different for each colorspace. In the worst case, you get this:

Effects on pixel intensity if colorspace information is ignored

The left color is the Bt-2020 source image displayed as if it were Bt-709 data (or: “on a Bt-709/HDTV/sRGB device”). The right image is the inverse. The middle image is correct. It shows the importance of indicating the correct colorspace in video files, and correctly converting colorspaces when the target display device doesn’t support the source data’s colorspace.

Your UHDTV at home may actually do the right thing, but that’s largely because the ecosystem is almost entirely closed. This is completely different from … the web! And video colorspace support on the web is, unfortunately, a mess, if not just outright ignored. Not to mention that lots of video files don’t identify the colorspace of the YUV data inside it. But if they did…

It’s perhaps not realistic to expect all browsers to support all colorspaces. It’s easier to just stream them the data that they support, and convert it while you’re processing the file anyway, e.g. while you’re encoding it as a streaming service. For this purpose, we wrote the colorspace filter in FFmpeg. The idea is simple: it will convert YUV data in any colorspace to YUV data in any other colorspace. The simplest way to use this filter is to convert data from whatever the input is to Bt-709 before encoding it to the streamable format eventually sent to browsers (or mobile devices), since Bt-709 appears to the be the only format universally (and correctly) supported by mainstream browsers. But it could also be used for other purposes. For example, Cment Bœsch suggested that we use the colorspace filter as a generator for the lut3d filter, which would greatly improve performance of the colorspace conversion. I’m hoping he’ll write a tutorial on how to do that!

You may remember 20 years ago, we’d have to download Quicktime for one website or RealMedia player for another website, to be served small stamp-sized videos in players that displayed ads bigger than the video itself. We’ve come a long way, overcoming Flash, with VP9 or H.264 as universal web formats integrated in our browsers and mobile devices. Now that the problem of video playback on the web is being solved, let’s step up from displaying anything at all to displaying colors as they were intended to be.

Posted in General | 1 Comment

The world’s best VP9 encoder: Eve

VP9 is a bit of a paradox: it offers compression well above today’s industry standard for internet video streaming (H.264 – usually created using the opensource encoder x264), and playback is widely supported by today’s generation of mobile devices (Android) and browsers (Chrome, Edge, Opera, Firefox). Yet many companies and people are wary of using VP9. I’ve blogged about the benefits of VP9 (using Google’s encoder, libvpx) before, and I keep hearing some common responses: libvpx is slow, libvpx is blurry, libvpx is optimized for PSNR, libvpx doesn’t look visually better compared to x264 encodes (or more extreme: x264 looks much better!), libvpx doesn’t adhere to target rates. Really, most of what I hear is not so much VP9, but more about libvpx. But this is a significant issue, because libvpx is the only VP9 software encoder available.

To fix this, we wrote an entirely new VP9 encoder, called Eve (“Efficient Video Encoder”). For those too lazy to read the whole post: this VP9 encoder offers 5-10% better compression rates (for broadcast-quality source files) compared to libvpx, while being 10-20% faster at the same time. Compared to x264, it offers 15-20% better compression rates, but is ~5x slower. Its target rate adherence is far superior to libvpx and comparable to x264. Most importantly, these improvements aren’t just in metrics: the resulting files look visually much better than those generated (at the same bitrate) by libvpx and x264. Don’t believe it? Read on!

Test setup

As software, I used a recent version of Eve, libvpx 1.5.0 and x264 git hash 7599210. For downsampling to 720p/360p and measuring PSNR/SSIM, I used ffmpeg git hash 69e80d6.
As source material for these tests, I used the “4k” test clips from Xiph. These are broadcast-quality source files at 4k resolution (YUV 4:2:0, 4096×2160, 10 bit/component, 60fps). For these tests, since I have limited resources, I downsampled them to 360p (640×360, 8 bit/component, 30 fps) or 720p (1280×720, 8 bit/component, 30 fps) before encoding them.
I did two types of tests: 1-pass CRF (where you set a quality target) and 2-pass VBR (where you set an average bitrate target). For both tests, I measured objective quality (PSNR), effective bitrate and encoding time. For 2-pass VBR, I also measured target bitrate adherence (i.e. difference between actual and target file size). Lastly, I looked at visual quality.

CRF (1-pass)

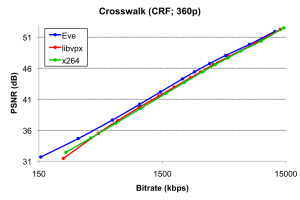
crosswalk crf psnrI encoded the 360p test set using recommended 1-pass CRF settings for each encoder. First, let’s look at the PSNR metrics. The table shows bitrate improvement between Eve and libvpx/x264, i.e. “how many percent less (or more) bits does Eve need to accomplish the same PSNR value”. For example, a bitrate improvement of 10% for one clip means that it needs, on average (BD-RATE) over the bitrate spectrum in the graph for that clip, 10% less bits (e.g. 9 bits for Eve instead of 10 bits for the other encoder) to accomplish the same quality (PSNR). The average across all clips in this test set is -12.6% versus libvpx, which means that Eve needs, on average, 12.6% less bits than libvpx to accomplish the same quality (PSNR). Compared to x264, Eve needs 14.1% less bits to accomplish the same quality.
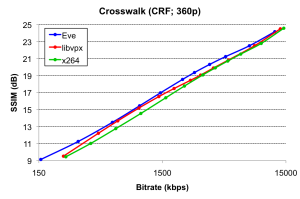
crosswalk crf ssim 2Some people object to using PSNR as a quality metric, so I measured the same files using SSIM as a metric. The results are not fundamentally different: Eve is 8.9% better than libvpx, and 22.5% better than x264. x264 looks a little worse in these tests than in the PSNR tests, and that’s primarily because x264 does significant metric-specific optimizations, which don’t (yet) exist in libvpx or Eve. However, more importantly, this shows that Eve’s quality improvement is independent of the specific metric used.

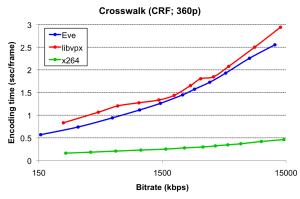
crosswalk crf enctimeLastly, I looked at encoding time. Average encoding time for each encoder depends somewhat on the target quality point. For most bitrate targets, Eve is quite a bit faster than libvpx. Overall, for an average (across all CRF values and test sequences) encoding time of about 1.28 sec/frame, Eve is 0.30 sec/frame faster than libvpx (1.58 sec/frame). At 0.25 sec/frame, x264 is ~5x faster, which is not surprising, since H.264 is a far simpler codec, and x264 a much more mature encoder.

CRF; 360p PSNR, Eve vs. SSIM, Eve vs. Encoding time (sec/frame)
libvpx x264 libvpx x264 Eve libvpx x264
Aerial -15.85% -21.97% -16.40% -29.77% 1.32 1.58 0.22
BarScene -13.68% -15.83% -8.90% -25.85% 0.91 0.95 0.15
Boat -17.67% -15.12% -16.76% -30.21% 1.38 1.95 0.23
BoxingPractice -13.13% -14.88% -9.72% -24.08% 1.25 1.35 0.23
Crosswalk -13.46% -14.22% -11.52% -20.90% 1.38 1.66 0.29
Dancers -4.87% -9.31% 17.99% -8.03% 0.76 0.75 0.12
DinnerScene -2.72% -20.82% 4.18% -22.97% 0.86 0.71 0.12
DrivingPOV -13.24% -12.59% -11.88% -22.97% 1.56 1.88 0.28
FoodMarket -18.34% -12.43% -16.72% -19.55% 1.55 1.99 0.29
FoodMarket2 -15.84% -23.36% -16.80% -34.58% 1.52 2.02 0.26
Narrator -17.04% -15.04% -16.54% -26.82% 1.11 1.14 0.18
PierSeaside -14.89% -16.32% -16.11% -25.55% 1.38 1.66 0.23
RitualDance -12.06% -11.85% -7.58% -17.20% 1.44 1.81 0.32
RollerCoaster -11.02% -19.15% -7.22% -27.16% 1.32 1.56 0.25
SquareAndTimelapse -14.36% -13.38% -13.38% -24.19% 1.22 1.72 0.25
Tango -13.95% -11.94% -10.97% -18.08% 1.52 1.83 0.30
ToddlerFountain -13.44% -9.08% -7.83% -12.52% 1.55 2.48 0.50
TunnelFlag -7.34% -13.38% -2.84% -29.49% 1.42 1.95 0.35
WindAndNature -5.92% 3.62% 0.58% -8.38% 0.84 1.04 0.16
OVERALL -12.57% -14.05% -8.86% -22.54% 1.28 1.58 0.25

VBR (2-pass)

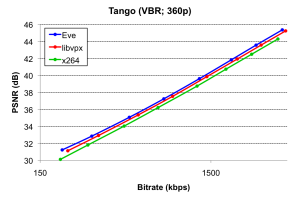
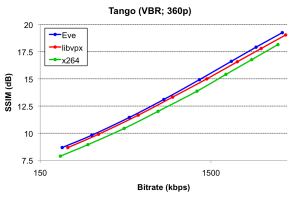
tango vbr psnr tango vbr ssimI encoded the same 360p sequences again, but instead of specifying a target CRF value, I specified a target bitrate using otherwise recommended settings for each encoder (Eve, vpxenc, x264), and used target bitrate adherence as an additional metric. Again, let’s first look at the objective quality metrics: the table shows results that are not fundamentally different from the CRF results: Eve requires 7.7% less bitrate than libvpx to accomplish the same quality in PSNR. Results for SSIM are not much different: Eve requires 6.6% less bitrate than libvpx to accomplish the same quality. Compared to x264, Eve requires 15.9% (PSNR) or 24.5% (SSIM) less bits to accomplish the same quality.

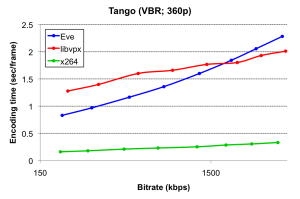
tango vbr enctimeFor an average encoding time of around 1.26 sec/frame, Eve is approximately 0.31 sec/frame faster than libvpx (1.57 sec/frame), which is similar to the CRF results. At 0.20 sec/frame, x264 is again several times faster than either Eve or libvpx, for the same reasons as explained in the CRF section.

VBR; 360p PSNR, Eve vs. SSIM, Eve vs. Encoding time (sec/frame)
libvpx x264 libvpx x264 Eve libvpx x264
Aerial -8.40% -24.47% -10.30% -32.46% 1.19 1.85 0.17
BarScene -23.17% -16.27% -17.69% -24.65% 0.58 1.00 0.09
Boat -13.82% -15.04% -15.89% -30.62% 1.57 2.27 0.20
BoxingPractice -2.72% -16.52% -2.58% -25.00% 1.37 1.22 0.20
Crosswalk -6.92% -16.65% -8.15% -24.28% 1.46 1.64 0.25
Dancers -3.37% -7.23% 18.94% -2.45% 0.52 0.37 0.08
DinnerScene -3.32% -20.45% 0.10% -22.35% 0.87 0.31 0.09
DrivingPOV -5.32% -14.27% -12.62% -25.06% 1.55 2.03 0.22
FoodMarket -17.25% -14.59% -10.07% -22.92% 1.54 2.13 0.23
FoodMarket2 -9.22% -26.83% -12.90% -40.92% 1.97 2.34 0.24
Narrator -9.19% -14.32% -8.42% -25.76% 1.07 0.92 0.15
PierSeaside -6.83% -23.86% -13.33% -34.01% 0.98 1.52 0.14
RitualDance -3.26% -13.44% -2.28% -19.03% 1.43 1.71 0.26
RollerCoaster -6.02% -27.72% -8.24% -32.59% 0.93 1.32 0.15
SquareAndTimelapse -9.05% -14.57% -8.86% -26.07% 1.49 1.99 0.24
Tango -6.19% -14.22% -7.25% -21.04% 1.51 1.68 0.24
ToddlerFountain -7.19% -9.75% -2.34% -12.61% 1.61 2.50 0.37
TunnelFlag -3.30% -17.22% -2.56% -36.15% 1.55 2.04 0.30
WindAndNature -1.88% 5.51% -1.56% -8.16% 0.77 0.93 0.13
OVERALL -7.71% -15.89% -6.63% -24.53% 1.26 1.57 0.20

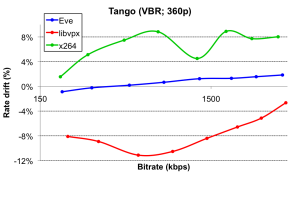
tango vbr rateadhIn terms of target bitrate adherence, Eve and x264 adhere to the target rate much more closely than libvpx does. Expressed as average absolute rate drift, where rate drift is target / actual – 1.0, Eve misses the target rate on average by 2.66%. x264 is almost as good, missing the target rate by 3.83% at default settings. Libvpx is several times farther off, with an average absolute rate drift of 9.48%, which confirms libvpx’ rate adherence concerns I’ve heard from others. Each encoder has options to curtail the rate drift, but enabling this option costs quality. If I curtail libvpx’ rate drift to the same range as x264/Eve (commandline options: --undershoot-pct=2 --overshoot-pct=2; table below: RRD), it loses another 3.6% in quality, at which point Eve requires 11.3% less bitrate to accomplish the same quality, with a rate drift of 3.33% for libvpx.

VBR; 360p PSNR, Eve vs. Absolute rate drift
libvpx libvpx (RRD) x264 Eve libvpx libvpx (RRD) x264
Aerial -8.40% -11.45% -24.47% 1.36% 4.85% 0.97% 3.58%
BarScene -23.17% -23.49% -16.27% 7.11% 15.88% 16.16% 4.17%
Boat -13.82% -24.60% -15.04% 2.71% 19.21% 0.49% 4.50%
BoxingPractice -2.72% -3.92% -16.52% 1.49% 7.05% 1.82% 7.71%
Crosswalk -6.92% -13.10% -16.65% 0.46% 14.84% 0.46% 3.24%
Dancers -3.37% -11.80% -7.23% 4.66% 9.07% 6.59% 4.11%
DinnerScene -3.32% -10.00% -20.45% 4.04% 8.95% 5.31% 4.62%
DrivingPOV -5.32% -6.55% -14.27% 1.49% 6.45% 1.03% 1.68%
FoodMarket -17.25% -16.03% -14.59% 0.71% 12.43% 2.80% 2.40%
FoodMarket2 -9.22% -11.49% -26.83% 2.50% 2.87% 0.94% 3.43%
Narrator -9.19% -18.17% -14.32% 1.98% 15.03% 1.77% 6.23%
PierSeaside -6.83% -12.79% -23.86% 1.47% 14.19% 2.90% 5.25%
RitualDance -3.26% -3.10% -13.44% 0.97% 1.20% 1.02% 2.94%
RollerCoaster -6.02% -6.76% -27.72% 5.72% 16.55% 11.14% 1.99%
SquareAndTimelapse -9.05% -9.84% -14.57% 2.53% 14.22% 2.76% 1.19%
Tango -6.19% -13.80% -14.22% 0.98% 8.41% 0.76% 6.07%
ToddlerFountain -7.19% -8.21% -9.75% 1.38% 3.95% 0.79% 4.00%
TunnelFlag -3.30% -2.84% -17.22% 4.72% 2.49% 3.65% 2.68%
WindAndNature -1.88% -7.40% 5.51% 4.26% 2.38% 1.99% 2.91%
OVERALL -7.71% -11.33% -15.89% 2.66% 9.48% 3.33% 3.83%

HD resolutions

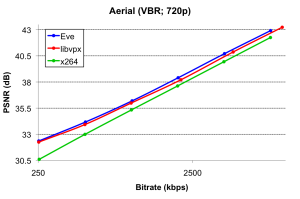
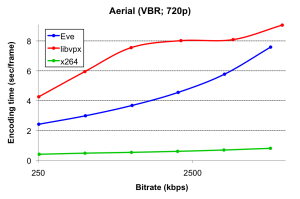
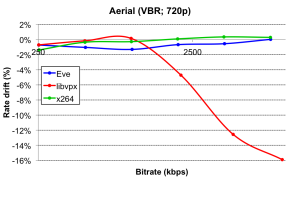
aerial 720p psnrMost people in the US watch video at resolutions much higher than 360p nowadays, so I repeated the VBR tests at 720p to ensure consistency of the results at higher resolutions. Compared to libvpx, Eve needs 5.5% less bits to accomplish the same quality. Compared to x264, Eve needs 20.4% less bits. At 5.09 sec/frame versus 5.52 sec/frame, Eve is 0.43 sec/frame faster than libvpx, with the strongest gains at the low-to-middle bitrate spectrum. At 0.76 sec/frame, x264 is several times faster than either. In terms of bitrate adherence, Eve misses the target rate by 1.82% on average, and x264 by 1.65%. libvpx, at 8.88%, is several times worse. To curtail libvpx’ rate drift to the same range as Eve/x264 (using --undershoot-pct=2 --overshoot-pct=2), libvpx loses another 2.9%, becoming 8.4% worse than Eve at an average absolute rate drift of 1.50%. Overall, these results are mostly consistent with the 360p results.

aerial 720p enctimeaerial 720p rateadh

VBR; 720p PSNR, Eve vs. Encoding time (sec/frame) Absolute rate drift (%)
libvpx libvpx (RRD) x264 Eve libvpx x264 Eve libvpx libvpx (RRD) x264
Aerial -7.32% -10.61% -23.93% 4.50 7.15 0.59 0.72% 6.54% 0.38% 0.46%
BarScene -7.86% -8.99% -27.22% 3.64 2.47 0.40 1.02% 1.79% 1.39% 2.94%
Boat -10.11% -17.53% -13.19% 6.27 8.04 0.78 1.91% 10.67% 0.57% 1.89%
BoxingPractice 0.32% -0.48% -20.12% 5.71 4.69 0.73 1.41% 5.74% 1.08% 2.59%
Crosswalk -6.77% -8.61% -25.22% 5.79 5.61 0.93 1.15% 16.90% 0.36% 0.79%
Dancers 4.95% 1.06% -27.12% 2.29 1.45 0.32 2.56% 6.59% 3.34% 2.04%
DinnerScene -3.42% -13.21% -32.75% 3.89 1.64 0.36 2.12% 12.36% 2.72% 1.74%
DrivingPOV -2.69% -4.60% -14.62% 5.73 7.28 0.81 1.92% 9.98% 0.83% 0.96%
FoodMarket -20.16% -14.96% -15.66% 6.98 8.65 1.05 1.35% 7.15% 1.23% 2.85%
FoodMarket2 -8.54% -10.72% -24.24% 5.90 7.49 0.73 2.86% 4.05% 2.60% 1.84%
Narrator -5.98% -15.51% -22.80% 4.58 3.32 0.57 1.23% 13.71% 0.86% 2.38%
PierSeaside -7.21% -19.58% -21.66% 4.83 6.38 0.63 1.75% 21.85% 1.36% 3.56%
RitualDance -2.38% -1.83% -19.78% 5.05 5.31 0.92 1.33% 1.89% 0.85% 0.47%
RollerCoaster -2.82% -4.71% -25.01% 5.83 5.27 0.80 2.14% 12.52% 1.33% 0.72%
SquareAndTimelapse -7.69% -6.68% -14.99% 4.45 6.01 0.79 1.79% 10.66% 2.70% 0.93%
Tango -4.03% -5.10% -20.34% 6.09 5.97 0.91 1.30% 11.43% 0.55% 1.66%
ToddlerFountain -10.64% -11.78% -14.49% 5.27 7.67 1.45 1.66% 6.62% 0.95% 0.59%
TunnelFlag -2.27% -1.75% -20.29% 6.09 7.03 1.09 4.21% 5.89% 3.52% 1.15%
WindAndNature -0.04% -4.92% -3.63% 3.80 3.36 0.53 2.13% 2.31% 1.84% 1.74%
OVERALL -5.51% -8.45% -20.37% 5.09 5.52 0.76 1.82% 8.88% 1.50% 1.65%

Visual quality

The most-frequent concern I’ve heard about libvpx concerns visual quality. It usually goes like this: “the metrics for libvpx are better, but x264 _looks_ better!” (Or, at the very least, “libvpx does not look better!”) So, let’s try to look at some of these (equal bitrate/filesize) videos and decide whether we can see actual visual differences. When doing visual comparisons, it should be obvious why effective rate targeting is important, because visually comparing two files of significantly different size is quite meaningless.

For this comparison, I picked three files: one where Eve is far ahead of libvpx (BarScene), one where the two perform relatively equally (BoxingPractice), and one which represents roughly the median across the files in this test set (SquareAndTimelapse). In each case, the difference between Eve and x264 is close to the median. For target rate, I picked values around 200-1000kbps, with visual optimizations (i.e. no --tune=psnr). Overall, this gives reasonable visual quality and is typical for internet video streaming at this resolution, but at the same time allows easy distinction of visual artifacts between encoders. For higher resolution, you’d use higher bitrates, but the types visual artifacts would not change substantially.

Source Eve libvpx x264
barscene217-source barscene217-eve barscene217-libvpx barscene217-x264
barscene217-source-d barscene217-eve-d barscene217-libvpx-d barscene217-x264-d
barscene217-source-c barscene217-eve-c barscene217-libvpx-c barscene217-x264-c
barscene217-source-b barscene217-eve-b barscene217-libvpx-b barscene217-x264-b
barscene217-source-a barscene217-eve-a barscene217-libvpx-a barscene217-x264-a

First, BarScene: I encoded the file at 200kbps and picked frame 217 of each encoded file. The coded frame size is 889 bytes (Eve), 1020 bytes (libvpx) and 862 bytes (x264),with total file size of 505kB (Eve), 500kB (libvpx) and 507kB (x264). Full-sized images are clickable. In the close-ups, we see various artifacts:

  • Bartender’s face: x264 makes the man’s nose and forehead look like a zombie, because of high-frequency noise at sharp edges. Libvpx has the opposite artifact: it is blurry, which is the most-often heard complaint about this encoder.
  • Bartender’s shirt and girl’s sweater: libvpx blurs out most texture in the clothing. x264, on the other hand, has high-frequency noise around the buttons on the bartender’s shirt. Both x264 as well as libvpx manage to make the lemon in the glass disappear.
  • Patron’s faces: libvpx is again blurry. x264 is also more blurry than it typically is.
  • Bar area: x264 hides the finger of the left-hand (top/right, holding the menu), and adds a dark scar (instead of a faint shadow) to the thumb on the right hand. libvpx changes the color of the drink from orange to yellow, makes straws disappear, and is – surprise! – blurry.
Source Eve libvpx x264
sat101-source sat101-eve sat101-libvpx sat101-x264
sat101-source-a sat101-eve-a sat101-libvpx-a sat101-x264-a
sat101-source-b sat101-eve-b sat101-libvpx-b sat101-x264-b
sat101-source-c sat101-eve-c sat101-libvpx-c sat101-x264-c

Second, let’s look at SquareAndTimelapse. I encoded the file at 1 mbps and selected frame 101 of each encoded file. The coded frame sizes are 2651 bytes (Eve), 2401 bytes (libvpx) and 3721 bytes (x264), with total file size of 1.27 MB (Eve), 1.30 MB (libvpx) and 1.24 MB (x264). Full-sized images are clickable. In the close-ups, we can again compare visual artifacts:

  • Man in black coat and woman in pink sweater: x264 turned the woman’s face green’ish. On the other hand, it maintains most texture in the black coat. Eve maintains almost as much detail in the coat, but libvpx blurs it quite significantly. Libvpx also bleeds the red color from the man’s t-shirt into the hair of the woman in front of him (mid/bottom).
  • Man in blue t-shirt and woman in white shirt: libvpx blurs the bottom of the man’s t-shirt, particularly the red portion, which is barely visible anymore. x264, on the other hand, blurs away the woman’s face quite significantly (e.g. her mouth disappears). x264 also again suffers from  coloring artifacts in the top/left girl’s neck (which turns gray) and the woman in the bottom/right (whose face turns blue). Also with x264, we again see significant high-frequency artifacts in what used to be a shoulderbag in the person to the top/right.
  • Red backpack: libvpx combines two recurring artifacts here – blur and color bleed – at the bottom/right edge of the backpack, where the red backpack bleeds into neighbouring objects. x264 does the opposite, and replaces the red color in the bottom/right corner of the backpack with a green patch that seems to come out of nowhere.
Source Eve libvpx x264
box86-source box86-eve box86-libvpx box86-x264
box86-source-c box86-eve-c box86-libvpx-c box86-x264-c
box86-source-b box86-eve-b box86-libvpx-b box86-x264-b
box86-source-a box86-eve-a box86-libvpx-a box86-x264-a

Lastly, let’s look at BoxingPractice. I encoded the file at 1 mbps and selected frame 86 of each encoded file. The coded frame sizes are 3060 (Eve), 2785 (libvpx) and 2171 bytes (x264), with total file size of 509 kB (Eve), 481 kB (libvpx) and 513 kB (x264). Full-sized images are clickable. In the close-ups, we can again compare visual artifacts:

  • Man with red gloves: in x264, we see the boxing glove color bleeding through into the man’s face. The high frequency noise is also abundantly present, particularly around his left hand’s boxing glove. And although all three encoders suffer significantly from blurring artifacts, libvpx is still by far the worst.
  • Man with blue gloves: the x264 file shows more high-frequency noise artifacts on the right shoulder area, and a bright red patch coming out of nothing on the left. And libvpx is this time much more blurry than either of the other two encodes, and also loses the red spot on the base of the glove. The man’s facial color is not well maintained by any of the encoders, unfortunately.
  • Foreground boxer: x264 has more high-frequency noise artifact just under the man’s nose. Libvpx, on the other hand, is once again blurry, and loses significantly more color in the man’s face.

Overall, we start seeing a pattern in these artifacts: at comparable file sizes and frame sizes, compared to Eve, libvpx is blurry, and x264 suffers from high-frequency noise artifacts at sharp edges and has issues with skin textures. Both x264/libvpx also have significantly more color-artifacts compared to Eve: x264 tends to lose color and libvpx often bleeds colors. Eve – although obviously not perfect – looks visually much more pleasing, at the same frame size and file size.

Conclusion

Eve is a world-class VP9 encoder that fixes some of the key issues people have complained about with libvpx. Here, I tested the encoder at 360p and 720p using broadcast-style settings, where one encoded file is streamed many, many times, and therefore slow encoding times (1 sec/frame) are acceptable. At these tested CRF/VBR settings, Eve:

  • provides better quality metrics than libvpx (5-10% bitrate reduction) and x264 (~15-20% bitrate reduction)
  • provides better visual results than libvpx/x264
  • is faster than libvpx (10-20%), but slower than x264 (~5x)
  • has better target rate adherence than libvpx, and has comparable target rate adherence with x264. To get libvpx at the same target rate adherence, it loses another ~2-3% in quality metrics compared to Eve.

At Two Orioles, we are working to further improve Eve’s quality and speed every day, and lots of work can still be done (e.g.: faster encoding modes, multi-threading). At the same time, we would love to help you use VP9 for internet video streaming. Do you stream lots of video, and are you interested in trying out VP9 or improving your VP9 pipeline using Eve? Contact us, or see our website for more information.

Posted in General | 22 Comments

VP9 Analyzer

Almost a year ago, I decided to quit my job and start my own business. Video coding technology in general, and VP9 specifically, seemed interesting enough that I should be able to build a business on top of it, right? The company is called Two Orioles.

Two Orioles Logo

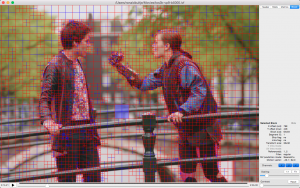
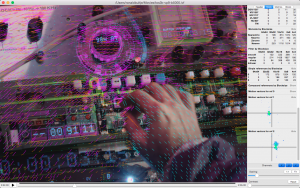
As a first product, I’ve created a VP9 bitstream analyzer. What’s a bitstream analyzer? It’s a tool to analyze the VP9 bitstream, of course! As such, it will visualize coding tools used for each VP9 frame, such as block/transform decompositions, intra/inter prediction modes used, segmentation maps; it also displays the frame buffer at each decoding stage (prediction, pre-loopfilter, final reconstruction), differences between each of these stages, and error between each stage and the source. It can also export block-, frame- and stream-level statistics  to external tools (e.g. Google Sheets or Microsoft Excel) for further analysis.

Screen Shot 2016-01-13 at 11.18.36 AM Screen Shot 2016-01-13 at 11.16.06 AM

I’m considering adding support for more codecs to it, let me know if you’re interested in that.

Posted in General | 5 Comments

VP9 encoding/decoding performance vs. HEVC/H.264

A while ago, I posted about ffvp9, FFmpeg‘s native decoder for the VP9 video codec, which significantly outperforms Google’s decoder (part of libvpx). We also talked about encoding performance (quality, mainly), and showed VP9 significantly outperformed H.264, although it was much slower. The elephant-in-the-room question since then has always been: what about HEVC? I couldn’t address this question back then, because the blog post was primarily about decoders, and FFmpeg’s decoder for HEVC was immature (from a performance perspective). Fortunately, that concern has been addressed! So here, I will compare encoding (quality+speed) and decoding (speed) performance of VP9 vs. HEVC/H.264. [I previously presented this at the Webm Summit and VDD15, and a Youtube version of that talk is available also.]

Encoding quality

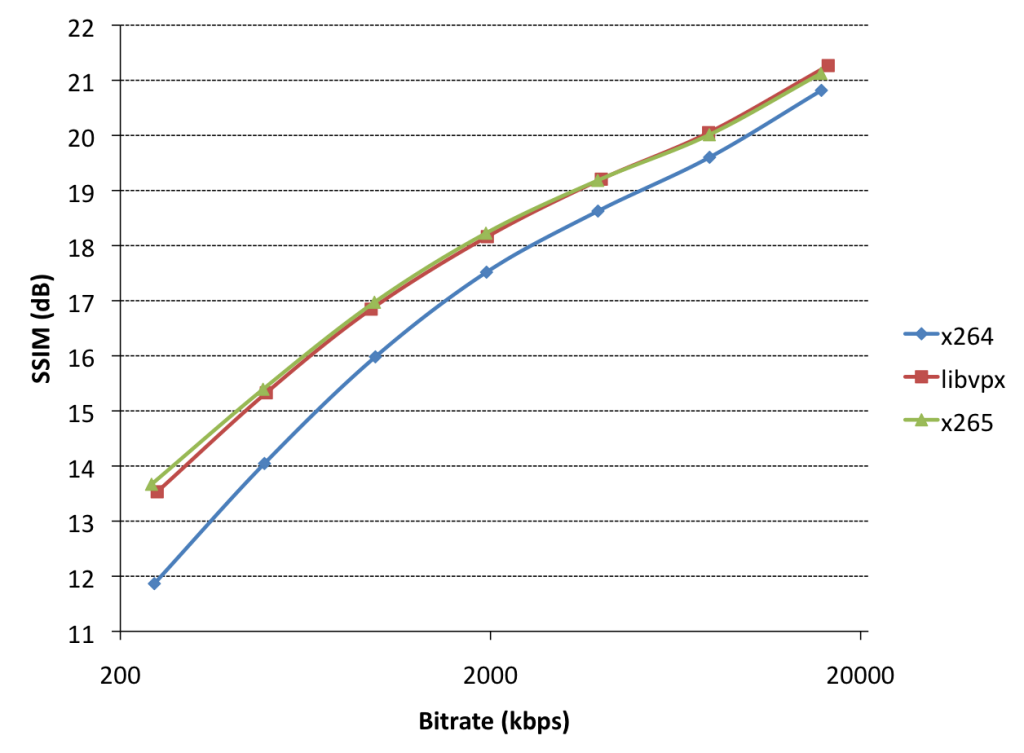
The most important question for video codecs is quality. Scientifically, we typically encode one or more video clips using standard codec settings at various target bitrates, and then measure the objective quality of each output clip. The recommended objective metric for video quality is SSIM. By drawing these bitrate/quality value pairs in a graph, we can compare video codecs. Now, when I say “codecs”, I really mean “encoders”. For the purposes of this comparison, I compared libvpx (VP9), x264 (H.264) and x265 (HEVC), each using 2-pass encodes to a set of target bitrates (x264/x265: –bitrate=250-16000; libvpx: –target-bitrate=250-16000) with SSIM tuning (–tune=ssim) at the slowest (i.e. highest-quality) setting (x264/5: –preset=veryslow; libvpx: –cpu-used=0), all forms of threading/tiling/slicing/wpp disabled, and a 5-second keyframe interval. As test clip, I used a 2-minute fragment of Tears of Steel (1920×800).

vp9-x264-x265-encoding-quality

This is a typical quality/bitrate graph. Note that both axes are logarithmic. Let’s first compare our two next-gen codecs (libvpx/x265 as encoders for VP9/HEVC) with x264/H.264: they’re way better (green/ref is left of blue, which means “smaller filesize for same quality”, or alternatively you could say they’re above, which means “better quality for same filesize”). Either way, they’re better. This is expected. By how much? So, we typically try to estimate how much more bits “blue” needs to accomplish the same quality as (e.g.) “red”, by comparing an actual point of red to an interpolated point (at the same SSIM score) of the blue line. For example, the red point at 1960kbps has an SSIM score of 18.16. The blue line has two points at 17.52 (1950) and 18.63 (3900kbps). Interpolation gives an estimated point for SSIM=18.16 around 2920kbps, which is 49% larger. So, to accomplish the same SSIM score (quality), x264 needs 49% more bitrate than libvpx. Ergo, libvpx is 49% better than x264 at this bitrate, this is called the bitrate improvement (%). x265 gets approximately the same improvement over x264 as libvpx at this bitrate. The distance between the red/green lines and blue line get larger as the bitrate goes down, so the codecs have a higher bitrate improvement at low bitrates. As bitrates go up, the improvements go down. We can also see slight differences between x265/libvpx for this clip: at low bitrates, x265 slightly outperforms libvpx. At high bitrates, libvpx outperforms x265. These differences are small compared to the improvement of either encoder over x264, though.

Encoding speed

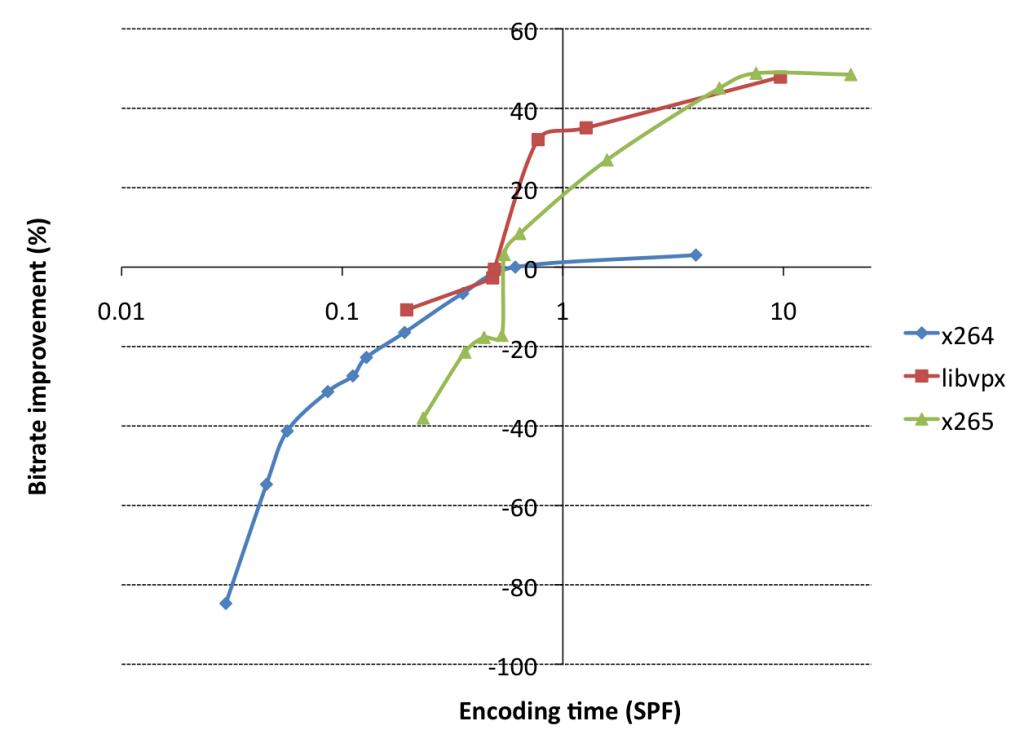
So, these next-gen codecs sound awesome. Now let’s talk speed. Encoder devs don’t like to talk speed and quality at the same time, because they don’t go well together. Let’s be honest here: x264 is an incredibly well-optimized encoder, and many people still use it. It’s not that they don’t want better bitrate/quality ratios, but rather, they complain that when they try to switch, it turns out these new codecs have much slower encoders, and when you increase their speed settings (which lowers their quality), the gains go away. Let’s measure that! So, I picked a target bitrate of 4000kbps for each encoder, using otherwise the same settings as earlier, but instead of using the slow presets, I used variable-speed presets (x265/x264: –preset=placebo-ultrafast; libvpx: –cpu-used=0-7).

vp9-x264-x265-encoding-speed

This is a graph people don’t talk about often, so let’s do exactly that. Horizontally, you see encoding time in seconds per frame. Vertically, we see bitrate improvement, the metric we introduced previously, basically a combination of the quality (SSIM) and bitrate, compared to a reference point (x264 @ veryslow is the reference point here, which is why the bitrate improvement over itself is 0%).

So what do these results mean? Well, first of all, yeah, sure, x265/libvpx are ~50% better than x264, as claimed. But, they are also 10-20x slower. That’s not good! If you normalize for equal CPU usage, you’ll notice that (again looking at the x264 point at 0%, 0.61 sec/frame), if you look at intersected points of the red line (libvpx) vertically above it, the bitrate improvement normalized for CPU usage is only 20-30%. For x265, it’s only 10%. What’s worse is that the x265 line actually intersects with the x264 line just left of that. In practice, that means that if your CPU usage target for x264 is anything faster than veryslow, you basically want to keep using x264, since at that same CPU usage target, x265 will give worse quality for the same bitrate than x264. The story for libvpx is slightly better than for x265, but it’s clear that these next-gen codecs have a lot of work left in this area. This isn’t surprising, x264 is a lot more mature software than x265/libvpx.

Decoding speed

Now let’s look at decoder performance. To test decoders, I picked the x265/libvpx-generates files at 4000kbps, and created an additional x264 file at 6500kbps, all of which have an approximately matching SSIM score of around 19.2 (PSNR=46.5). As decoders, I use FFmpeg’s native VP9/H264/HEVC decoders, libvpx, and openhevc. OpenHEVC is the “upstream” of FFmpeg’s native HEVC decoder, and has slightly better assembly optimizations (because they used intrinsics for their idct routines, whereas FFmpeg still runs C code in this place, because it doesn’t like intrinsics).

ffmpeg-libvpx-openhevc-decoder-speed

So, what does this mean? Let’s start by comparing ffh264 and ffvp9. These are FFmpeg’s native decoders for H.264 and VP9. They both get approximately the same decoding speed, ffvp9 is in fact slightly faster, by about 5%. Now, that’s interesting. When academics typically speak about next-gen codecs, they claim it will be 50% slower. Why don’t we see that here? The answer is quite simple: because we’re comparing same-quality (rather than same-bitrate) files. Decoders that are this well optimized and mature, tend to spend most of their time in decoding coefficients. If the bitrate is 50% larger, it means you’re spending 50% more time in coefficient decoding. So, although the codec tools in VP9 may be much more complex than in VP8/H.264, the bitrate savings cause us to not spend more time doing actual decoding tasks at the same quality.

Next, let’s compare ffvp9 with libvpx-vp9. The difference is pretty big: ffvp9 is 30% faster! But we already knew that. This is because FFmpeg’s codebase is better optimized than libvpx. This also introduces interesting concepts for potential encoder optimizations: apparently (in theory) we should be able to make encoders that are much better optimized (and thus much faster) than libvpx. Wouldn’t that be nice?

Lastly, let’s compare ffvp9 to ffhevc: VP9 is 55% faster. This is partially because HEVC is much, much, much more complex than VP9, and partially because of the C idct routines in ffhevc. To normalize, we also compare to openhevc (which has idct intrinsics). It’s still 35% slower, so the story for VP9 at this point seems more interesting than for HEVC. A lot of work is left to be done on FFmpeg’s HEVC decoder.

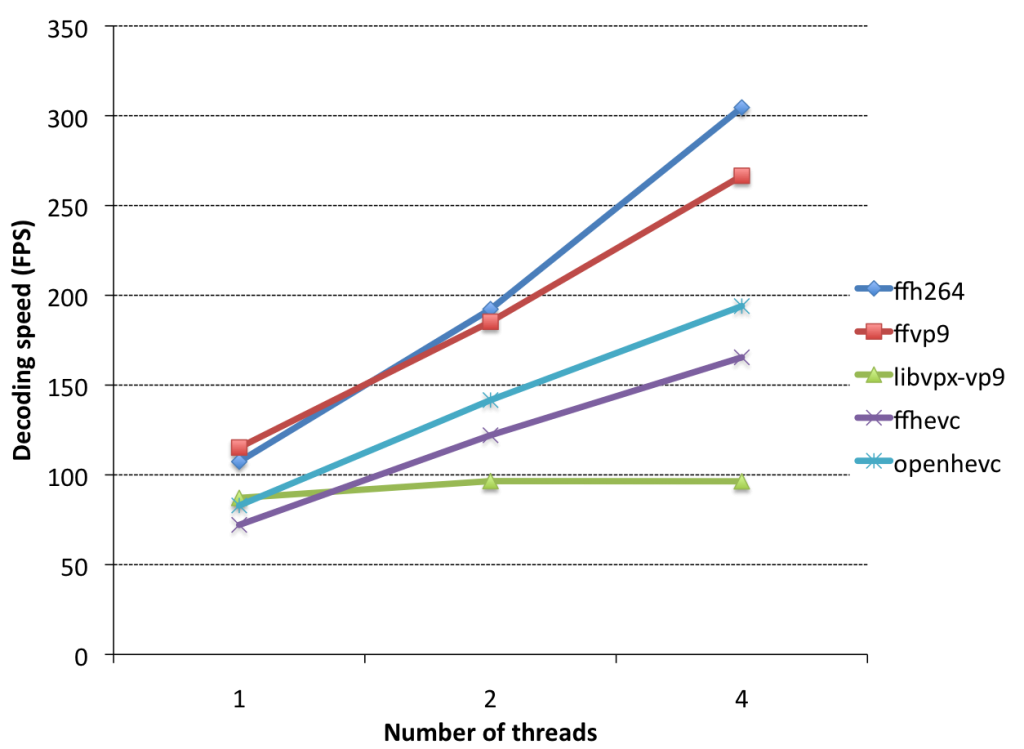
Multi-threaded decoding

Lastly, let’s look at multi-threaded decoding performance:

ffmpeg-libvpx-openhevc-decoder-mt

Again, let’s start by comparing ffvp9 with ffh264: ffh264 scales much better. This is expected, the backwards adaptivity feature in VP9 affects multithreaded scaling somewhat, and ffh264 doesn’t have such a feature. Next, ffvp9 versus ffhevc/openhevc: they both scale about the same. Lastly: libvpx-vp9. What happened? Well, when backwards adaptivity is enabled and tiling is disabled in the VP9 bitstream, libvpx doesn’t use multi-threading at all, so I’ll call it a TODO item in libvpx. There is no reason why this is the case, as is proven by ffvp9.

Conclusions

  • Next-gen codecs provide 50% bitrate improvements over x264, but are 10-20x as slow at the top settings required to accomplish such results.
  • Normalized for CPU usage, libvpx already has some selling points when compared to x264; x265 is still too slow to be useful in most practical scenarios except in very high-end scenarios.
  • ffvp9 is an incredibly awesome decoder that outperforms all other decoders.

Lastly, I was asked this question during my VDD15 talk, and it’s fair question so I want to address it here: why didn’t I talk about encoder multi-threading? There’s certainly a huge scope of discussion there (slicing, tiling, frame-multithreading, WPP).  The answer is that the primary target of my encoder portion was VOD (e.g. Youtube), and they don’t really care about multi-threading, since it doesn’t affect total workload. If you encode four files in parallel on a 4-core machine and each takes 1 minute, or you encode each of them serially using 4 threads, where each takes 15 seconds, you’re using the full machine for 1 minute either way. For clients of VOD streaming services, this is different, since you and I typically watch one Youtube video at a time.

Posted in General | 41 Comments

The world’s fastest VP9 decoder: ffvp9

As before, I was very excited when Google released VP9 – for one, because I was one of the people involved in creating it back when I worked for Google (I no longer do). How good is it, and how much better can it be? To evaluate that question, Clément Bœsch and I set out to write a VP9 decoder from scratch for FFmpeg. The goals never changed from the original ffvp8 situation (community-developed, fast, free from the beginning). We also wanted to answer new questions: how does a well-written decoder compare, speed-wise, with a well-written decoder for other codecs? TLDR (see rest of post for details):

  • as a codec, VP9 is quite impressive – it beats x264 in many cases. However, the encoder is slow, very slow. At higher speed settings, the quality gain melts away. This seems to be similar to what people report about HEVC (using e.g. x265 as an encoder).
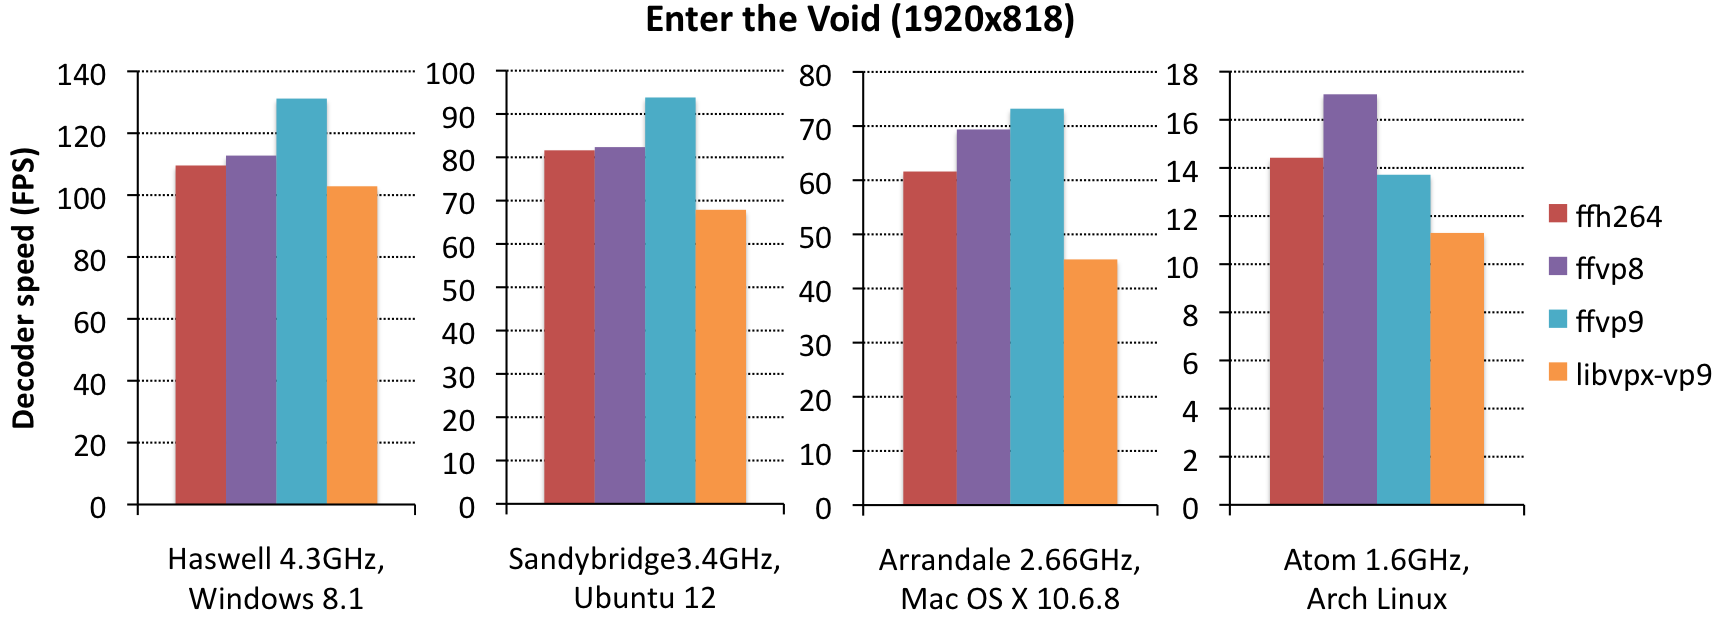
  • single-threaded decoding speed of libvpx isn’t great. FFvp9 beats it by 25-50% on a variety of machines. FFvp9 is somewhat slower than ffvp8, and somewhat faster than ffh264 decoding speed (for files encoded to matching SSIM scores).
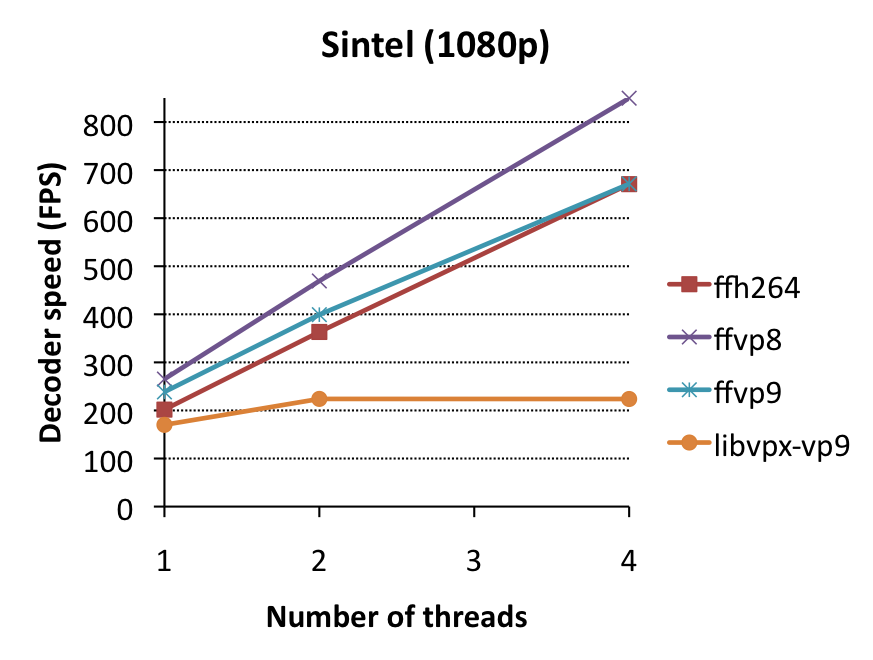
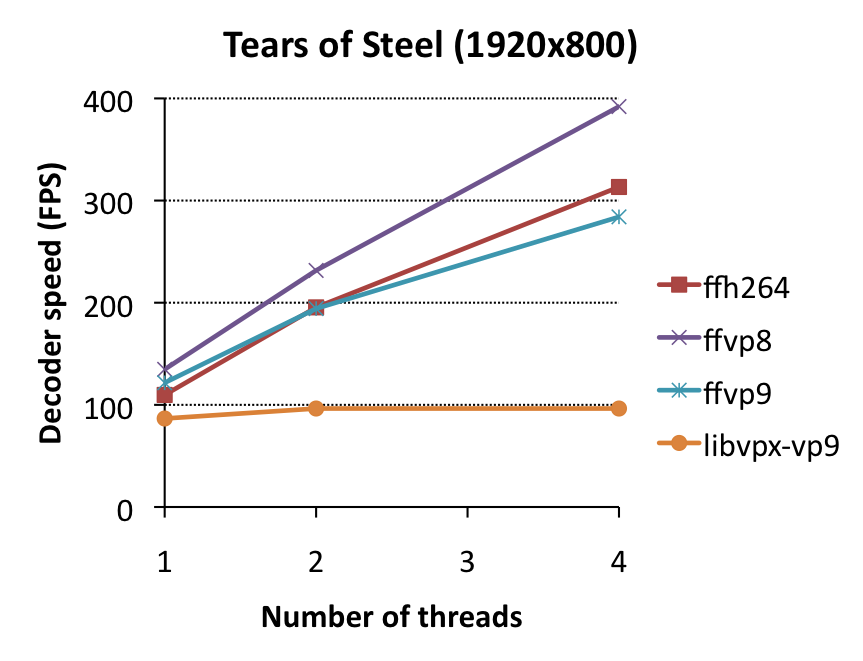
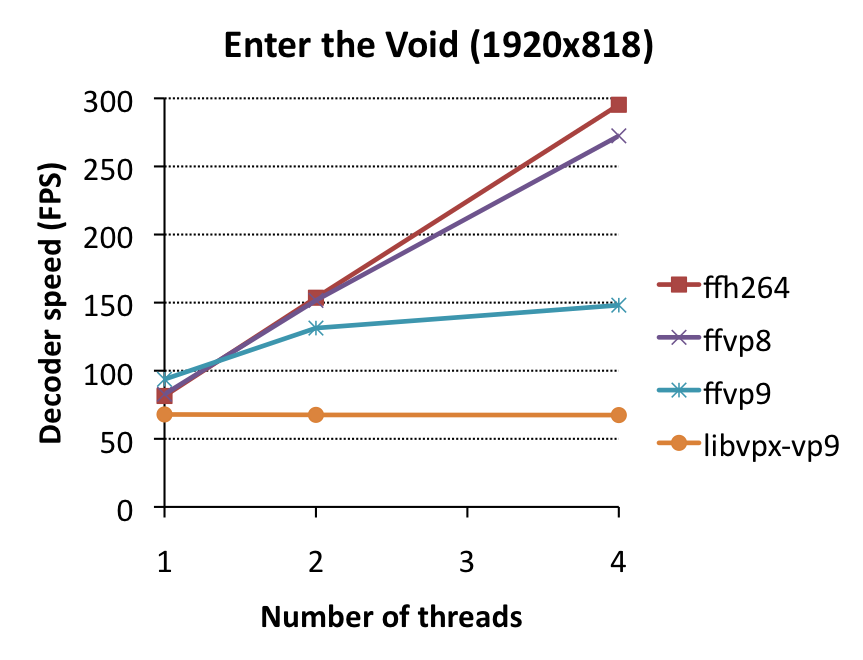
  • Multi-threading performance in libvpx is deplorable, it gains virtually nothing from its loopfilter-mt algorithm. FFvp9 multi-threading gains nearly as much as ffh264/ffvp8 multithreading, but there’s a cap (material-, settings- and resolution-dependent, we found it to be around 3 threads in one of our clips although it’s typically higher) after which further threads don’t cause any more gain.

The codec itself

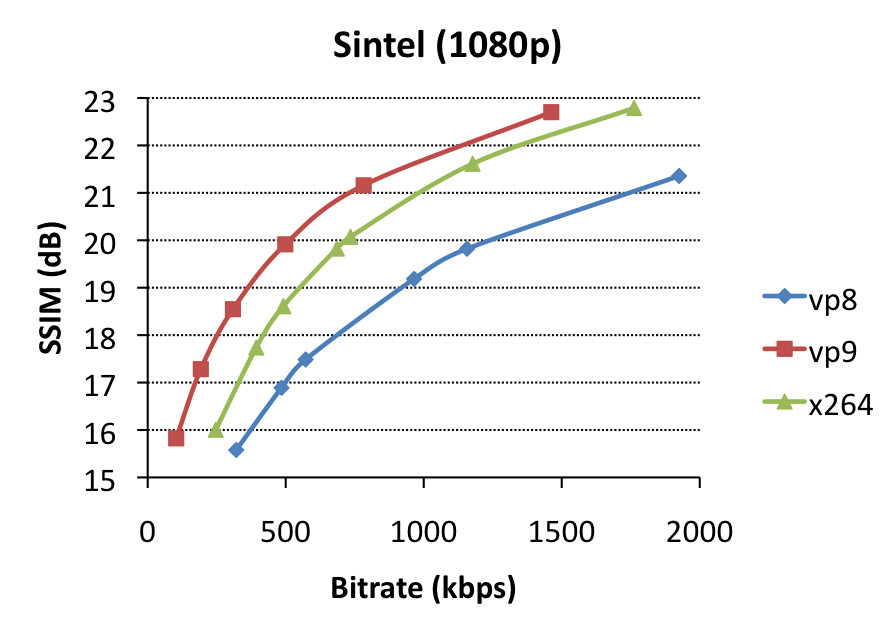
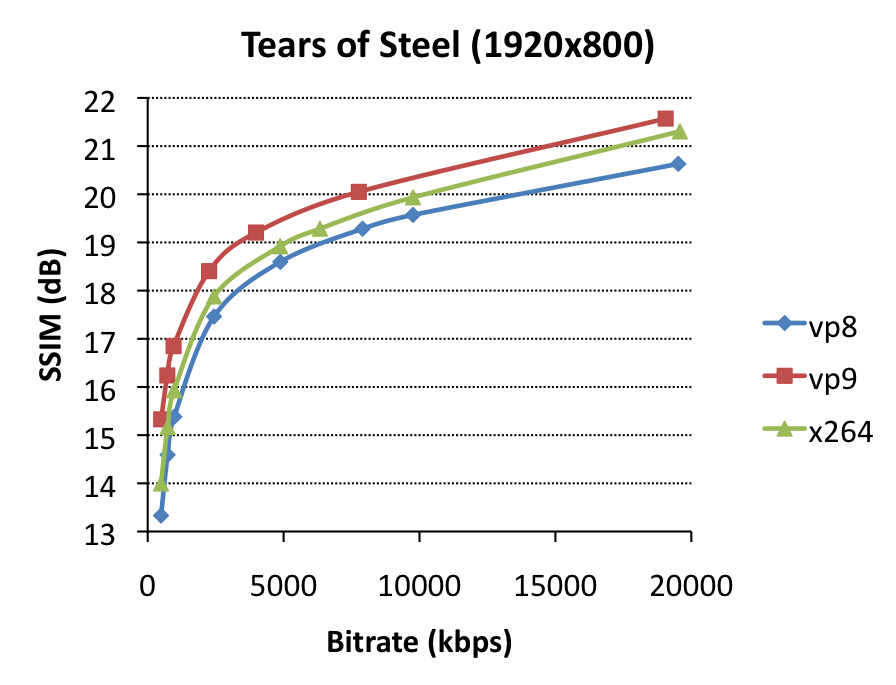
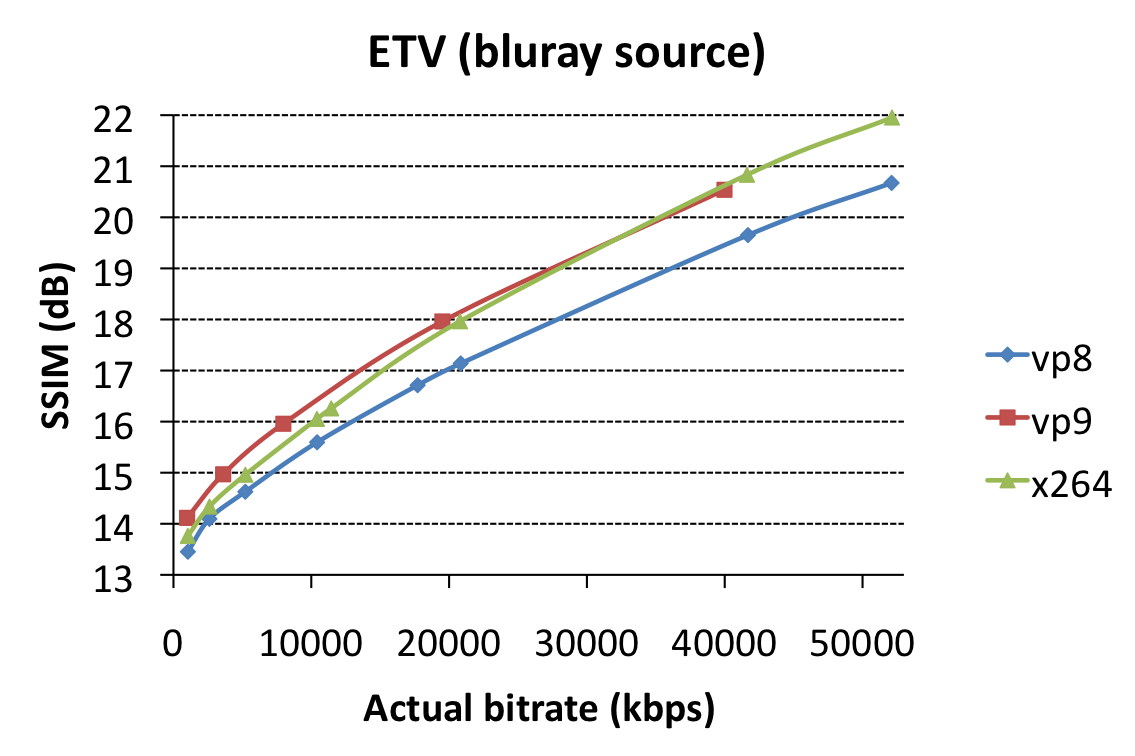
To start, we did some tests on the encoder itself. The direct goal here was to identify bitrates at which encodings would give matching SSIM-scores so we could do same-quality decoder performance measurements. However, as such, it also allows us to compare encoder performance in itself. We used settings very close to recommended settings for VP8, VP9 and x264, optimized for SSIM as a metric. As source clips, we chose Sintel (1920×1080 CGI content, source), a 2-minute clip from Tears of Steel (1920×800 cinematic content, source), and a 3-minute clip from Enter the Void (1920×818 high-grain/noise content, screenshot). For each, we encoded at various bitrates and plotted effective bitrate versus SSIM.

sintel_ssimtos_ssim


You’ll notice that in most cases, VP9 can indeed beat x264, but, there’s some big caveats:

  • VP9 encoding (using libvpx) is horrendously slow – like, 50x slower than VP8/x264 encoding. This means that encoding a 3-minute 1080p clip takes several days on a high-end machine. Higher –cpu-used=X parameters make the quality gains melt away.
  • libvpx’ VP9 encodes miss the target bitrates by a long shot (100% off) for the ETV clip, possibly because of our use of –aq-mode=1.
  • libvpx tends to slowly decay towards normal at higher bitrates for hard content – again, look at the ETV clip, where x264 shows some serious mature killer instinct at the high bitrate end of things. [edit 6/3/’14: original results showed x264 beating libvpx by a lot at high bitrates, but the source had undergone double compression itself so we decided to re-do these experiments – thanks to Clement for picking up on this.]

Overall, these results are promising, although the lack-of-speed is a serious issue.

Decoder performance

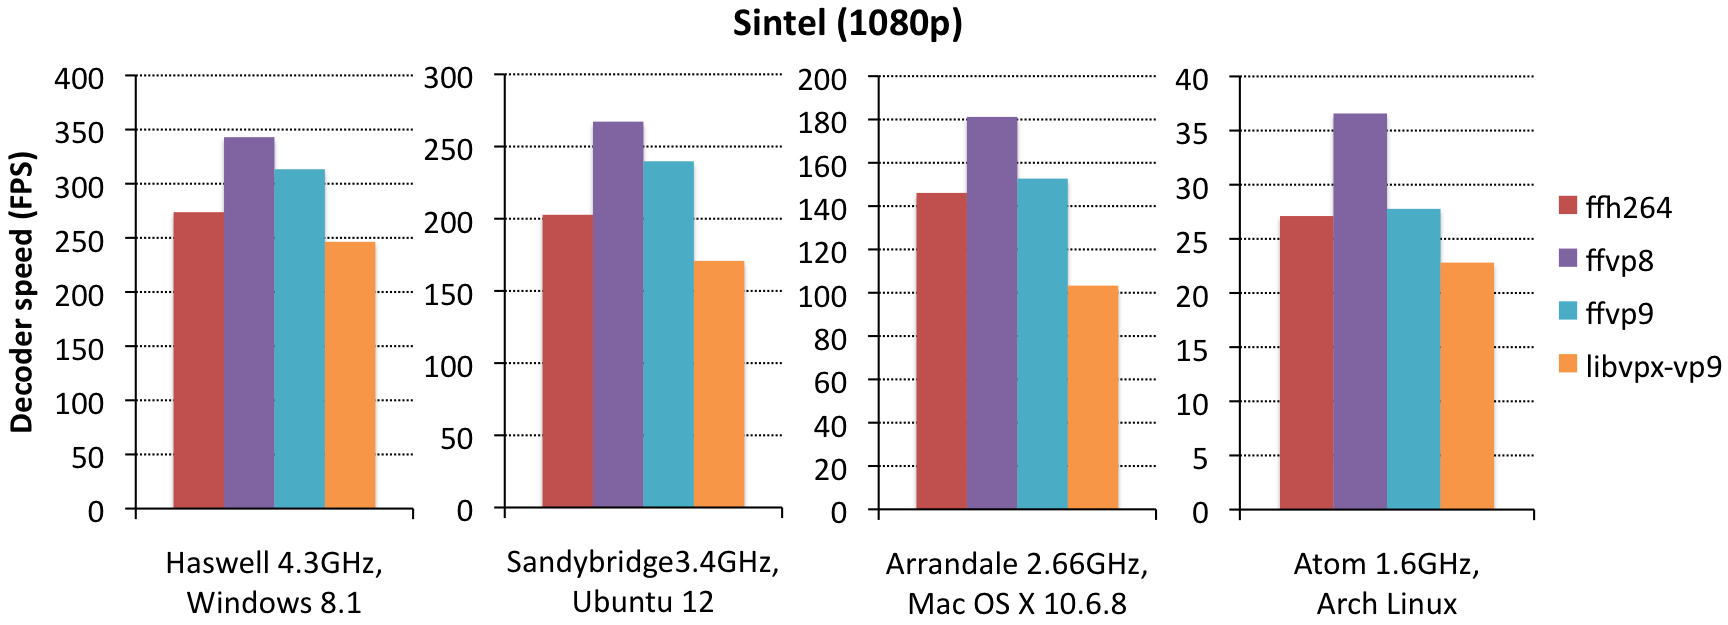
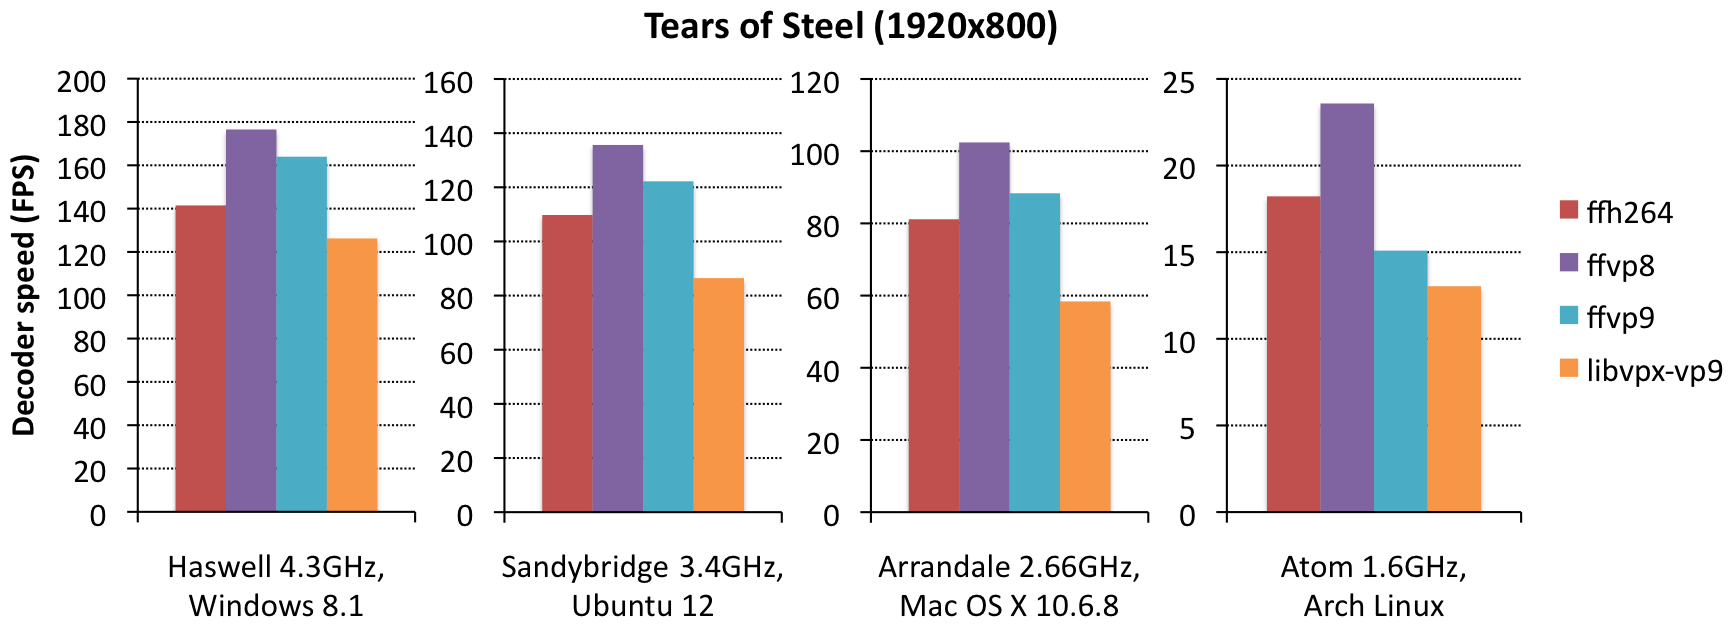
For decoding performance measurements, we chose (Sintel) 500 (VP9)1200 (VP8) and 700 (x264) kbps (SSIM=19.8); Tears of Steel 4.0 (VP9)7.9 (VP8) and 6.3 (x264) mbps (SSIM=19.2); and Enter the Void 9.7 (VP9)16.6 (VP8) and 10.7 (x264) mbps (SSIM=16.2). We used FFmpeg to decode each of these files, either using the built-in decoder (to compare between codecs), or using libvpx-vp9 (to compare ffvp9 versus libvpx). Decoding time was measured in seconds using “time ffmpeg -threads 1 [-c:v libvpx-vp9] -i $file -f null -v 0 -nostats – 2>&1 | grep user”, with this FFmpeg and this libvpx revision (downloaded on Feb 20th, 2014).

sintel_archs

tos_archsetv_archs


A few notes on ffvp9 vs. libvpx-vp9 performance:

  • ffvp9 beats libvpx consistently by 25-50%. In practice, this means that typical middle- to high-end hardware will be able to playback 4K content using ffvp9, but not using libvpx. Low-end hardware will struggle to playback even 720p content using libvpx (but do so fine using ffvp9).
  • on Haswell, the difference is significantly smaller than on sandybridge, likely because libvpx has some AVX2 optimizations (e.g. for MC and loop filtering), whereas ffvp9 doesn’t have that yet; this means this difference might grow over time as ffvp9 gets AVX2 optimizations also.
  • on the Atom, the differences are significantly smaller than on other systems; the reason for this is likely that we haven’t done any significant work on Atom-performance yet. Atom has unusually large latencies between GPRs and XMM registers, which means you need to take special care in ordering your instructions to prevent unnecessary halts – we haven’t done anything in that area yet (for ffvp9).
  • Some users may find that ffvp9 is a lot slower than advertised on 32bit; this is correct, most of our SIMD only works on 64bit machines. If you have 32bit software, port it to 64bit. Can’t port it? Ditch it. Nobody owns 32bit x86 hardware anymore these days. [Edit: as of 12/27/2014, all ffvp9 optimizations work on 32-bit, and baseline has moved from SSSE3 to SSE2.]

So how does VP9 decoding performance compare to that of other codecs? There’s basically two ways to measure this: same-bitrate (e.g. a 500kbps VP8 file vs. a 500kbps VP9 file, where the VP9 file likely looks much better), or same-quality (e.g. a VP8 file with SSIM=19.2 vs. a VP9 file with SSIM=19.2, where the VP9 file likely has a much lower bitrate). We did same-quality measurements, and found:

  • ffvp9 tends to beat ffh264 by a tiny bit (10%), except on Atom (which is likely because ffh264 has received more Atom-specific attention than ffvp9).
  • ffvp9 tends to be quite a bit slower than ffvp8 (15%), although the massive bitrate differences in Enter the Void actually makes it win for that clip (by about 15%, except on Atom). Given that Google promised VP9 would be no more than 40% more complex than VP8, it seems they kept that promise.
  • we did some same-bitrate comparisons, and found that x264 and ffvp9 are essentially identical in that scenario (with x264 having slightly lower SSIM scores); vp8 tends to be about 50% faster, but looks significantly worse.

Multithreading

One of the killer-features in FFmpeg is frame-level multithreading, which allows multiple cores to decode different video frames in parallel. Libvpx also supports multithreading. So which is better?

sintel_decspeedtos_decspeedetv_decspeed


Some things to notice:

  • libvpx multithreading performance is deplorable. It gains virtually nothing. This is likely because libvpx’ VP9 decoder supports only loopfilter-multithreading (which is enabled here), or tile multithreading, which is only enabled if files are encoded with –frame-parallel (which disables backwards adaptivity, a major source of quality improvement in VP9 over VP8) and –tile-rows=0 –tile-cols=N for N>0 (i.e. only tile columns, but specifically no tile rows). It’s confusing why this combination of restriction exists before tile-multithreading is enabled (in theory, it could be enabled whenever –tile-cols=N for N>0, but for now it looks like libvpx’ decoding performance won’t gain anything from multithreading in most practical settings.
  • ffvp9 multithreading performance is mostly on-par with that of ffvp8/ffh264, although it scales slightly less well (i.e. the performance improvement is marginally worse for ffvp9 than for ffvp8/ffh264)…
  • … but you’ll notice a serious issue at 4 threads in Enter the Void – suddenly it stops improving. Why? Well, this clip is very noisy and encoded at a high bitrate, which effectively means that there will be many non-zero coefficients, and thus a dispropotionally high percentage of decoding time (as much as 30%) will be spent in coefficient decoding. Remember when I mentioned backwards adaptivity? A practical side-effect of this feature is that the next frame can only start decoding when the previous frame has finished decoding all coefficients (and modes), so that adaptivity updates can actually take place before the next thread starts decoding the next frame. If coefficient decoding takes 30% plus another 5-10% for mode decoding and other overhead, it means 35-40% of processing time is non-reconstruction-related and can’t be parallelized in VP9 – thus performance reaches a ceiling at 2.5-3 threads. The solution? –frame-parallel=1 in the encoder, but then quality will drop.

Next steps

So is ffvp9 “done” now? Well, it’s certainly usable, and has been fuzzed extensively, thus it should be relatively secure (so not to repeat this), but it’s nowhere near done:

  • many functions (idct16/32, iadst16, motion compensation, loopfilter) could benefit from AVX2 implementations.
  • there’s no SIMD optimizations for non-x86 platforms yet (e.g. arm-neon).
  • more special-use-cases like Atom have not been explored yet.
  • ffvp9 does not yet support SVC or 444. [Edit: as of 05/06/2015, SVC, profile 1 (4:2:2, 4:4:0 ad 4:4:4) and profile 2-3 (10-12 bpp support) are supported.]

But all of this is decoder-only, and the 800-pound gorilla issue for VP9 adoption – at this point – is encoder performance (i.e. speed).

What about HEVC?

Well, HEVC has no optimized, opensource decoder yet, so there’s nothing to measure. It’s coming, but not yet finished. We did briefly look into x265, one of the more popular HEVC encoders. Unfortunately, it suffers from the same basic issue as libvpx: it can be fast, and it can beat x264, but it can’t do both at the same time.

Raw data

See here. Also want to high-five Clément Bœsch for writing the decoder with me, and thank Clément Bœsch (again) and Hendrik Leppkes for helping out with the performance measurements.

Posted in General | 18 Comments

Brute-force thread-debugging

Thread debugging should be easy; there’s advanced tools like helgrind and chess, so it’s a solved problem, right?

Once upon a time, FFmpeg merged the mt-branch, which allowed frame-level multi-threading. While one CPU core decodes frame 1, the next CPU core will decode frame 2 in parallel (and so on for any other CPU cores you have). This might sound somewhat odd, because don’t most video codecs use motion vectors to access data in previously coded reference frames? Yes, they do, but we can simply add a condition variable so that thread 2 waits for the relevant data in the reference frame (concurrently decoded by thread 1) to have finished reconstructing that data, and all works fine. Although this might seem to destroy the whole point of concurrency, it works well in practice (because motion vectors tend to not cross a whole frame).

Heisenbugs and their tools

Like any other software feature, this feature contained bugs. Threading bugs have the funny name “heisenbugs”: by virtue of the scheduling of instructions on your 2 CPU cores not being identical between different runs, the interaction between 2 threads will not be identical between 2 runs of exact the same commandline. In FFmpeg, we use an elaborate framework knows as FATE to test for video decoder regressions, and we set up some stations to specifically test various multithreading configurations. As you’d expect with heisenbugs, some of these would occasionally fail a test, but otherwise run OK. So how do you debug this?

Let me start with chess. Chess is actually an extension to MSVC, so I actually first had to port FFmpeg to MSVC (which was also useful for Chrome). With that problem out of the way, this should be easy right? Last release 5 years ago, forum dead as of 2011, right… Anyway, what chess attempts to do, is to settle a fixed scheduling path between your different threads, such that they will interact in the same way between multiple runs, thus allowing you to consistently reproduce the same bug for debugging purposes. That’s incredibly helpful, but I never tried it out at the end. I’m looking forward to this appearing in some next version of MSVC.

So, helgrind. FATE actually has a helgrind station, and it sucks, reporting 1000s of potential races for files that have never failed decoding (that is, they are pixel-perfect every single time). Is there a race? Who knows, maybe. But I’m not interested in debugging theoretical races, I want a tool that helps me debug stuff that is happening. Imagine how infuriating asan, valgrind or gdb would be if they told us about stuff that might crash instead of the crash we’re investigating. (Now, post-hoc, it turns out that helgrind did indeed identify one of the bugs causing the heisenbugs in ffmpeg-mt, but it was lost in the noise.)

Brute-force heisen-debugging

So now that all our best tools are not all that helpful, what to do? I ended up doing it the brute-force way (In this example, I’m debugging the h264-conformance-cama2_vtc_b FATE test in FFmpeg):

$ make THREADS=2 V=1 fate-h264-conformance-cama2_vtc_b
[..]
ffmpeg -nostats -threads 2 -thread_type frame -i cama2_vtc_b.avc -f framecrc -

Note that it didn’t fail! So now that we know what commandline it’s executing, let’s change that into something that brute-forces a heisenbug out of its hiding. First, let’s generate a known-good reference:

$ ./ffmpeg -threads 1 -i cama2_vtc_b.avc -f md5 -nostats -v 0 -
MD5=ec33975ec4d2fccc55485da3f37a755b

Note that that used only 1 thread, since it serves as our known-good reference. Lastly, let’s see how (and how often) we can make that fail by running it as often as it takes until it fails:

$ cat test.sh
i=0
while [ true ]; do
  MD5=$(./ffmpeg -threads 2 -thread_type frame \
            -i cama2_vtc_b.avc -f md5 -nostats -v 0 -)
  if [ "$MD5" != "MD5=ec33975ec4d2fccc55485da3f37a755b" ]; then
    echo "$i failed! $MD5"
  else
    printf "$i\r"
  fi
  ((i++))
done
$ bash test.sh
2731 failed! MD5=9cdbf390e5aed1e723c7c3a2def96377
3681 failed! MD5=64a112a2cfc61610a5f75c65293bbbbc
5892 failed! MD5=10224e406d4a2451c60e642a24fc3dce

And we have a reproducible failing testcase! One problem with thread debugging is failures are hard to reproduce, and another is that we may be looking at different failures at the same time (as is demonstrated by the different outputs for the 2 shown failures). However, we’d like to focus on runs that fail in one particular type of way (assuming that the cause for identical-output failures is consistent), thus taking the heisen- out of the bug. We can adjust the script slightly to focus on any one of our choosing (it turned out that all failures for this particular FATE test were caused by the same bug, displaying itself in slightly different ways).

$ cat test2.sh
i=0
while [ true ]; do
  MD5=$(./ffmpeg -threads 2 -thread_type frame \
            -i cama2_vtc_b.avc -f md5 -nostats \
            -v 0 - -y -f yuv4mpegpipe out.y4m)
  if [ "$MD5" != "MD5=64a112a2cfc61610a5f75c65293bbbbc" ]; then
    echo "$i failed! $MD5"
    break
  elif [ "$MD5" != "MD5=ec33975ec4d2fccc55485da3f37a755b" ]; then
    echo "$i failed (the wrong way): $MD5"
  else
    printf "$i\r"
  fi
  ((i++))
done
$ bash test2.sh
2201 failed (the wrong way): MD5=9cdbf390e5aed1e723c7c3a2def96377
9587 failed! MD5=64a112a2cfc61610a5f75c65293bbbbc

And with the heisen-part out of the way, we can now start debugging this as any other bug (printf debugging is easy this way, but you could even get fancy and try to attach to gdb when a particular situation occurs). Below is a comparison of ref.y4m (left, decoded with -threads 1) and out.y4m (right, delta from left with enhanced contrast). The differences are the 3 thin horizontal black/white lines towards the top of the frame. Further research by focussing more narrowly on the decoding process for these specific blocks (using the same technique) led to this fix, and the same technique was also used to fix two other heisenbugs.

delta


Posted in General | 3 Comments

Microsoft Visual Studio support in FFmpeg and Libav

An often-requested feature for FFmpeg is to compile it using Microsoft Visual Studio’s C compiler (MSVC). The default (quite arrogant) answer used to be that this is not possible, because the godly FFmpeg code is too good for MSVC. Usually this will be followed by some list of C language features/extensions that GCC supports, but MSVC doesn’t (e.g. compound literals, designated initializers, GCC-style inline assembly). There are complete patches and forks related to this one single feature.

Reality is, many of these C language features are cosmetic extensions introduced in C99 that are trivially emulated using classic C89 syntax. Consider designated initializers:

struct {
    int a, b;
} var = { .b = 1, };

This can be trivially emulated in C89 by using the following syntax:

struct {
    int a, b;
} var = { 0, 1 };

For unions, you can change the initialization (as long as the size of the first field is large enough to hold the contents of any other field in the union) to do a binary translation of the initialized field type to the first field type:

union {
    unsigned int a;
    float b;
} var = { .b = 1.0, };

becomes:

union {
    unsigned int a;
    float b;
} var = { 0x3f800000, };

Here, 0x3f800000 is the binary representation of the floating point number 1.0. If the value to be converted is not static, the assignment can simply become a statement on its own:

union {
    unsigned int a;
    float b;
} var;
var.b = 1.0;

Other C99 language features (e.g. compound literals) can be translated in a similar manner:

struct {
    int *list;
} var = { (int *) { 0, 1 } };

becomes:

int *list = { 0, 1 };
struct {
    int *list;
} var = { list };

Two other Libav developers (Derek Buitenhuis and Martin Storsjo) and I wrote a conversion tool that automatically translates these C99 language features to C89-compatible equivalents. With this tool, the FFmpeg and Libav source trees can be translated and subsequently compiled with MSVC. A wrapper is provided so that you can tell the FFmpeg build script to use that as compiler. The wrapper will then (internally) call the conversion utility to convert the source file from C99 to C89, and then it calls the MSVC build tools to compile the resulting “C89’ified source file”. In the end, this effectively means FFmpeg and Libav can be compiled with MSVC, and the resulting binaries are capable of decoding all media types covered by the test suite (32bit, 64bit) and can be debugged using the Visual Studio debugger.

For the adventurous, here’s a quick guide (this is being added to the official Windows build documentation as-we-speak):

Requirements:

  • Microsoft Visual Studio 2010 or above (2008 may work, but is untested; 2005 won’t work);
  • msys (part of mingw or mingw-64);
  • yasm;
  • zlib, compiled with MSVC;
  • a recent version (e.g. current git master) of Libav or FFmpeg.

Build instructions:

  • from the Start menu, open a “Visual Studio Command Prompt” for whatever version of Visual Studio you want to use to compile FFmpeg/Libav;
  • from this DOS shell, open a msys shell;
  • first-time-only – build c99-to-c89 (this may be tricky for beginners):
    • you’ll need clang, compiled with MSVC, for this step;
    • check out the c99-to-c89 repository;
    • compile it with clang (this probably requires some manual Makefile hackery; good luck!);
    • at some point in the near future, we will provide pre-compiled static binaries to make this easier (then, you won’t need clang anymore);
  • get the C99 header file inttypes.h from code.google.com and place it in the root folder of your source tree;
  • use the configure option “–toolchain=msvc” to tell it to use the MSVC tools (rather than the default mingw tools) to compile FFmpeg/Libav. Ensure that the c99-to-c89 conversion tools (c99wrap.exe and c99conv.exe, generated two steps up) are in your $PATH;
  • now, “make” will generate the libraries and binaries for you.

If you want to run tests (“fate”), use the “–samples=/path/to/dir” configure option to tell it where the test suite files are located. You need bc.exe (not included in default msys install) in your $PATH to run the testsuite.

It’s probably possible to generate Visual Studio solutions (.sln files) to import this project in the actual Visual Studio user interface (e.g. libvpx does that) so you no longer need the msys shell for compilation (just for configure). Although we haven’t done that yet, we’re very interested in such a feature.

Posted in General | 46 Comments