Project Templates

Now that Builder has integrated Template-GLib, I started working on creating projects from templates. Today, this is only supported from the command line. Obviously the goal is to have it in the UI side-by-side with other project creation methods.

I’ve put together a demo for creating a new shared-library project with autotools. Once I’m happy with the design, I’ll document project templates so others can easily contribute new templates.

Anyway, you can give it a go as follows.

ide create-project my-project -t shared-library
cd my-project
ide build

Hiding, Dock-able, and Floating Panels

I’m doing some research on panel systems that people love, hate, and love to hate. Send me a short email with the following to get your voice heard. No promises of implementation, but I’d like to inform myself nonetheless.

Name: Application or Library Name
Screenshots: 1-2 screenshot links
Likes: 1-2 Sentence max of likes
Dislikes: 1-2 Sentence max of dislikes

Builder Plugins – Part II

Previously, Builder Plugins, Part I. Read this if you haven’t.

Now that we’ve learned the mechanics of creating a plugin, let’s look at another plugin interface, IdeWorkbenchAddin. This interface allows us to extend the IdeWorkbench. An IdeWorkbench is the toplevel window for a given project. Since Builder supports having more than one project open at a time (each in a given workbench window), this is the interface you would use for extensions that are per-project.

the workbench window

The workbench window has an important property. The IdeWorkbench:context. This is the IdeContext. Each loaded project has an IdeContext. This is the primary data structure that provides access to your Version Control System, Build System, Device Manager, and many other components.

The two important virtual functions in the IdeWorkbenchAddin interface are IdeWorkbenchAddin::load and IdeWorkbenchAddin::unload. These provide an IdeWorkbench as a parameter, for which you can use to your hearts content. IdeWorkbenchAddin::unload() should reverse anything that happened in IdeWorkbenchAddin::load().

The other virtual functions are optional, and can be used to allow your IdeWorkbenchAddin to perform custom actions upon opening URIs and such. I’m sure we’ll add more as we go.

Anyway, let’s create a sample IdeWorkbenchAddin that prints some information about our loaded project.

# my_plugin.py

from gi.repository import Ide
from gi.repository import GObject

class MyWorkbenchAddin(GObject.Object, Ide.WorkbenchAddin):
    def do_load(self, workbench):
        self.workbench = workbench

        context = workbench.props.context
        vcs = context.props.vcs
        build_system = context.props.build_system

        print("Version Control System is:", repr(vcs))
        print("Build System is:", repr(build_system))

    def do_unload(self, workbench):
        self.workbench = None

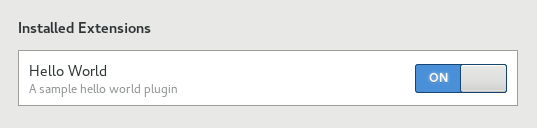
Use the same my_plugin.plugin found in Part I.

Running Builder should result in something like this on the command line.

Version Control System is: <__gi__.IdeGitVcs object at 0x7fffbd8de438 (IdeGitVcs at 0x1caaee0)>
Build System is: <__gi__.IdeAutotoolsBuildSystem object at 0x7fffbd8de798 (IdeAutotoolsBuildSystem at 0x1d00890)>

You can see that my project uses Git for Version Control, and Autotools for the build system. Nothing too spectacular here, so now we’ll move on to something a bit more complex.

perspectives See each of the icons on the left of the workbench? Those are what we call perspectives. Currently, we only have two perspectives. One for the editor, and one for preferences. I’m sure you can imagine a bunch of new perspectives. Bugzilla, git, debugger, profiler, database browser, and designer all come to mind.

I should mention that I’m not sure whether or not we’ll keep the perspective bar like this. It’s been there since some of the earliest designs, but we may opt for something slightly different.

Like many of the other extension points in Builder, IdePerspective is an interface you can implement in your library. However, you need to add it to the workbench using IdeWorkbench.add_perspective(). As always, you should remove it when you unload your plugin, using IdeWorkbench.remove_perspective().

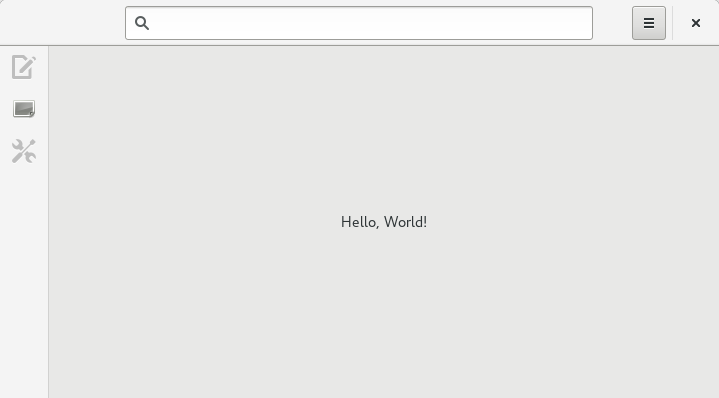
Lets create a Hello World perspective.

# my_plugin.py

from gi.repository import Ide
from gi.repository import GObject
from gi.repository import Gtk

class MyWorkbenchAddin(GObject.Object, Ide.WorkbenchAddin):
    def do_load(self, workbench):
        self.perspective = HelloPerspective(visible=True)
        workbench.add_perspective(self.perspective)

    def do_unload(self, workbench):
        workbench.remove_perspective(self.perspective)
        self.perspective = None

class HelloPerspective(Gtk.Box, Ide.Perspective):
    def __init__(self, *args, **kwargs):
        super().__init__(*args, **kwargs)

        label = Gtk.Label(label="Hello, World!",
                          expand=True,
                          visible=True)
        self.add(label)

        self.titlebar = Ide.WorkbenchHeaderBar(visible=True)

    def do_get_id(self):
        return 'hello-world'

    def do_get_title(self):
        return 'Hello'

    def do_get_priority(self):
        return 10000

    def do_get_icon_name(self):
        return 'image-missing'

    def do_get_titlebar(self):
        return self.titlebar

Lets run Builder and see what happens!

Screenshot from 2016-01-21 15-48-43

More next time, same bat channel.

Builder Plugins – Part I

The time to start writing plugins for Builder is here!

While the API of LibIDE may churn a bit, now is a good time to get started on your plugin of choice. Things are easier than ever and we hope to continue trending in that direction.

We support writing plugins in a variety of languages. Currently, C, Vala, and Python 3 are all supported in Builder.You can find examples of all of these in the plugins/ directory.

We use libpeas for our plugin support. That means the process for creating a plugin in Builder is quite similar to Gedit, Rythmbox, Eog, and others.

I’m going to use Python 3 as our language of choice for examples due to the succinctness.

Create a .plugin description

The first step in our plugin is to create a plugin description file. The convention we use for this is module-name.plugin.

[Plugin]
Name=Hello World
Description=A sample hello world plugin
Authors=Example 
Copyright=Copyright © 2016 Example

Loader=python3
Module=my_plugin

The stuff at the top is your basic title, description, and attribution.

The two lines at the bottom tell us what plugin loader to use, and the name of the module to load. In this case, we want to use the python3 loader. Omitting this line would default to the C loader, which can load a shared library using an equivalent to dlopen().

The Module, in this case, is our Python 3 module. If we were doing this in C or Vala, it would be the name of the shared library, omitting the “lib” prefix and “.so” suffix.

Create a plugin Python module

Lets create our python module now. The following will create an IdeApplicationAddin. An IdeApplicationAddin allows you to extend the IdeApplication object. There is only ever one IdeApplication per-process, so this is an excellent place to put “singleton” type code.

# my_plugin.py

from gi.repository import GObject
from gi.repository import Ide

# Ide.ApplicationAddin interface requires a GObject, so we
# inherit from GObject.Object. Ide.ApplicationAddin is an
# interface and it has two override'able methods. do_load()
# and do_unload(). Each take the application instance as a
# parameter.
class MyAppAddin(GObject.Object, Ide.ApplicationAddin):
    def do_load(self, app):
        print("Hello, World!")

        # If you'd like to access this instance like a
        # singleton from other extensions in your plugin,
        # then you might want to give yourself access to
        # the MyAppAddin instance.
        #
        # Doing the following will allow you to use
        # "MyAppAddin.instance" as your singleton.
        MyAppAddin.instance = self

    def do_unload(self, app):
        # Unload our singleton
        MyAppAddin.instance = None

That’s it! Put my_plugin.plugin and my_plugin.py in ~/.local/share/gnome-builder/plugins and restart Builder.

You should see your plugin in the Extensions section of the Preferences perspective.

hello-world

You can imagine lots of things you might want to do only once per-process. Setup a DBus service, manage compiler tooling, provide access to an external web service, you name it.

In my next post, we’ll take things a bit deeper now that we have the machanics of creating a new plugin.

EggStateMachine

So the topic of the day is EggStateMachine. This is a handy class for managing various states in your UI that might have complex transitions. One example might be the GNOME 3 style search pattern. The search pattern has a few states.

  • Inital state which contains the content overview
  • The active search state, including type-ahead search
  • Object selection state
  • Object selection state with a selection

When we switch between the above states, we might need to:

  • Toggle search and object-selection toggle buttons
  • Toggle search revealer visibility
  • Toggle action bar visibility
  • Toggle action bar button sensitivity
  • Show checkbuttons on content overview
  • Alter headerbar CSS classes
  • Toggle visibility of close button on header bar
  • Toggle visibility of cancel button on header bar

You get the idea. Getting everything right is critical to the UX, and that becomes unpleasant code rather quickly.

EggStateMachine allows you to do much of above all from your Gtk+ .ui template file. Additionally, you can use the native C API if using .ui templates is not your thing. For those people, you can jump to the header file to get the idea, link at the bottom.

For the rest of you, take a look at this snippet.

<object class="EggStateMachine">
 <property name="state">browse</property>
 <states>

  <state name="browse">
   <object id="titlebar">
    <property name="show-close-button">true</property>
   </object>
   <object id="cancel_button">
    <property name="visible">false</property>
   </object>
   <object id="action_bar">
    <property name="visible">false</property>
   </object>
  </state>

  <state name="selection">
   <object id="titlebar">
    <property name="show-close-button">false</property>
    <style>
     <class name="selection-mode"/>
    </style>
   </object>
  </state>

 </states>
</object>

This is just a snippet, and shows two states. The “browse” state and the “selection” state. You can see that you can reference other objects in your .ui definition using the <object id=""> syntax. While I didn’t show it here, you can use the binding syntax to bind properties only in a given state.

You can also define style-classes in the state. When the state transitions, the style-class will automatically be added or removed.

To perform a state transition, set the EggStateMachine:state property. You can also create an action for this using egg_state_machine_create_action(). If you add that action to your widget hierarchy (such as win.state), then you can remove the need to perform complex toggles in your application code as well. Take a look at the following snippet.

<object class="GtkToggleButton" id="selection_button">
  <property name="action-name">win.state</property>
  <property name="action-target">'selection'</property>
  <child>
   <object class="GtkImage">
    <property name="visible">true</property>
    <property name="icon-name">object-select-symbolic</property>
   </object>
  </child>
</object>

To add the state action to your widget hierarchy, do something like:

GAction *action;

action = egg_state_machine_create_action (state_machine, "state");
g_action_map_add_action (G_ACTION_MAP (my_window), action);
g_object_unref (action);

Now the button will be toggled when the state matches "selection".

And for practical use, see Builder’s greeter implementation.

EggAnimation

Here is a nifty trick I’ve had up my sleeve since the Gtk 2.x days (wow, over half a decade ago!). I’ve used this on a bunch of projects over the years, and it always gets a few smiles. It has a very similar API to the early days of Clutter, where it’s inpsiration came from. I should preface this with: If you need very fast, GPU optimized graphics, this is not what you want. However, for automating property changes, it is very handy.

Let’s start simple by transitioning the opacity of a widget from 0 (transparent) to 1 (opaque).

gtk_widget_set_opacity (widget, 0.0);
egg_object_animate (widget,
                    EGG_ANIMATION_LINEAR,
                    1000, /* duration in msec */
                    NULL, /* frame clock, NULL for default */
                    "opacity", 1.0, /* key/value properties */
                    NULL);

This is fairly contrived, because you almost certainly want to do the above with CSS transitions.

Now consider scrolling to the bottom of a GtkScrolledWindow. The GtkAdjustment is not a widget, and therefore does not have a frame-clock. So we will pass the frame-clock of the scrolled window instead.

GdkFrameClock *frame_clock;
GtkAdjustment *v_adjustment;
gdouble upper;
gdouble page_size;
gdouble value;

frame_clock = gtk_widget_get_frame_clock (scroller);
v_adjustment = gtk_scrollable_get_vadjustment (scroller);
upper = gtk_adjustment_get_upper (v_adjustment);
page_size = gtk_adjustment_get_page_size (v_adjustment);
value = MAX (0.0, (upper - page_size));

egg_object_animate (v_adjustment,
                    EGG_ANIMATION_EASE_IN_OUT_QUAD,
                    1000,
                    frame_clock,
                    "value", value,
                    NULL);

egg_object_animate() returns a weak pointer to the EggAnimation. This is safe since the animation won’t start until the next iteration of the main loop. If you want to hold on to it, either use g_object_weak_ref() or g_object_ref. I prefer the weak ref (via g_object_add_weak_pointer()) so it is easy for me to cancel in-flight animations with egg_animation_stop().

Here is an example of how we use EggAnimation in Builder to make the “yank” operation in Vim mode more visible.

For many things, you’ll be able to just use CSS transitions. And you should definitely check if that is an option before using EggAnimation.

But that said, it’s used all over in Builder. If I did my job well, you barely even notice. And of course, for the animation hating crowed, GtkSettings:gtk-enable-animations is respected.

EggScrolledWindow

A common pattern you see across software targeting a recent Gtk+ stack requires the use of GtkPopover. Choosing the right default-size for that popover is an exercise in futility.

Really, what you want is for the popover to shrink and grow in size based on the child, but only up to a certain point. EggScrolledWindow makes this relatively quick and easy for you to do.

Simply replace your use of GtkScrolledWinodw with EggScrolledWindow (in a template .ui file I hope) and set the max-content-width and max-content-height properties.

<object class="EggScrolledWindow">
  <property name="visible">true</property>
  <property name="min-content-height">20</property>
  <property name="max-content-height">500</property>
  <property name="min-content-width">100</property>
  <property name="max-content-width">400</property>
  <child>
    <object ...>
    </object>
  </child>
</object>

Update: Patrick Griffis ported EggScrolledWindow to Python, which can be found found here.

EggSlider

Today we’ll cover a playful widget. You probably won’t find many great uses for this widget, but then again, maybe you will.

You can use this widget to “hide” things on the top, left, right, or bottom of a widget. The contents will slide in based on the EggSlider:position property. If someone manages to tie this together with GtkGesture, you could have something like “hidden menus” found in some Android and iOS applications.

EggSettingsSandwich

GSettings is awesome, no doubt about it. Another uncommon thing we need in Builder are “layered settings”. We may have user “global settings” which are different than configured “project settings”.

In comes in the form of a wonderfully named EggSettingsSandwich. It let’s you stack GSettings atop one another, and read from the highest priority layer with modifications. Change notification works by tracking underlying changes and generating a “compiled” state using a memory-backed GSettings.

Your layer cake can be arbitrarily deep. We use g_settings_get_user_value() to determine if the value has changed at that layer.