Fedora Atomic Workstation → Team Silverblue

I have been writing a long series of posts about my experience with
Fedora Atomic Workstation, which I’ve enjoyed it quite a bit. But all good things must come to an end. So, no more Atomic Workstation for me …since we’re renaming it to Team Silverblue.

Team Silverblue logoWith this project, we want to take the Atomic Workstation as it is today, and turn into something that is not just cool for the few who know it, but useful for everybody who has a need for a Workstation.

There is still some work to be done to reach that goal. We have some ideas what is needed, but as with all open projects, those who show up to build it get a chance to shape the end product.

So, come and join us in Team Silverblue!

Fedora Atomic Workstation: Getting comfortable with GNOME Builder

Note: Fedora Atomic Workstation has recently been renamed to Team Silverblue. Learn more here.

I am still going with my attempt to use Fedora Atomic Workstation fulltime as my main  development system. As part of that, I am figuring out how to do GTK+ development on an immutable OS, using GNOME Builder.

As I’ve explained in a previous post, one thing I figured out early on is that while the flatpak support in GNOME Builder is optimized for desktop applications, you can use it for other things. In my case, that means developing GTK+.

Build Configurations

GNOME Builder knows what and how to build via its build configurations. It can have multiple such configurations for each project – the Build Preferences page has a list of them. In the flatpak case, build configurations correspond more or less 1:1 to flatpak manifests that are stored as json files in the source tree. Last time, I created one that launches the  gtk4-demo application.

Currently, creating a new build configuration means copying an existing flatpak manifest to a new file, but in  3.28, GNOME Builder will support copying build configurations directly in the Build Preferences.

Environment

Influencing GTK+ at runtime for debugging purposes is often done via environment variables, such as GTK_DEBUG for controlling the debug output. Unfortunately, setting environment variables is not the most obvious in GNOME Builders flatpak support, currently.

There is an Environment section in the Build Preferences, but it sets environment variables at build time, not in the runtime sandbox that gtk4-demo will run in. GNOME Builder currently has no UI for setting up the runtime environment. We can still do it, by manually adding –env options in the finish-args section of the flatpak manifest:

"finish-args" : [
   "--share=ipc",
   "--share=network",
   "--socket=x11",
   ...
   "--env=GTK_DEBUG=modules"
 ],

This is hardly elegant, and it has the big downside that any change to the flatpak manifest will cause GNOME Builder to rebuild the project, even if the change only affects the runtime setup, as is the case here. I hope that GNOME Builder will gain proper runtime setup UI at some point.

Terminals

But maybe it would be more natural to get a command prompt and set environment variables as usual, while launching apps from there.

GNOME Bulder can actually give you a terminal, with Ctrl-Alt-Shift-T, but it is a terminal in the build sandbox, not the runtime sandbox.

Thankfully, we can help ourselves in the same way as before: Just create another build configuration, this time using “sh” as the command – that gives us a shell inside the runtime sandbox, and we can launch test apps from there while setting environment variables.

Portals

One aspect of GTK+ that I have worked on in this new setup is module loading. I’ve switched GTK+s printing support to use a GIO extension point, and of course, I wanted to test this before pushing it.

So I was a bit surprised at first that the print dialog in gtk4-demo did not trigger my new module loading code and yet seemed to work just fine. But then I remembered that we are working in a flatpak sandbox now, so GTK+s portal support kicked in and helpfully redirected the print operation to an out-of-process print dialog.

Fedora Atomic Workstation: Theming Possible

Note: Fedora Atomic Workstation has recently been renamed to Team Silverblue. Learn more here.

Today, I decided to try out how themes work with flatpak:ed apps on an Atomic Workstation.

To change themes, I need gnome-tweaks. I already had it installed from the gnome-nightly-apps repository. Unfortunately, it didn’t work, complaining about a missing python package in the runtime. Such is life with nightly builds.

Instead, I used package layering to install a stable version of gnome-tweaks:

$ rpm-ostree install gnome-tweaks

This worked better, and …I found that there are no themes on the Atomic Workstation install, apart from the default ones (Adwaita and HighContrast). So, back to package layering once more. I installed Adapta:

$ rpm-ostree install adapta-gtk-theme

Now I could switch the theme to Adapta in gnome-tweaks:After all this preparation, I was finally ready to see how flatpak:ed apps handle the new theme. But first I wanted to update them:

$ flatpak update
Looking for updates...
Installing for user: org.gtk.Gtk3theme.Adapta/x86_64/3.22 from flathub
[####################] 1 delta parts, 2 loose fetched; 336 KiB transferred in 1 seconds
...

Neat. Flatpak detected the current GTK+ theme (by reading the gsetting), found a matching runtime extension, and automatically installed it. Flatpak has a similar automatism built-in for matching the host GL drivers and for installing some hardware-specific libraries.

Of course, I could have just manually installed the theme, but this is much more convenient. To see what themes are available on flathub, use:

$ flatpak remote-ls flathub | grep theme
org.gtk.Gtk3theme.Adapta
org.gtk.Gtk3theme.Adapta-Eta
org.gtk.Gtk3theme.Adapta-Nokto
org.gtk.Gtk3theme.Adapta-Nokto-Eta
org.gtk.Gtk3theme.Ambiance
org.gtk.Gtk3theme.Arc
org.gtk.Gtk3theme.Arc-Dark
org.gtk.Gtk3theme.Arc-Dark-solid
org.gtk.Gtk3theme.Arc-Darker
org.gtk.Gtk3theme.Arc-Darker-solid
org.gtk.Gtk3theme.Arc-solid
org.gtk.Gtk3theme.Breeze
org.gtk.Gtk3theme.Breeze-Dark
org.gtk.Gtk3theme.Communitheme
org.gtk.Gtk3theme.Greybird
org.gtk.Gtk3theme.Materia
org.gtk.Gtk3theme.Materia-dark
org.gtk.Gtk3theme.Materia-light
org.gtk.Gtk3theme.Mint-Y
org.gtk.Gtk3theme.Mint-Y-Dark
org.gtk.Gtk3theme.Mint-Y-Darker
org.gtk.Gtk3theme.Numix
org.gtk.Gtk3theme.Pop
org.gtk.Gtk3theme.Pop-light
org.gtk.Gtk3theme.elementary

And now, when I run a flatpak app, for example GNOME Characters, it comes up with the Adapta theme:

Lessons learned from this quick experiment: Nightly apps don’t always work, but flatpak can handle themes just fine.

Update: It is probably worth a brief explanation why it is necessary to install the theme twice, on the host and for Flatpak.  With Flatpak, the apps can use different runtimes, and those may contain different version of libraries like GTK+. The host system may be much more stable (think RHEL). So, for every “OS extension” (like fonts, or themes, or drivers) we have to ask ourselves  – will this work across possibly different library versions ? For fonts, the answer we found is yes, font file formats have been stable forever, and it is very unlikely that a font you have on your system will not work with any app or runtime. Therefore, we make the host system fonts available inside flatpak sandboxes – you don’t have to install them again. For themes, we were not so confident, despite GTK+ 3 being stable now, we decided that it is better to have themes match the toolkit version in each runtime.

Fedora Atomic Workstation: Developer Tools, continued

Note: Fedora Atomic Workstation has recently been renamed to Team Silverblue. Learn more here.

Last time, I wrote about using flatpak-builder to do commandline development in a container (namely, in a flatpak sandbox). Flatpak-builder is a pretty versatile and well-documented tool.

Of course, it works well to build desktop apps that already have a flatpak manifest in their git tree. But I have also used it successfully to build and run anything from a library to a session service.

For this reason, I suggested that we should add it to the default Fedora Workstation installation – it is a nice tool to have around.  When the Workstation SIG discussed this idea, it was rightly pointed out that there are quite a few dependencies that flatpak-builder pulls in: git, bzr, svn, meson, autotools, … Not surprising for a meta-build-tool that supports diverse source control and build systems.  But it does make the default install quite a bit heavier.

Maybe some of this can be fixed by turning ‘fringe’ dependencies like svn or bzr into Recommends and make flatpak-builder handle the lack these tools gracefully. But there’s an easier solution here: Just use flatpak! It may not be the premier use case it is designed for, but flatpak can handle commandline apps just fine.

So we created a flatpak for flatpak-builder today, and made it available on flathub. You can get it with:

flatpak install flathub org.flatpak.Builder

As I’ve explained in an earlier post, you can get the familiar command name back by setting up a shell alias:

PATH=$PATH:$HOME/.local/share/flatpak/bin
alias flatpak-builder=org.flatpak.Builder

And, voilá, flatpak-builder works as before! And all its dependencies are in the runtime that it uses (in this case, an SDK). My host system can stay lean and clean, as I like it.

At first I was surprised by this use of flatpak, but then I learned that there are already a few non-graphical applications on flathub. For example, you can install glxinfo from there (under the name org.freedesktop.GlxInfo), and vim is also available on flathub.

I suspect that we might see more commandline tools become available in this form in the future.

Fedora Atomic Workstation: Developer tools

Note: Fedora Atomic Workstation has recently been renamed to Team Silverblue. Learn more here.

A while ago, I wrote about using GNOME Builder for GTK+ work on my Fedora Atomic Workstation. I’ve done this with some success since then. I am using the nightly builds of GNOME Builder from the sdk.gnome.org flatpak repository, since I like to try the latest improvements.

As these things go, sometimes I hit a bug. Recently, I ran into a memory leak that caused GNOME Builder to crash and burn. This was happening just as I was trying to take some screenshots for a blog post. So, what to do?

I figured that I can go back to using the commandline, without giving up the flatpak environment that I’m used to now, by using flatpak-builder, which is a commandline tool to build flatpak applications. In my opinion, it should come out-of-the-box with the Atomic Workstation image, just like other container tools. But  that is not the case right now, so I used the convenient workaround of package layering:

$ rpm-ostree install flatpak-builder

flatpak-builder uses a json manifest that describes what and how to build. GTK+ is shipping manifests for the demo apps in its source tree already, for example this one:

https://gitlab.gnome.org/GNOME/gtk/blob/master/build-aux/flatpak/org.gtk.WidgetFactory.json

These manifests are used in the GNOME gitlab instance to build testable flatpaks for merge requests, as can be seen here:

https://gitlab.gnome.org/GNOME/gtk/-/jobs/24276/artifacts/browse

This is pretty amazing as a way to let interested parties (designers, translators, everybody) test suggested changes without having to go through a prolonged and painful build process of ever-changing dependencies (the jhbuild experience). You can read more about it in Carlos‘ and Jordan’s posts.

For me, it means that I can just use one of these manifests as input to flatpak-builder to build GTK+:

$ flatpak-builder build \
   build-aux/flatpak/org.gtk.WidgetFactory.json

This produces a local build in the build/ directory, and I can now run commands in a flatpak sandbox that is populated with the build results like this:

$ flatpak-builder --run build \
   build-aux/flatpak/org.gtk.WidgetFactory.json \
   gtk4-widget-factory

A few caveats are in order when you are using flatpak-builder for development:

flatpak-builder will complain if the build/ directory already exists, so for repeated building, you should add the –force-clean option.

The manifest we are using here is referring to the main GTK+ git repository, and will create a clean checkout from there, ignoring local changes in your checkout. To work around this, you can replace the https url pointing at the git repository by a file: url pointing at your checkout:

 "url": "file:///home/mclasen/Sources/gtk"

You still have to remember to create a local commit for all the changes you want to go into the build. I have suggested that flatpak-builder should support a different kind of source to make this a little easier.

Once you have the basic setup working, things should be familiar. You can get a shell in the build sandbox by using ‘sh’ as the command:

$ flatpak-builder --run build \
  build-aux/flatpak/org.gtk.WidgetFactory.json \
  sh

flatpak-builder knows to use the sdk as runtime when setting up the sandbox, so tools like gdb are available to you. And the sandbox has access to the display server, so you can run graphical apps without problems.

In the end, I got my screenshots of the font chooser, and this setup should keep me going until GNOME Builder is back on track.

A font update

At the end of march I spent a few days with the Inkscape team, who were so nice to come to the Red Hat Boston office for their hackfest. We discussed many things, from the GTK3 port of Inkscape, to SVG and CSS, but we also spent some time on one of my favorite topics: fonts.

Font Chooser

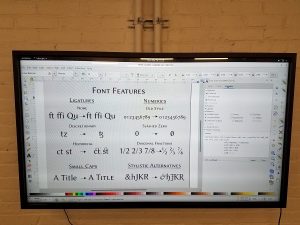
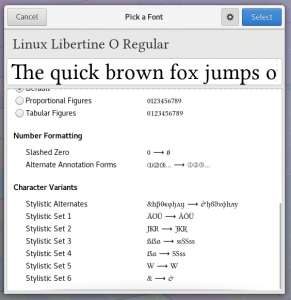
One thing Tav showed me which I was immediately envious of is the preview of OpenType features that Inkscape has in its font selector.

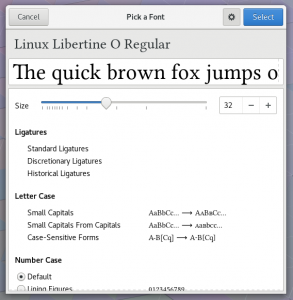
Clearly, we want something like that in the GTK+ font chooser as well. So, after coming back from the hackfest, I set out to see if I can get this implemented. This is how far I got so far, it is available in GTK+ master.

This really helps understanding which glyphs are affected by a font feature. I would like to add a preview for ligatures as well, but harfbuzz currently does not offer any API to get at the necessary information (understandably — its main focus is applying font features for shaping) and I’m not prepared to parse those font tables myself in GTK+. So, ligatures will have to wait a bit.

Another thing I would like to explore at some point is possible approaches for letting users apply font features to smaller fragments of text, like a headline or a single word. This could be a ‘font tweak’ dialog or panel. If you have suggestions or ideas for this, I’d love to hear them.

At the request of the Inkscape folks, I’ve also explored a backport of the new font chooser capabilities to the 3.22 branch, but since this involves new API, we’re not sure yet which way to go with this.

Font Browser

While doing font work it is always good to have a supply of featureful fonts, so I end up browing the Google web fonts quite a bit.

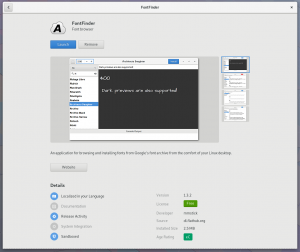
Recently, I stumbled over a nice-looking desktop app for doing so, but alas, it wasn’t available as a package, and it is written in rust, which I know very little about (I’m hoping to change that soon, but that’s a topic for another post).

But I’ve mentioned this app on #flatpak, and just a few days later, it appeared on flathub, and thus also in GNOME software on my system, just a click away. So nice of the flathub team!

The new flathub website is awesome, btw. Go check it out.

The best part is that this nice little app is now available not just on my bleeding-edge Fedora Atomic Workstation, but also on Ubuntu, Gentoo and even RHEL, thanks to flatpak.  Something we could only dream of a few years ago.


Fedora Atomic Workstation: Beta

Note: Fedora Atomic Workstation has recently been renamed to Team Silverblue. Learn more here.

The Beta release of Fedora 28 is out, and it contains the usual assortment of good stuff:

  • better battery life
  • Thunderbolt support
  • guest additions  make Fedora work better in VirtualBox
  • the latest GNOME release brings polish and new applications
  • updated versions of tons of popular software

The announcement was highlighting all the ways in which you can try it out: there are isos for Workstation, Server and Atomic Host. One thing it forgot to point out is that you can also try Fedora 28 Beta in the form of the Atomic Workstation.

How do you get it ?

To install Fedora Atomic Workstation from scratch, use this iso:

https://download.fedoraproject.org/pub/fedora/linux/releases/test/28_Beta/AtomicWorkstation/x86_64/iso/Fedora-AtomicWorkstation-ostree-x86_64-28_Beta-1.3.iso

If you already have an Atomic Workstation installation of Fedora 27, you can jump to Fedora 28 Beta with the rpm-ostree rebase command:

# rpm-ostree rebase atomic:fedora/28/x86_64/workstation

This assumes you have already an ostree remote pointing at the Fedora atomic repository. If not, this command creates one:

# ostree remote add --set=gpgkeypath=/etc/pki/rpm-gpg/RPM-GPG-KEY-fedora-28-primary atomic https://kojipkgs.fedoraproject.org/atomic/repo
Whats new ?

Besides all the general Fedora 28 news, there are some improvements that are specific to the Atomic Workstation.

The version of GNOME software that is included in the Beta is now able to update the OS image. This is an outcome of our effort to close the feature gaps between the traditional and Atomic Workstation variants. I hope we can close a few more before Fedora 28 is released.

Where to learn more ?

The Project Atomic website has lots of useful information about Atomic and related technologies, such as this Introduction to Atomic Workstation.

And the #atomic irc channel on freenode is a good place to get answers to Atomic Workstation questions. Feel free to come by!

Update: Don’t forget that a fresh Atomic Workstation installation currently comes without any pre-configured flatpak remotes. You need to add one before GNOME Software can show you flatpak apps. The flathub remote can be added by clicking on this link:

https://flathub.org/repo/flathub.flatpakrepo


Fedora Atomic Workstation: Almost fool-proof

Note: Fedora Atomic Workstation has recently been renamed to Team Silverblue. Learn more here.

I’ve had a little adventure with my Fedora Atomic Workstation this morning and almost missed a meeting because I couldn’t get to a desktop session.
I’ve been using the rawhide branch of Fedora Atomic Workstation to keep up to speed with the latest developments in Fedora. As is expected of rawhide,  recently, it would not get me to a login screen (much less a working desktop session). I’ve just booted back into my working image and ignored this for a few days.

The Adventure begins

But since it didn’t go away by itself, yesterday, I decided to see if I can debug it a bit. Looking at the journal for the last unsuccessful boot gave some hints:

gnome-shell[2934]: Failed to create backend: Failed to initialize renderer: Missing extension for GBM renderer: EGL_KHR_platform_gbm
gnome-session-binary[2920]: WARNING: App 'org.gnome.Shell.desktop' exited with code 1
gnome-session-binary[2920]: Unrecoverable failure in required component org.gnome.Shell.desktop

Poking the nearest graphics team member about this, I was asked to provide the output of eglinfo in this situation. Since I had an hour to spare before the meeting, I booted back into the broken image in runlevel 3, logged in on a vt, … and found that eglinfo is not in the OS image.

Well, thats easy enough to fix on an Atomic system, using package layering:

rpm-ostree install egl-utils

After that, I proceeded to reboot to get to the OS image with the newly added layer, and when I got to the boot prompt, I realized my mistake: rpm-ostree never replaces the booted image, since it (reasonably) assumes that the booted image is ‘working’.  But it only keeps two images around, so it had to replace the other one – which was the image which successfully boots to my desktop.

Now, at the boot prompt, I was faced with the choice between

  • the broken image
  • the broken image + egl-utils

Ugh. Not what I had hoped for. And my meeting starts in 50 minutes. Admittedly, this was entirely my fault. rpm-ostree behaved as it should and as documented. Since it is a snow day, I need to do the meeting from home and need a web browser for that.

So, what can be done? I remembered that ostree is ‘like git for binaries’, so there should be history, right? After some fiddling with the ostree commandline, I found the log command that shows me the history of my local repository. But sadly, the output was disappointing:

$ ostree log fedora/rawhide/x86_64/workstation
commit fa09fd6d2551a501bcd3670c84123a22e4c704ac30d9cb421fa76821716d8c20
ContentChecksum: 74ff34ccf6cc4b7554d6a8bb09591a42f489388ba986102f6726f9e662b06fcb
Date: 2018-03-20 10:27:42 +0000
Version: Rawhide.20180320.n.0
(no subject)

<< History beyond this commit not fetched >>

rpm-ostree defaults to only keeping the latest commit in the local repository, a bit like a shallow git clone. Thankfully, just like git, ostree is versatile, and bit more searching brought me to the pull command, and its –depth option:

# ostree pull --depth=5 onerepo fedora/rawhide/x86_64/workstation

Receiving metadata objects: 698/(estimating) 2.2 MB/s 23.7 MB

This command writes to the local repo in /sysroot/ostree/repo and thus needs to be run as root.

Now ostree log showed a few older commits. I had to bump the depth a few times to find the last working commit. Then, I made that commit available for booting into again, using the depoy command:

# ostree admin deploy 76723f34b8591434fd9ec0

where that hex string is a prefix of the commit ID of the last working commit.  This command also needs to be run as root.

Now a quick reboot, and… the boot loader menu had an entry for the working image again. I made it back to my desktop with 5 minutes to spare before the meeting. Phew!Update: Since you might be wondering, the output of eglinfo was:

eglinfo: eglInitialize failed

Fedora Atomic Workstation: Ruling the commandline

Note: Fedora Atomic Workstation has recently been renamed to Team Silverblue. Learn more here.

In my recent posts, I’ve mostly focused on finding my way around with GNOME Builder and using it to do development in Flatpak sandboxes. But I am not really the easiest target audience for an IDE like GNOME Builder, having spent most of my life on the commandline with tools like vim and make.

So, what about the commandline in an Atomic Workstation environment? There are many container tools, like buildah, atomic, oc, podman, and so on. I am not going to talk about these, since I don’t know them very well, and they are covered, e.g. on www.projectatomic.io.

But there are a few commands that are essential to life on the Atomic Workstation: rpm-ostree and flatpak.

rpm-ostree

First of all, there’s rpm-ostree, which is the commandline frontend to the rpm-ostreed daemon that manages the OS image(s) on the Atomic Workstation.

You can run

rpm-ostree status

to get some information about your OS image (and the other images that may be present on your system). And you can run

rpm-ostree upgrade

to get the latest update for your OS image (the terminology clash here is a bit unfortunate; rpm-ostree calls an upgrade what most Linux distros and packaging tools call an update).

You can run this command as normal user in a terminal, and rpm-ostreed will present you with a polkit dialog to do its privileged operations. Recently, rpm-ostreed has also gained the ability to check for and deploy upgrades automatically.

An important thing to keep in mind is that rpm-ostree never changes your running system. You have to reboot into the new image to see the changes, so

systemctl reboot

should be in your repertoire of commands as well. Alternatively, you can use the –reboot option to tell rpm-ostree to reboot when the upgrade command completes.

flatpak

The other essential command is flatpak. Where rpm-ostree controls your OS image, flatpak rules the applications. flatpak has many commands that are worth exploring, I’ll only mention the most important ones here.

It is quite common to have more than one source for flatpaks enabled.

flatpak remotes

lists them all. If you want to find applications, then

flatpak search

will do that for you, and

flatpak install

will let you install what you found. An important detail to point out here is that applications can be installed in system-wide (in /var) or per-user (in ~/.local/share). You can choose the location with the –user and  –system options. If you choose to install system-wide, you will get a polkit prompt, since this is a privileged operation.

After installing applications, you should keep them up-to-date by installing updates. The most straightforward way to so is to just run

flatpak update

which will install available updates for all applications. To just check if updates are available, you can use

flatpak remote-ls --updates
Launching applications

Probably the most important thing you will want to do with flatpak is to run applications. Unsurprisingly, the command to do so is called run, and it expects you to specify the unique application ID:

flatpak run org.gnome.gitg

This is certainly a departure from the traditional commandline, and could be considered cumbersome (even though it has bash completion for the application ID).

Thankfully, flatpak has recently gained a way to recover the familiar interface. It now installs shell wrappers for the flatpak run command in ~/.local/share/flatpak/bin. After adding that directory to your PATH, you can run gitg like this:

org.gnome.gitg

If (like me), you are still not satisfied with this, you can add a shell alias to get the traditional command name back:

PATH=$PATH:$HOME/.local/share/flatpak/bin
alias gitg=org.gnome.gitg

Now gitg works again, as it used to. Nice!

 

Fedora Atomic Workstation: Trying things out the easy way

Note: Fedora Atomic Workstation has recently been renamed to Team Silverblue. Learn more here.

If you’ve followed my posts about my first steps with Fedora Atomic Workstation, you may have seen that I’ve had to figure out how to make codecs work in the firefox that is included in the OS image. And then I had to work around some issues with the layered packages that I used for that when I rebased to a newer OS.

But maybe there is a better way to go about this?

Flatpak is the preferred way to install applications on the Atomic Workstation, so maybe that is the way to go. So far, all the flatpaks I’ve installed have come from Flathub, which is a convenient place to find all sorts of desktop apps. But firefox is not there (yet).

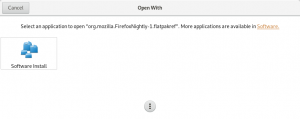
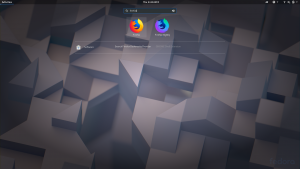
Thankfully, flatpak is fundamentally decentralized by design. There is nothing special about Flathub, flatpak can easily install apps from many different sources. A quick search yielded this unofficial firefox flatpak repository, with easy-to-follow instructions. Just clicking on this link will also work. If you open it with a sandboxed firefox, you will see the URI portal in action:

One nice aspect of this is that the nightly firefox is not just a one-off package that I’ve installed, it will receive updates just like any other app on my system. An important detail when it comes to web browsers!

Another nice aspect is that I did not have to remove the firefox that is already installed (I couldn’t anyway, since it is part of the immutable OS image). The two can peacefully coexist.

This is true not just for firefox, but in general: by isolating apps and their dependencies from each other, flatpak makes it very easy to try out different versions of apps without pain.

Want to try some bleeding-edge GNOME apps instead of the stable versions that are available on Flathub? No problem,  just enable the GNOME nightly repository like this:

flatpak remote-add --user --from gnome-apps-nightly https://sdk.gnome.org/gnome-apps-nightly.flatpakrepo

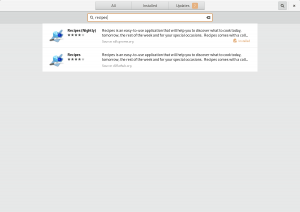
And then the nightly apps will be available for installation next to their stable counterparts. Note that GNOME software will indicate the source for each app in the search results.

Trying out new software has never been safer and easier!

Sorry for the wrong-colored screenshots in this post – there is still a price to pay for living on the bleeding edge of rawhide, even if Atomic Workstation makes it much safer.