Recently, I had to install GNU/Linux on a dozen or so machines. I didn’t want to install manually, mainly because I was too lazy, but also because the AC in the data centre is quite strong and I didn’t want to catch a cold… So I looked for some lightweight way of automatically installing an Ubuntu or so. Fortunately, I don’t seem to be the first person to be looking for a solution, although, retrospectively, I think the tooling is still poor.
I would describe my requirements as being relatively simple. I want to turn one of the to be provisioned machines on, wait, and then be able to log in via SSH. Ideally, most of the software that I want to run would already be installed. I’m fine with software the distribution ships. The installation must not require the Internet and should just work™, i.e. it should wipe the disk and not require anything special from the network which I have only little control over.
I looked at tools like Foreman, Cobbler, and Ubuntu’s MAAS. But I decided against them because it doesn’t necessarily feel lightweight. Actually, Cobbler doesn’t seem to work well when run on Ubuntu. It also fails (at least for me) when being behind an evil corporate proxy. Same for MAAS. Foreman seems to be more of a machine management framework rather than a hit and run style of tool.
So I went for an automated install using the official CD-ROMs. This is sub-optimal as I need to be physically present at the machines and I would have preferred a non-touch solution. Fortunately, the method can be upgrade to delivering the installation medium via TFTP/PXE. But most of the documents describing the process insist on Bind which I dislike. Also, producing an ISO is less error-prone so making that work first should be easier; so I thought.
Building an ISO
The first step is to mount to ISO and copy everything into a working directory. You could probably use something like isomaster, too.
mkdir iso.vanilla

sudo mount -oloop ubuntu.iso ./iso.vanilla

mkdir iso.new

sudo cp -ar ./iso.vanilla/* ./iso.vanilla/.*  iso.new/
After you have made changes to your image, you probably want to generate a new ISO image that you can burn to CD later.
sudo mkisofs -J -l -b isolinux/isolinux.bin -no-emul-boot -boot-load-size 4 -boot-info-table -z -iso-level 4 -c isolinux/isolinux.cat -o /tmp/ubuntu-16.04-myowninstall-amd64.iso -joliet-long iso.new
You’d expect that image to work If you now dd it onto a pendrive, but of course it does not… At least it didn’t for me. After trying many USB creators, I eventually found that you need to call isohybrid.
sudo isohybrid /tmp/ubuntu-16.04-myowninstall-amd64.iso
Now you can test whether it boots with qemu:
qemu-img create -f qcow2 /tmp/ubuntu.qcow2 10G

qemu-system-x86_64 -m 1G  -cdrom ubuntu-16.04-server-amd64.iso    -hda /tmp/ubuntu-nonet.qcow2
If you want to test whether a USB image would boot, try with -usb -usbdevice disk:/tmp/ubuntu-16.04-myowninstall-amd64.iso. If it doesn’t, then you might want to check whether you have assigned enough memory to the virtual machine. I needed to give -m 1G, because the default didn’t work with the following mysterious error.
It should also be possible to create a pendrive with FAT32 and to boot it on EFI machines. But my success was limited…
Making Changes
Now what changes do you want to make to the image to get an automated installation?
First of all you want to get rid of the language selection. Rumor has it that
echo en | tee isolinux/lang
is sufficient, but that did not work for me. Replacing timeout values in files in the isolinux to something strictly positive worked much better for me. So edit isolinux/isolinux.cfg.
If the image boots now, you don’t want the installer to ask you questions. Unfortunately, there doesn’t seem to be “fire and forget” mode which tries to install as aggressively as possible. But there are at least two mechanisms: kickstart and preseed. Ubuntu comes with a kickstart compatibility layer (kickseed).
Because I didn’t know whether I’ll stick with Ubuntu, I opted for kickstart which would, at least theoretically, allow me for using Fedora later. I installed system-config-kickstart which provides a GUI for creating a kickstart file. You can then place the file in, e.g. /preseed/ks-custom.cfg next to the other preseed files. To make the installer load that file, reference it in the kernel command line in isolinux/txt.cfg, e.g.
default install

label install

  menu label ^Install Custom Ubuntu Server

  kernel /install/vmlinuz

  append  file=/cdrom/preseed/ubuntu-server.seed vga=788 initrd=/install/initrd.gz ks=cdrom:/preseed/ks-custom.cfg DEBCONF_DEBUG=5 cdrom-detect/try-usb=false  usb_storage.blacklist=yes --
Ignore the last three options for now and remember them later when we talk about issues installing from a pen drive.
When you boot now, you’d expect it to “just work”. But if you are me then you’ll run into the installer asking you questions. Let’s discuss these.
Multiple Network Interfaces
When you have multiple NICs, the installer apparently asks you for which interface to use. That is, of course, not desirable when wanting to install without interruption. The documentation suggest to use
d-i netcfg/choose_interface select auto
That, however, seemed to crash the installer when I configured QEMU to use four NICs… I guess it’s this bug which, at least on my end, had been cause by my accidentally putting “eth0” instead of “auto”. It’s weird, because it worked fine with the single NIC setup. The problem, it seems, is that eth0 does not exist! It’s 2016 and we have “predictable device names” now. Except that we still have /dev/sda for the first harddisk. I wonder whether there is a name for the first NIC. Anyway, if you do want to have the eth0 scheme back, it seems to be possible by setting biosdevname=0 as kernel parameter when booting.
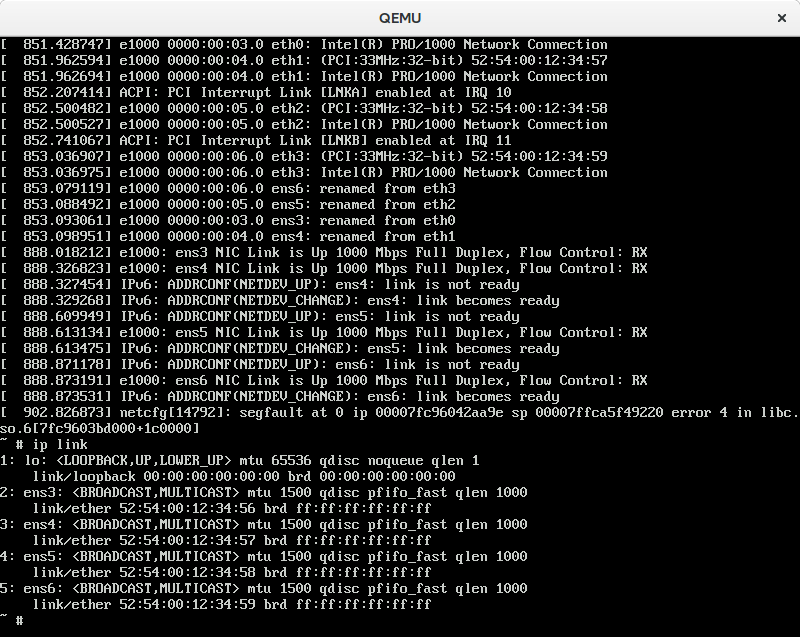
You can test with multiple NICs and QEMU like this:
sudo qemu-system-x86_64 -m 1G -boot menu=on -hda /tmp/ubuntu-nonet.qcow2 -runas $USER -usb -usbdevice disk:/tmp/ubuntu-16.04-myowninstall-amd64.iso -netdev user,id=network0 -device e1000,netdev=network0 -netdev user,id=network1 -device e1000,netdev=network1 -netdev user,id=network2 -device e1000,netdev=network2 -netdev user,id=network3 -device e1000,netdev=network3 -cdrom /tmp/ubuntu-16.04-myowninstall-amd64.iso
No Internet Access
When testing this with the real servers, I realised that my qemu testbed was still too ideal. The real machines can resolve names, but cannot connect to the Internet. I couldn’t build that scenario with qemu, but the following gets close:
sudo qemu-system-x86_64 -m 1G -boot menu=on -hda /tmp/ubuntu-nonet.qcow2 -runas $USER -usb -usbdevice disk:/tmp/ubuntu-16.04-myowninstall-amd64.iso -netdev user,id=network0,restrict=y -device e1000,netdev=network0 -netdev user,id=network1,restrict=y -device e1000,netdev=network1 -netdev user,id=network2,restrict=y -device e1000,netdev=network2 -netdev user,id=network3,restrict=y -device e1000,netdev=network3 -cdrom /tmp/ubuntu-16.04-myowninstall-amd64.iso
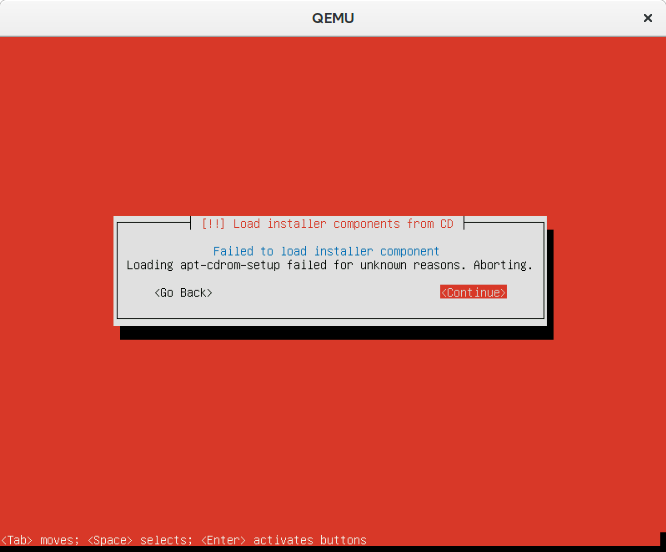
That, however, fails:
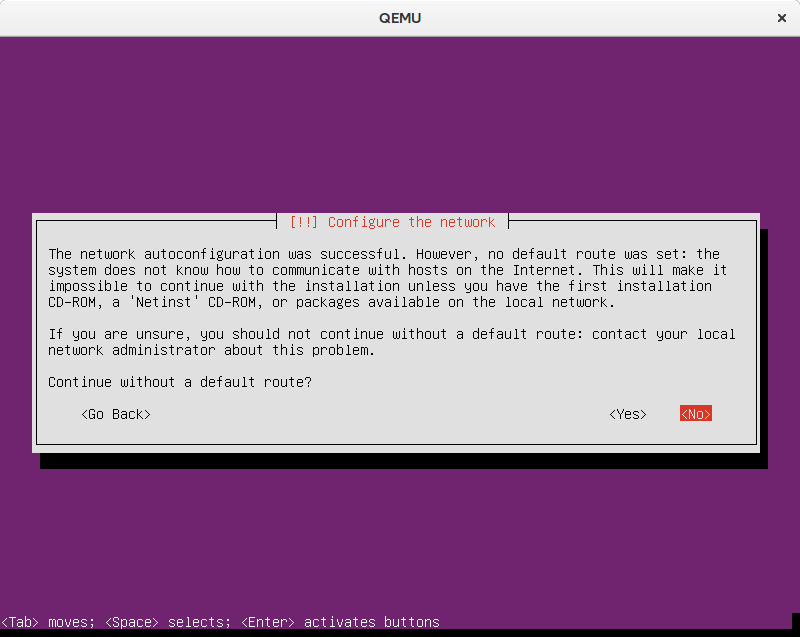
The qemu options seem to make the built-in DHCP server to not hand out a default gateway via DHCP. The installer seems to expect that, though, and thus stalls and waits for user input. According to the documentation a netcfg/get_gateway value of "none" could be used to make it proceed. It’s not clear to me whether it’s a special none type, the string literal “none”, or the empty string. Another uncertainty is how to actually make it work from within the kickstart file, because using this debconf syntax is for preseeding, not kickstarting. I tried several things,
preseed netcfg/get_gateway none

preseed netcfg/get_gateway      string

preseed netcfg/get_gateway      string 1.2.3.4

preseed netcfg/get_gateway      string none

preseed  netcfg/no_default_route boolean true
The latter two seemed to worked better. You may wonder how I found that magic configuration variable. I searched for the string being displayed when it stalled and found an anonymous pastebin which carries all the configurable items.
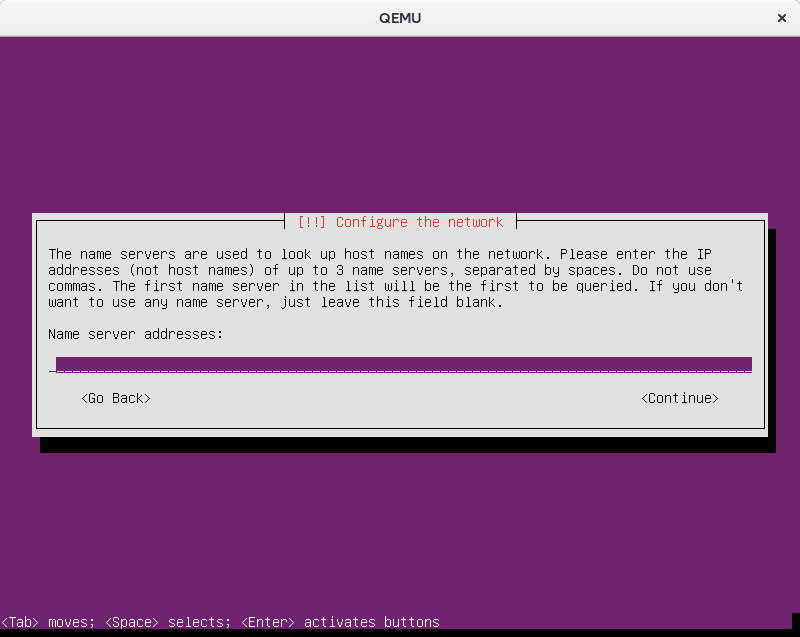
After getting over the gateway, it complained about missing nameservers. By putting
preseed netcfg/get_nameservers string 8.8.8.8
I could make it proceed automatically.
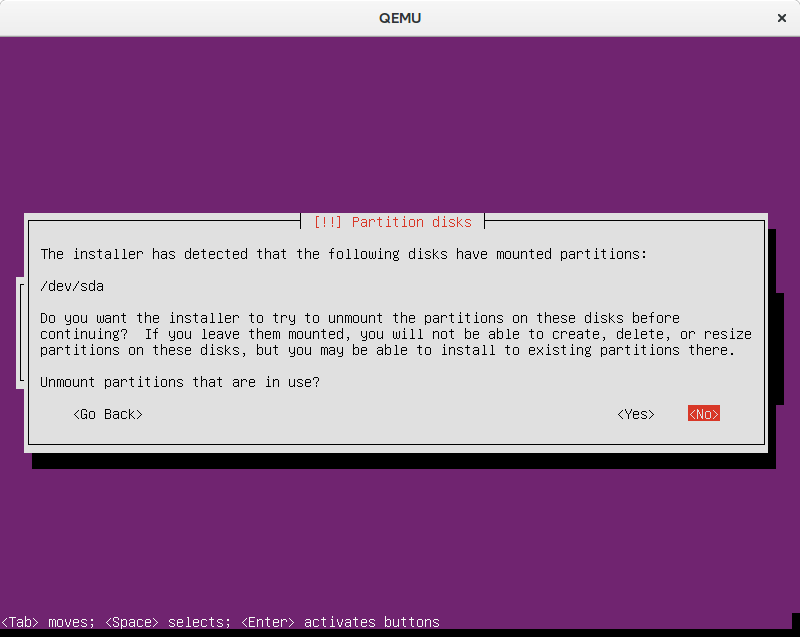
Overwriting existing partitions
When playing around you eventually get to the point where you need to retry, because something just doesn’t work. Then you change your kickseed file and try again. On the same machine you’ve just left half-installed with existing partitions and all. For a weird reason the installer mounts the partition(s), but cannot unmount them
The documentation suggest that a line like
preseed partman/unmount_active boolean true
would be sufficient, but not so for me. And it seems to be an issue since 2014 at least. The workarounds in the bug do not work. Other sources suggested to use partman/early_command string umount -l /media || true, partman/filter_mounted boolean false, or partman/unmount_active seen true. Because it’s not entirely clear to me, who the “owner” , in terms of preseed, is. I’ve also experimented with setting, e.g. preseed --owner partman-base partman/unmount_active boolean true. It started to work when I set preseed partman/unmount_active DISKS /dev/sda and preseed --owner partman-base partman/unmount_active DISKS /dev/sda. I didn’t really believe my success and reordered the statements a bit to better understand what I was doing. I then removed the newly added statements and expected it to not work. However, it did. So I was confused. But I didn’t have the time nor the energy to follow what really was going on. I think part of the problem is also that it sometimes tries to mount the pendrive itself! Sometimes I’ve noticed how it actually installed the system onto the pendrive *sigh*. So I tried hard to make it not mount USB drives. The statements that seem to work for me are the above mentioned boot parameters (i.e. cdrom-detect/try-usb=false usb_storage.blacklist=yes) in combination with:
preseed partman/unmount_active boolean true

preseed --owner partman-base partman/unmount_active boolean true

preseed partman/unmount_active seen true

preseed --owner partman-base partman/unmount_active seen true
#preseed partman/unmount_active DISKS /dev/sda
#preseed --owner partman-base partman/unmount_active DISKS /dev/sda
preseed partman/early_command string "umount -l /media || true"
preseed --owner partman-base partman/early_command string "umount -l /media ||$
How I found that, you may ask? Enter the joy of debugging.
Debugging debconf
When booting with DEBCONF_DEBUG=5, you can see a lot of information in /var/log/syslog. You can see what items are queried and what it thinks the answer is. It looks somewhat like this:

You can query yourself with the debconf-get tool, e.g.
# debconf-get partman/unmount_active

true
The file /var/lib/cdebconf/questions.dat seems to hold all the possible items. In the templates.dat you can see the types and the defaults. That, however, did not really enlighten me, but only wasted my time. Without knowing much about debconf, I’ve noticed that you seem to be able to not only store true and false, but also flags like “seen”. By looking at the screenshot above I’ve noticed that it forcefully sets partman/unmount_active seen false. According to the documentation mentioned above, some code really wants this flag to be reset. So that way was not going to be successful. I noticed that the installer somehow sets the DISKS attribute to the partman/unmount_active, so I tried to put the disk in question (/dev/sda) and it seemed to work.
Shipping More Software
I eventually wanted to install some packages along with the system, but not through the Internet. I thought that putting some more .debs in the ISO would be as easy as copying the file into a directory. But it’s not just that easy. You also need to create the index structure Debian requires. The following worked well enough for me:
cd iso.new

cd pool/extras

apt-get download squid-deb-proxy-client

cd ../..

sudo apt-ftparchive packages ./pool/extras/ | sudo tee dists/stable/extras/binary-i386/Packages
I was surprised by the i386 suffix. Although I can get over the additional apt-ftparchive, I wish it wouldn’t be necessary. Another source of annoyance is the dependencies. I couldn’t find a way to conveniently download all the dependencies of a given package.
These packages can then be installed with the %packages directive:
%packages

@ ubuntu-server

ubuntu-minimal

openssh-server

curl

wget

squid-deb-proxy-client

avahi-daemon

avahi-autoipd

telnet

nano

#build-essential

#htop
Or via a post-install script:
%post
apt-get install -y squid-deb-proxy-client
apt-get update
apt-get install -y htop
apt-get install -y glusterfs-client glusterfs-server
apt-get install -y screen
apt-get install -y qemu-kvm libvirt-bin
Unfortunately, I can’t run squid-deb-proxy-client in the installer itself. Not only because I don’t know how to properly install the udeb, but also because it requires the dbus daemon to be run inside the to-be-installed system which proves to be difficult. I tried the following without success:
preseed anna/choose_modules string squid-deb-proxy-client-udeb
preseed preseed/early_command string apt-install /cdrom/pool/extras/squid-deb-proxy-client_0.8.14_all.deb
%pre
anna-install /cdrom/pool/extras/squid-deb-proxy-client-udeb_0.8.14_all.udeb
If you happen to know how to make it work, I’d be glad to know about it.
Final Thoughts
Having my machines installed automatically cost me much more time than installing them manually. I expected to have tangible results much quicker than I actually did. However, now I can re-install any machine within a few minutes which may eventually amortise the investment.
I’m still surprised by the fact that there is no “install it, dammit!” option for people who don’t really care about the details and just want to get something up and running.
Unfortunately, it seems to be non-trivial to just save the diff of the vanilla and the new ISO 🙁 The next Ubuntu release will then require me to redo the modifications. Next time, however, I will probably not use the kickseed compatibility layer and stick to the pure method.
