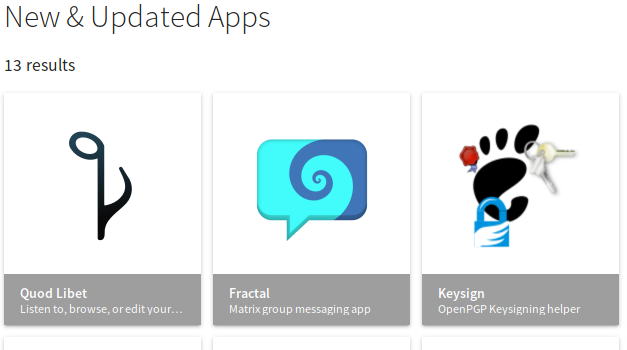
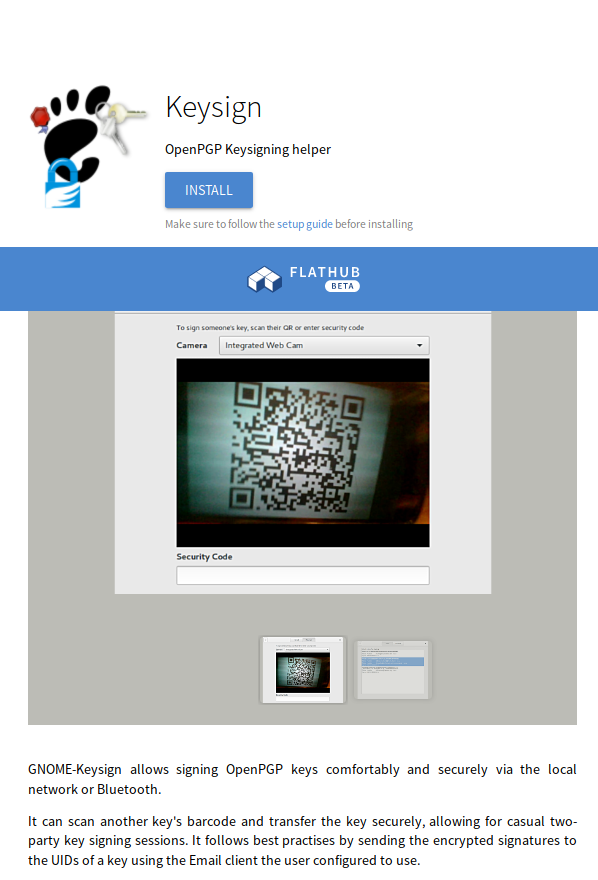
It’s been a while after my last post. This time, we have many exciting news to share. For one, we have a new release of GNOME Keysign which fixes a few bugs here and there as well as introduces Bluetooth support. That is, you can transfer your key with your buddy via Bluetooth and don’t need a network connection. In fact, it becomes more and more popular for WiFis to block clients talking to each other. A design goal is (or rather: was, see down below) to not require an Internet connection, simply because it opens up a can of worms with potential failures and attacks. Now you can transfer the key even if your WiFi doesn’t let you communicate with the other machine. Of course, both of you need have to have Bluetooth hardware and have it enabled.
The other exciting news is the app being on Flathub. Now it’s easier than ever to install the app. Simply go to Flathub and install it from there. This is a big step towards getting the app into users’ hands. And the sandbox makes the app a bit more trustworthy, I hope.
The future brings cool changes. We have already patches lined up that bring an Internet transport with the app. Yeah, that’s contrary to what I’ve just said a few paragraphs above. And it does cause some issues in the UI, because we do not necessarily want the user to use the Internet if the local transport just works. But that “if” is unfortunately getting bigger and bigger. So I’m happy to have a mix of transports now. I’m wondering what the best way is to expose that information to the user, though. Do we add a button for the potentially privacy invading act of connecting to the Internet? If we do, then why do we not offer buttons for the other transports like Bluetooth or the local network?
Similar to last year I managed to attend the Gulasch Programmier-Nacht (GPN) in Karlsruhe, Germany. Not only did I attend, I also managed to squeeze in a talk about PrivacyScore. We got the prime time slot on the opening day along with all the other relevant talks, including the Eurovision Song Contest, so we were not overly surprised that the audience had a hard time deciding where to go and eventually decided to attend talks which were not recorded. Our talk was recorded and is available here.
Given the tough selection of the audience by the other talks, we had the people who were really interested. And that showed during the official Q&A as well as in the hallway track. We exchanged contacts with other interested parties and got a few excellent comments on the project.
Another excellent part of this year’s GPN was the exhibition in the museum. As GPN takes places in a joint building belonging to the local media university as well as the superb art and media museum, the proximity to the artsy things allows for an interesting combination. This year, the open codes exhibition was not hosted in the ZKM, but GPN also took place in that exhibition. A fantastic setup. Especially with the GPN’s motto being “digital naïves”. One of the exhibition’s pieces is an assembly robot’s hand doing nothing else but writing a manifesto. Much like a disciplinary action for a school child. Except that the robot doesn’t care so much. Yet, it’s usefulness only expands to writing these manifestos. And the robot doesn’t learn anything from it. I like this piece, because it makes me think about the actions we take hoping that they have a desired effect on something or someone but we actually don’t know whether this is indeed the case.
I also like the Critical Engineering Manifesto being exhibited. I like to think about how the people who actual implement cetain technologies can be held responsible for the effects of it on individuals or the society. Especially with more and more “IoT” deployments where the “S” represents their security. It’s easy to blame Facebook for “leaking” user profiles although it’s in their Terms of Services, but it’s harder to shift the blame for the smart milk sensor in your fridge invading my privacy by reporting how much I consume. We will have interesting times ahead of us.
An exhibit pointing out the beauty of algorithms and computation is a board that renders a Julia Set. That’s wouldn’t be so impressive in itself, but you can watch the machine actually compute the values. The exhibit has a user controllable speed regulator and an insight into the CPU as well as the higher level code. I think it’s just an ingenious idea to enable the user to go full speed and see the captivating movements of the beautiful Julia set while also allowing the go super slow to investigate how this beauty is composed of relatively simple operations. Also, the slow execution itself is relatively boring. We get to see that we have to go very fast in order to be entertained. So fast that we cannot really comprehend what is going on.
I whole heartedly recommend visiting this exhibition. And the GPN, of course, too. It’s a nice chaotic event with a particular flair. It’s getting more and more crowded though, so better while the feeling lasts and doesn’t get drowned by all the tourists.
I seem to have skipped last year, but otherwise I have been to the DFN Workshop regularly. While I had a publication at this venue before, it’s only this year that I got to have a the conference.
I cannot comment on the other talks so much, because I could not attend too many 🙁 But our talk (slides) was well visited and I think people appreciated the presentation being a bit lighter than the previous one about the upcoming GDPR.
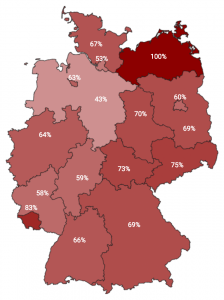
I talked about PrivacyScore.org and how we’ve measured German universities. The paper is here. Our results were mixed. As for TLS deployment, with a lot of imagination we can see a line dividing Germany. The West seems to have fewer problems with their TLS deployment than the East. The more red an area is, the worse its TLS support is. That ranges from not offering TLS at all to having an invalid certificate or using broken parameters.
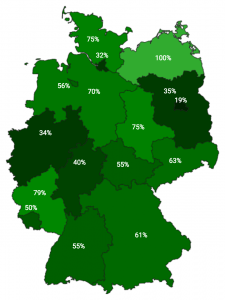
As for tracking its users we had the hypothesis that privately run institutions have a higher interest in tracking its users than publicly run institutions. The following graphic reflects the geographic distribution of trackers on German university’s Web sites.
That hypothesis can be confirmed by looking at the PrivacyScore list that discriminates those institutions.
We found data that was very likely not meant to be there, such as database dumps or Git repositories of the Web site’s code (including passwords for their staging environments, etc.). We tried to report these issues to the Web site operators, but it was difficult to get hold of the responsible people. For the 21 leaks we found I have 93 emails in my mailbox. Ideally, the 21 I sent off were enough. But even sending those emails is hard, because people don’t respect RFC 2142 and have a security@ address. Eventually, we made the Internet a tiny bit more secure by having those Website operators remove the leaks from their Web site, but there are still some pages which have (supposedly) unwanted information such as their visitors’ IP addresses online. The graph below shows that most of the operators who reacted did so in the first few days. So management of security incidents seems to be an area of improvement.
I hope to be able to return next year, if only for the catering 😉 Then, I better attend some more talks and chat with the other guests.
The old key F289F7BA977DF4143AE9FDFBF70A02906C301813 is considered to be too short by some and it’s sufficiently old to retire it.
My new key is F98D03D7DC630399AAA6F43826B3F39189C397F6.
It’s been a while since I did that last. And GnuPG still makes it hard to use an expired key, I cannot sign this transition statement with both keys as suggested by this document. Also, I might consider using a service such as https://www.expirybot.com/ for telling me when it’s time to think of a strategy for the next roll-over. It’s a shame we don’t have such tooling in place for the desktop.
Anyway, feel free to grab the new from the WebPKI protected resource here.
I didn’t take notice of the LinuxFoundation announcing CHAOSS, an attempt to bundle various efforts regarding measuring and creating metrics of Open Source projects. The CHAOSS community is thus a bunch of formerly separate projects now having one umbrella.
OpenStack’s Ildiko Vancsa opened the conference by saying that metrics is what drives our understanding of communities and that we’re all interested in numbers. That helps us to understand how projects work and make a more educated guess how healthy a project currently is, and, more importantly, what needs to be done in order to make it more sustainable. She also said that two communities within the CHAOSS project exist: The Metrics and the Software team. The metrics care about what information should be extracted and how that can be presented in an informational manner. The Software team implements the extraction parts and makes the analytics. She pointed the audience to the Wiki which hosts more information.
Georg Link from the metrics team then continued saying that health cannot universally be determined as every project is different and needs a different perspective. The metrics team does not work at answering the health question for each and every project, but rather enables such conclusions to be drawn by providing the necessary infrastructure. They want to provide facts, not opinions.
I think that we in the GNOME community can use data to make more informed decisions. For example, right now we’re fading out our Bugzilla instance and we don’t really have any way to measure how successful we are. In fact, we don’t even know what it would mean to be successful. But by looking at data we might get a better feeling of what we are interested in and what metric we need to refine to express better what we want to know. Then we can evaluate measures by looking at the development of the metrics over time. Spontaneously, I can think of these relatively simple questions: How much review do our patches get? How many stale wiki links do we have? How soon are security issues being dealt with? Do people contribute to the wiki, documentation, or translations before creating code? Where do people contribute when coding stalls?
Bitergia’s Daniel reported on Diversity and Inclusion in CHAOSS and he said he is building a bridge between the metrics and the software team. He tried to produce data of how many women were contributing what. Especially, whether they would do any technical work. Questions they want to answer include whether minorities take more time to contribute or what impact programs like the GNOME Outreach Program for Women have. They do need to code up the relevant metrics but intend to be ready for the next OpenStack Gender diversity report.
Bitergia’s CEO talked about the state of the GriomoireLab suite.
It’s software development analysis toolkit written largely in Python, ElasticSearch, and Kibana. One year ago it was still complicated to run the stack, he said. Now it’s easy and organisations like the Document Foundation run run a public instance. Also because they want to be as transparent as possible, he said.
Yousef from Mozilla’s Open Innovation team then showed how they make use of Grimoire to investigate the state of their community. They ingest data from Github, Bugzilla, newsgroup, meetups, discourse, IRC, stackoverflow, their wiki, rust creates, and a few other things reaching back as far as 20 years. Quite impressive. One of the graphs he found interesting was one showing commits by time zone. He commented that it was not as diverse as he hope as there were still many US time zones and much fewer Asian ones.
Raymond from the Linux Foundation talked about Metrics in Open Source Communities, what are they measuring and what do they do with the data. Measuring things is not too complicated, he said. But then you actually need to do stuff with it. Certain things are simply hard to measure, he said. As an example he gave the level of user or community support people give. Another interesting aspect he mentioned is that it may be a very good thing when numbers go down, also because projects may follow a hype cycle, too. And if your numbers drop, it’ll eventually get to a more mature phase, he said. He closed with a quote he liked and noted that he’s not necessarily making fun of senior management: Not everything that can be counted counts and not everything that counts can be counted.
Boris then talked about Crossminer, which is a European funded research project. They aim for improving the management of software projects by providing in-context recommendations and analytics. It’s a continuation of the Ossmeter project. He said that such projects usually die after the funding runs out. He said that the Crossminer project wants to be sustainable and survive the post-funding state by building an actual community around the software the project is developing. He presented a rather high level overview of what they are doing and what their software tries to achieve. Essentially, it’s an Eclipse plugin which gives you recommendations. The time was too short for going into the details of how they actually do it, I suppose.
Eleni talked about merging identities. When tapping various data sources, you have to deal with people having different identity domains. You may want to merge the identities belonging to the same person, she said. She gave a few examples of what can go wrong when trying to merge identities. One of them is that some identities do not represent humans but rather bots. Commonly used labels is a problem, she said. She referred to email address prefixes which may very well be the same for different people, think j.wright@apple.com, j.wright@gmail.com, j.wright@amazon.com. They have at least 13 different problems, she said, and the impact of wrongly merging identities can be to either underestimate or overestimate the number of community members. Manual inspection is required, at least so far, she said.
The next two days were then dedicated to FOSDEM which had a Privacy Devroom. There I had a talk on PrivacyScore.org (slides). I had 25 minutes which I was overusing a little bit. I’m not used to these rather short slots. You just warm up talking and then the time is already up. Anyway, we had very interesting discussions afterwards with a few suggestions regarding new tests. For example, someone mentioned that detecting a CDN might be worthwhile given that CloudFlare allegedly terminates 10% of today’s Web traffic.
When sitting with friends we noticed that FOSDEM felt a bit like Christmas for us: Nobody really cares a lot about Christmas itself, but rather about the people coming together to spend time with each other. The younger people are excited about the presents (or the talks, in this case), but it’s just a matter of time for that to change.
It’s been an intense yet refreshing weekend and I’m looking very much forward to coming back next time. For some reason it feels really good to see so many people caring about Free Software.
This season’s CCCongress, the 34C3, (well, the 2017 one) moved from Hamburg to Leipzig. That was planned, in the sense that everybody knew before the event moved to Hamburg, that the location will only be available for a few years.
My own CCCongress experience in the new location is limited, because I could not roam around as much as I wanted to. But I did notice that it was much easier to get lost in Hamburg than in the new venue. I liked getting lost, though.
We had a talk on anonymisation networks (slides, video) scheduled with three people, but my experience with making a show with several people on stage is not so good. So we had a one man show which I think is good enough. Plus, I had private commitments that prevented me from attending the CCCongress as much as I would have wanted to.
I could attend a few talks myself, but I’ll watch most of them later. CCCongress is getting less about the talks but about meeting people you haven’t seen in a while. And it’s great to have such a nice event to cater for the desire to catch up with fellow hackers, exchange ideas and visions.
That said, I’ll happily come back next year, hopefully with a bit more time and preparation to get the most of the visit. Although it hasn’t been announced yet, I would be surprised if it does not take place there again. So you might as well book your accommodation already 😉
Few weeks ago I had a talk at Cubaconf 2017 in Havanna, Cuba. It’s certainly been an interesting experience. If only because of Carribean people. But also because of the food and the conditions the country has be run under the last decades.
Before entering Cuba, I needed a tourist visa in form of the turist trajeta. It was bothering me for more than it should have. I thought I’d have to go to the embassy or take a certain airline in order to be able to get hold of one of these cased. It turned out that you can simply buy these tourist cards in the Berlin airport from the TUI counter. Some claimed it was possible to buy at the immigration, but I couldn’t find any tourist visa for sale there, so be warned. Also, I read that you have to prove that you have health insurance, but nobody was interested in mine. That said, I think it’s extremely clever to have one…
Connecting to the Internet is a bit difficult in Cuba. I booked a place which had “Wifi” marked as their features and I naïvely thought that it meant that you by booking the place I also get to connect to the Internet. Turns out that it’s not entirely correct. It’s not entirely wrong either, though. In my case, there was an access point in the apartment in which I rented a room. The owner needs to turn it on first and run a weird managing software on his PC. That software then makes the AP connect to other already existing WiFis and bridges connections. That other WiFi, in turn, does not have direct Internet access, but instead somehow goes through the ISP which requires you to log in. The credentials for logging in can be bought in the ISPs shops. You can buy credentials worth 1 hour of WiFi connection (note that I’m avoiding the term “Internet” here) for 3 USD or so from the dealer around the corner. You can get your fix from the legal dealer cheaper (i.e. the Internet office…), but that will probably involve waiting in queues. I often noticed people gathering somewhere on the street looking into their phones. That’s where some signal was. When talking to the local hacker community, I found out that they were using a small PCB with an ESP8266 which repeats the official WiFi signal. The hope is that someone will connect to their piece of electronics so that the device is authenticated and also connects the other clients associated with the fake hotspot. Quite clever.
The conference was surprisingly well attended. I reckon it’s been around hundred people. I say surprisingly, because from all what I could see the event was weirdly organised. I had close to zero communication with the organisers and it was pure luck for me to show up in time. But other people seemed to be in the know so I guess I fell through the cracks somehow. Coincidentally, you could only install the conference’s app from Google, because they wouldn’t like to offer a plain APK that you can install. I also didn’t really know how long my talks should be and needed to prepare for anything between 15 and 60 minutes.
My first talk was on PrivacyScore.org, a Web scanner for privacy and security issues. As I’ve indicated, the conference was a bit messily organised. The person before me was talking into my slot and then there was no cable to hook my laptop up with the projector. We ended up transferring my presentation to a different machine (via pen drives instead of some fancy distributed local p2p network) in order for me to give my presentation. And then I needed to rush through my content, because we were pressed for going for lunch in time. Gnah. But I think a few people were still able to grasp the concepts and make it useful for them. My argument was that Web pages load much faster if you don’t have to load as many trackers and other external content. Also, these people don’t get updates in time, so they might rather want to visit Web sites which generally seem to care about their security. I was actually approached by a guy running StreetNet, the local DIY Internet. His idea is to run PrivacyScore against their network to see what is going on and to improve some aspects. Exciting.
My other talk was about GNOME and how I believe it makes more secure operating systems. Here, my thinking was that many people don’t have expectations of how their system is supposed to be looking or even working. And being thrown into the current world in which operating systems spy on you could lead to being primed to have low expectations of the security of the system. In the GNOME project, however, we believe that users must have confidence in their computing being safe and sound. To that end, Flatpak was a big thing, of course. People were quite interested. Mostly, because they know everything about Docker. My trick to hook these people is to claim that Docker does it all wrong. Then they ask pesky questions which gives me many opportunities to mention that for some applications squashfs is inferior to, say, OStree, or that you’d probably want to hand out privileges only for a certain time rather than the whole life-time of an app. I was also to make people look at EndlessOS which attempts to solve many problems I think Cubans have.
The first talk of the conference was given by Ismael and I was actually surprised to meet people I know. He talked about his hackerspace in Almería, I think. It was a bit hard to me to understand, because it was in Spanish. He was followed by Valessio Brito who talked about putting a price on Open Source Software. He said he started working on Open Source Software at the age of 16. He wondered how you determine how much software should cost. Or your work on Open Source. His answer was that one of the determining factors was simply personal preference of the work to be performed. As an example he said that if you were vegan and didn’t like animals to be killed, you would likely not accept a job doing exactly that. At least, you’d be inclined to demand a higher price for your time. That’s pretty much all he could advise the audience on what to do. But it may also very be that I did not understand everything because it was half English and half Spanish and I never noticed quickly enough that the English was on.
An interesting talk was given by Christian titled “Free Data and the Infrastructure of the Commons”. He began saying that the early textile industry in Lyon, France made use of “software” in 1802 with (hard wired) wires for the patterns to produce. With the rise of computers, software used to be common good in the early 1960s, he said. Software was a common good and exchanged freely, he said. The sharing of knowledge about software helped to get the industry going, he said. At the end of the 1970s, software got privatised and used to be licensed from the manufacturer which caused the young hacker movement to be felt challenged. Eventually, the Free Software movement formed and hijacked the copyright law in order to preserve the users’ freedoms, he said. He then compared the GPL with the French revolution and basic human rights in that the Free Software movement had a radical position and made the users’ rights explicit. Eventually, Free Software became successful, he said, mainly because software was becoming more successful in general. And, according to him, Free Software used to fill a gap that other software created in the 80s. Eventually, the last bastion to overcome was the desktop, he said, but then the Web happened which changed the landscape. New struggles are software patents, DRM, and privacy of the “bad services”. He, in my point of view rightfully so, said that all the proliferation of free and open source software, has not lead to less proprietary software though. Also, he is missing the original FOSS attitude and enthusiasm. Eventually he said that data is the new software. Data not was not an issue back when software, or Free Software even, started. He said that 99% of the US growth is coming from the data processing ad companies like Google or Facebook. Why does data have so much value, he asked. He said that actually living a human is a lot of work. Now you’re doing that labour for Facebook by entering the data of your human life into their system. That, he said, is where the value in coming from. He made the the point that Software Freedoms are irrelevant for data. He encouraged the hackers to think of information systems, not software. Although he left me wondering a bit how I could actually do that. All in all, a very inspiring talk. I’m happy that there is a (bad) recording online:
I visited probably the only private company in Cuba which doubles as a hackerspace. It’s interesting to see, because in my world, people go and work (on computer stuff) to make enough money to be free to become a singer, an author, or an artist. In Cuba it seems to be the other way around, people work in order to become computer professionals. My feeling is that many Cubans are quite artsy. There is music and dancing everywhere. Maybe it’s just the prospects of a rich life though. The average Cuban seems to make about 30USD a month. That’s surprising given that an hour of bad WiFi costs already 1 USD. A beer costs as much. I was told that everybody has their way to get hold of some more money. Very interesting indeed. Anyway, the people in the hackerspace seemed to be happy to offer their work across the globe. Their customers can be very happy, because these Cubans are a dedicated bunch of people. And they have competitive prices. Even if these specialists make only hundred times as much the average Cuban, they’d still be cheap in the so called developed world.
After having arrived back from Cuba, I went to the Rust Hackfest in Berlin. It was hosted by the nice Kinvolk folks and I enjoyed meeting all the hackers who care about making use of a safer language. I could continue my work on rustifying pixbuf loaders which will hopefully make it much harder to exploit them. Funnily enough, I didn’t manage to write a single line of Rust during the hackfest. But I expected that, because we need to get to code ready to be transformed to Rust first. More precisely, restructure it a bit so that it has explicit error codes instead of magic numbers. And because we’re parsing stuff, there are many magic numbers. While digging through the code, other bugs popped up as well which we needed to eliminate as side challenges. I’m looking much forward to writing an actual line of Rust soon! 😉
Uh, I almost forgot about blogging about having talked at the GI Tracking Workshop in Darmstadt, Germany. The GI is, literally translated, the “informatics society” and sort of a union of academics in the field of computer science (oh boy, I’ll probably get beaten up for that description). And within that body several working groups exist. And one of these groups working on privacy organised this workshop about tracking on the Web.
I consider “workshop” a bit of a misnomer for this event, because it was mainly talks with a panel at the end. I was an invited panellist for representing the Free Software movement contrasting a guy from affili.net, someone from eTracker.com, a lady from eyeo (the AdBlock Plus people), and professors representing academia. During the panel discussion I tried to focus on Free Software being the only tool to enable the user to exercise control over what data is being sent in order to control tracking. Nobody really disagreed, which made the discussion a bit boring for me. Maybe I should have tried to find another more controversial argument to make people say more interesting things. Then again, it’s probably more the job of the moderator to make the participants discuss heatedly. Anyway, we had a nice hour or so of talking about the future of tracking, not only the Web, but in our lives.
One of the speakers was Lars Konzelmannwho works at Saxony’s data protection office. He talked about the legislative nature of data protection issues. The GDPR is, although being almost two years old, a thing now. Several types of EU-wide regulations exist, he said. One is “Regulation” and the other is “Directive”.The GDPR has been designed as a Regulation, because the EU wanted to keep a minimum level of quality across the EU and prevent countries to implement their own legislation with rather lax rules, he said. The GDPR favours “privacy by design” but that has issues, he said, as the usability aspects are severe. Because so far, companies can get the user’s “informed consent” in order to do pretty much anything they want. Although it’s usefulness is limited, he said, because people generally don’t understand what they are consenting to. But with the GDPR, companies should implement privacy by design which will probably obsolete the option for users to simply click “agree”, he said. So things will somehow get harder to agree to. That, in turn, may cause people to be unhappy and feel that they are being patronised and being told what they should do, rather than expressing their free will with a simple click of a button.
Next up was a guy with their solution against tracking in the Web. They sell a little box which you use to surf the Web with, similar to what Pi Hole provides. It’s a Raspberry Pi with a modified (and likely GPL infringing) modification of Raspbian which you plug into your network and use as a gateway. I assume that the device then filters your network traffic to exclude known bad trackers. Anyway, he said that ads are only the tip of the iceberg. Below that is your more private intimate sphere which is being pried on by real time bidding for your screen estate by advertising companies. Why would that be a problem, you ask. And he said that companies apply dynamic pricing depending on your profile and that you might well be interested in knowing that you are being treated worse than other people. Other examples include a worse credit- or health rating depending on where you browse or because your bank knows that you’re a gambler. In fact, micro targeting allows for building up a political profile of yours or to make identity theft much easier. He then went on to explain how Web tracking actually works. He mentioned third party cookies, “social” plugins (think: Like button), advertisement, content providers like Google Maps, Twitter, Youtube, these kind of things, as a means to track you. And that it’s possible to do non invasive customer recognition which does not involve writing anything to the user’s disk, e.g. no cookies. In fact, such a fingerprinting of the users’ browser is the new thing, he said. He probably knows, because he is also in the business of providing a tracker. That’s probably how he knows that “data management providers” (DMP) merge data sets of different trackers to get a more complete picture of the entity behind a tracking code. DMPs enrich their profiles by trading them with other DMPs. In order to match IDs, the tracker sends some code that makes the user’s browser merge the tracking IDs, e.g. make it send all IDs to all the trackers. He wasn’t really advertising his product, but during Q&A he was asked what we can do against that tracking behaviour and then he was forced to praise his product…
Eye/o’s legal counsel Judith Nink then talked about the juristic aspects of blocking advertisements. She explained why people use adblockers in first place. I commented on that before, claiming that using an adblocker improves your security. She did indeed mention privacy and security being reasons for people to run adblockers and explicitly mentionedmalvertising. She said that Jerusalem Post had ads which were actually malware. That in turn caused some stir-up in Germany, because it was coined as attack on German parliament… But other reasons for running and adblocker were data consumption and the speed of loading Web pages, she said. And, of course, the simple annoyance of certain advertisements. She presented some studies which showed that the typical Web site has 50+ or so trackers and that the costs of downloading advertising were significant compared to downloading the actual content. She then showed a statement by Edward Snowden saying that using an ad-blocker was not only a right but is a duty.
Everybody should be running adblock software, if only from a safety perspective
Browser based ad blockers need external filter lists, she said. The discussion then turned towards the legality of blocking ads. I wasn’t aware that it’s a thing that law people discuss. How can it possibly not be legal to control what my client does when being fed a bunch of HTML and JavaScript..? Turns out that it’s more about the entity offering these lists and a program to evaluate them *shrug*. Anyway, ad-blockers use either blocking or hiding of elements, she said where “blocking” is to stop the browser from issuing the request in first place while “hiding” is to issue the request, but to then hide the DOM element. Yeah, law people make exactly this distinction. She then turned to the question of how legal either of these behaviours is. To the non German folks that question may seem silly. And I tend to agree. But apparently, you cannot simply distribute software which modifies a Browser to either block requests or hide DOM elements without getting sued by publishers. Those, she said, argue that gratis content can only be delivered along with ads and that it’s part of the deal with the customer. Like that they also transfer ads along with the actual content. If you think that this is an insane argument, especially in light of the customer not having had the ability to review that deal before loading that page, you’re in good company. She argued, that the simple act of loading a page cannot be a statement of consent, let alone be a deal of some sorts. In order to make it a deal, the publishers would have to show their terms of service first, before showing anything, she said. Anyway, eye/o’s business is to provide those filter lists and a browser plugin to make use of those lists. If you pay them, however, they think twice before blocking your content and make exceptions. That feels a bit mafiaesque and so they were sued for “aggressive geschäftliche Handlung”, an “aggressive commercial behaviour”. I found the history of cases interesting, but I’ll spare the details for the reader here. You can follow that, and other cases, by looking at OLG Koeln 6U149/15.
Next up was Dominik Herrmann to present on PrivacyScore.org, a Web portal for scanning Web sites for security and privacy issues. It is similar to other scanners, he said, but the focus of PrivacyScore is publicity. By making results public, he hopes that a race to the top will occur. Web site operators might feel more inclined to implement certain privacy or security mechanisms if they know that they are the only Web site which doesn’t protect the privacy of their users. Similarly, users might opt to use a Web site providing a more privacy friendly service. With the public portal you can create lists in order to create public benchmarks. I took the liberty to create a list of Free Desktop environments. At the time of creation, GNOME fell behind many others, because the mail server did not implement TLS 1.2. I hope that is being taking as a motivational factor to make things more secure.
I was invited to present GNOME at the Kieler LinuxTage in Kiel, Germany.
Compared to other events, it’s a tiny happening with something between fifty and hundred people or so. I was presenting on how I think GNOME pushes the envelope regarding making secure operating systems (slides, videos to follow). I was giving three examples of how GNOME achieves its goal of priding a secure OS without compromising on usability. In fact, I claimed that the most successful security solutions must not involve the user. That sounds a bit counter intuitive to people in the infosec world, because we’re trying to protect the user, surely they must be involved in the process. But we better not do that. This is not to say that we shouldn’t allow the user to change preferences regarding how the solutions behave, but rather that it should work without intervention. My talk was fairly good attended, I think, and we had a great discussion. I tend to like the discussion bit better than the actual presentation, because I see it as an indicator for how much the people care. I couldn’t attend many other presentations, because I would only attend the second day. That’s why I couldn’t meet with Jim :-/
But I did watch Benni talking about hosting a secure Web site (slides). He started his show with mentioning DNS which everybody could read, He introduced DNSSEC. Which, funnily enough, everybody also can read, but he failed to mention that. But at least nobody can manipulate the response. Another issue is that you leak information about your host names with negative responses, because you tell the client that there is nothing between a.example.com and b.example.com. He continued with SSH for deploying your Web site and mentioned SSHFP which is a mechanism for authenticating the host key. The same mechanism exists for Web or Mail servers, he said: DANE, DNS-based Authentication of named entities. It works via TLSA records which encode either the certificate or the used public key. Another DNS-based mechanism is relatively young: CAA. It asserts that a certificate for a host name shall be signed by a certain entity. So you can hopefully prevent a CA that you’ve never heard of creating a certificate for your hosts. All of these mechanisms try to make the key exchange in TLS a bit less shady. TLS ensures a secure channel, i.e. confidentiality, non-repudiation, and integrity. That is considered to be generally useful in the Web context. TLS tends to be a bit of a minefield, because of the version and configuration matrix. He recommended to use at least TLS as of version 1.2, to disable compression due to inherent attacks on typical HTTP traffic (CRIME), and to use “perfect forward secrecy” ciphers for protecting the individual connections after the main key leaked. Within TLS you use x509 certificates for authenticating the parties, most importantly in the Web world, the server side. The certificate shall use a long enough RSA key, he said, The certificate shall not use a CN field to indicate the host name, but rather the SAN field. The signatures should be produced with “at least SHA-256”. He then mentioned OCSP because life happens and keys get lost or stolen. However, with regular OSCP the clients expose the host names they visit, he said. Enter OCSP Stapling. In that case the Web server itself gets the OCSP response and hands it over to the client. Of course, this comes with its own challenges. But it may also happen that CAs issue certificates for a host name which doesn’t expect that new certificate. In that case, Certificate transparency becomes useful. It’s composed of three components, he said. Log servers which logs all created certificates, monitors which pull the logs, and auditors which check the logs for host names. Again, your Browser may want to check whether the given certificate is in the CT logs. This opens the same privacy issue as with OCSP and can be somewhat countered with signed log statements from a few trusted log servers.
In any case, TLS is only useful, he said, if you are actually using it. Assuming you had a secure connection once, you can use the TLS Strict Transport Security header. It tells the browser to use TLS in the future. Of course, if you didn’t have that first connection, you can have your webapp entered in the STS Preloading list which is then baked into major browsers. Another mechanism is HTTP Public Key Pinning which is a HTTP header to tell the client which certificates or CAs shall be accepted. The header value is a simple list of hashed certificates. He mentioned the risk of someone hijacking your Web presence with an injected HPKP header. A TLS connection has eventually been established successfully. Now the HTTP layer gets interesting, he said. The Content Type Options header prevents Internet Explorer from snooping content types which might cause an image to be executed as JavaScript. Many Cross-Site Scripting attacks, he said, originate from being embedded in a frame. To prevent that, you can set the X-Frame-Options header. To activate Cross-Site Scripting protection mechanisms, the X-XSS-Protection header can be set. It’s probably turned off by default for compatibility reasons, he said. If you know where exactly your data is coming from, you can make use of a Content Security Policy which is like SELinux for your browser. It’s a bit of a complicated mechanism though. For protecting your Webapp he mentioned Sub-Resource Integrity which is essentially the hash of what script you expect. This prevents tampering with the foreign script, malicious or not.
I think that was one of the better talks in the schedule with many interesting details to be discovered. I enjoyed it a lot. I did not enjoy their Web sites, though, which are close to being unusable. The interface for submitting talks gives you a flashback to the late 90’s. Anyway, it seems to have worked for many years now and hope they will have many years to come.
A few weeks ago, I was fortunate enough to talk at the 7th Privacy Enhancing Techniques Conference (PET-CON 2017.2) in Hamburg, Germany. It’s a teeny tiny academic event with a dozen or so experts in the field of privacy.
The talks were quite technical, involving things like machine learning over logs or secure multi-party computation. I talked about how I think that the best technical solution does not necessarily enable the people to be more private, simply because the people might not be able to make use of the tool properly. A concern that’s generally shared in the academic community. Yet, the methodology to create and assess the effectiveness of a design is not very elaborated. I guess we need to invest more brain power into creating models, metrics, and tools for enabling people to do safer computing.
So I’m happy to have gone and to have had the opportunity of discussing the issues I’m seeing. Likewise, I find it very interesting to see where the people are currently headed towards.


